Winter is finally here. Nature photographer and official Nikon D4 endorser David C. Schultz shares his encounters with photographing ice, icebergs, and various icy landscapes. You might remember this Utah-based photographer from the tips and adorable images he shared for photographing penguins, which is another great article to check out.
Looking to get inspired to shoot your next winter adventure? Scroll down for this pro’s expert tips, gear guides, and incredibly icy-cool images!

The Big Chill: Photographing Ice
by David C. Schultz
I first became interested in polar travel and photographing ice after seeing the incredible images by Frank Hurley, the photographer on the ill-fated Imperial Trans-Antarctic Expedition of 1914, also known as the Endurance Expedition. If you’re not familiar with this incredible true-to-life adventure, I recommend checking out the book The Endurance by Caroline Alexander. Shortly after seeing the images that Hurley captured during the expedition, I booked my first voyage to Antarctica, also referred to as, “The Ice” by its return visitors. Today, having sailed to the frozen continent a dozen times, my focus has been to capture images of the various ice formations—tabular icebergs, bergy bits, pancake ice, and glaciers. I’ve also worked in the high Arctic, another obvious location for images of this nature.

Hit play to see an iceberg adventure in action:
In this story, I’ll be sharing my experiences and tips with shooting ice—from formations at the end of the globe to the Wasatch Mountains of Utah, which is much closer to home. As it’s winter right now, this will hopefully inspire you to get your gear out and search for your own photo opportunities on ice.
I. Photographing Frost

It was late in November. All the leaves are off the trees. Things looked pretty bleak while out hiking in the mountains with my dog. I noticed how the leaves on the ground in this one area were all rimmed with thick frost. So I began a two-week project of shooting the details of the dead, decaying leaves. It’s not uncommon for me to take off on a project similar to this—really working a shot or subject until I feel I’ve done my best, or am completely burnt out.

I started with what I had in my camera bag that first morning. I even tried to tape a leaf onto a branch to position it, so it was back-lit. Nice try, but knew I could do better. For later attempts, I hauled a light stand and took some tweezers and bidder clips to make it easier to work with.
As I got into the second week, the small stream was frozen over, different days with various patterns in the ice. I used a plastic bag several times to diffuse the light, so I wouldn’t lose any details in the whites and to help make the sometimes soft colors of the leaf pop a little more.

The leaf that is rimmed with frost and backlit was captured with a Nikkor 105 Macro. I had to shoot early in the morning, so I could get the mountain in the background in shadow while having a low angle of the sun for the backlight. I exposed carefully so as not to blow out the details in the frost.
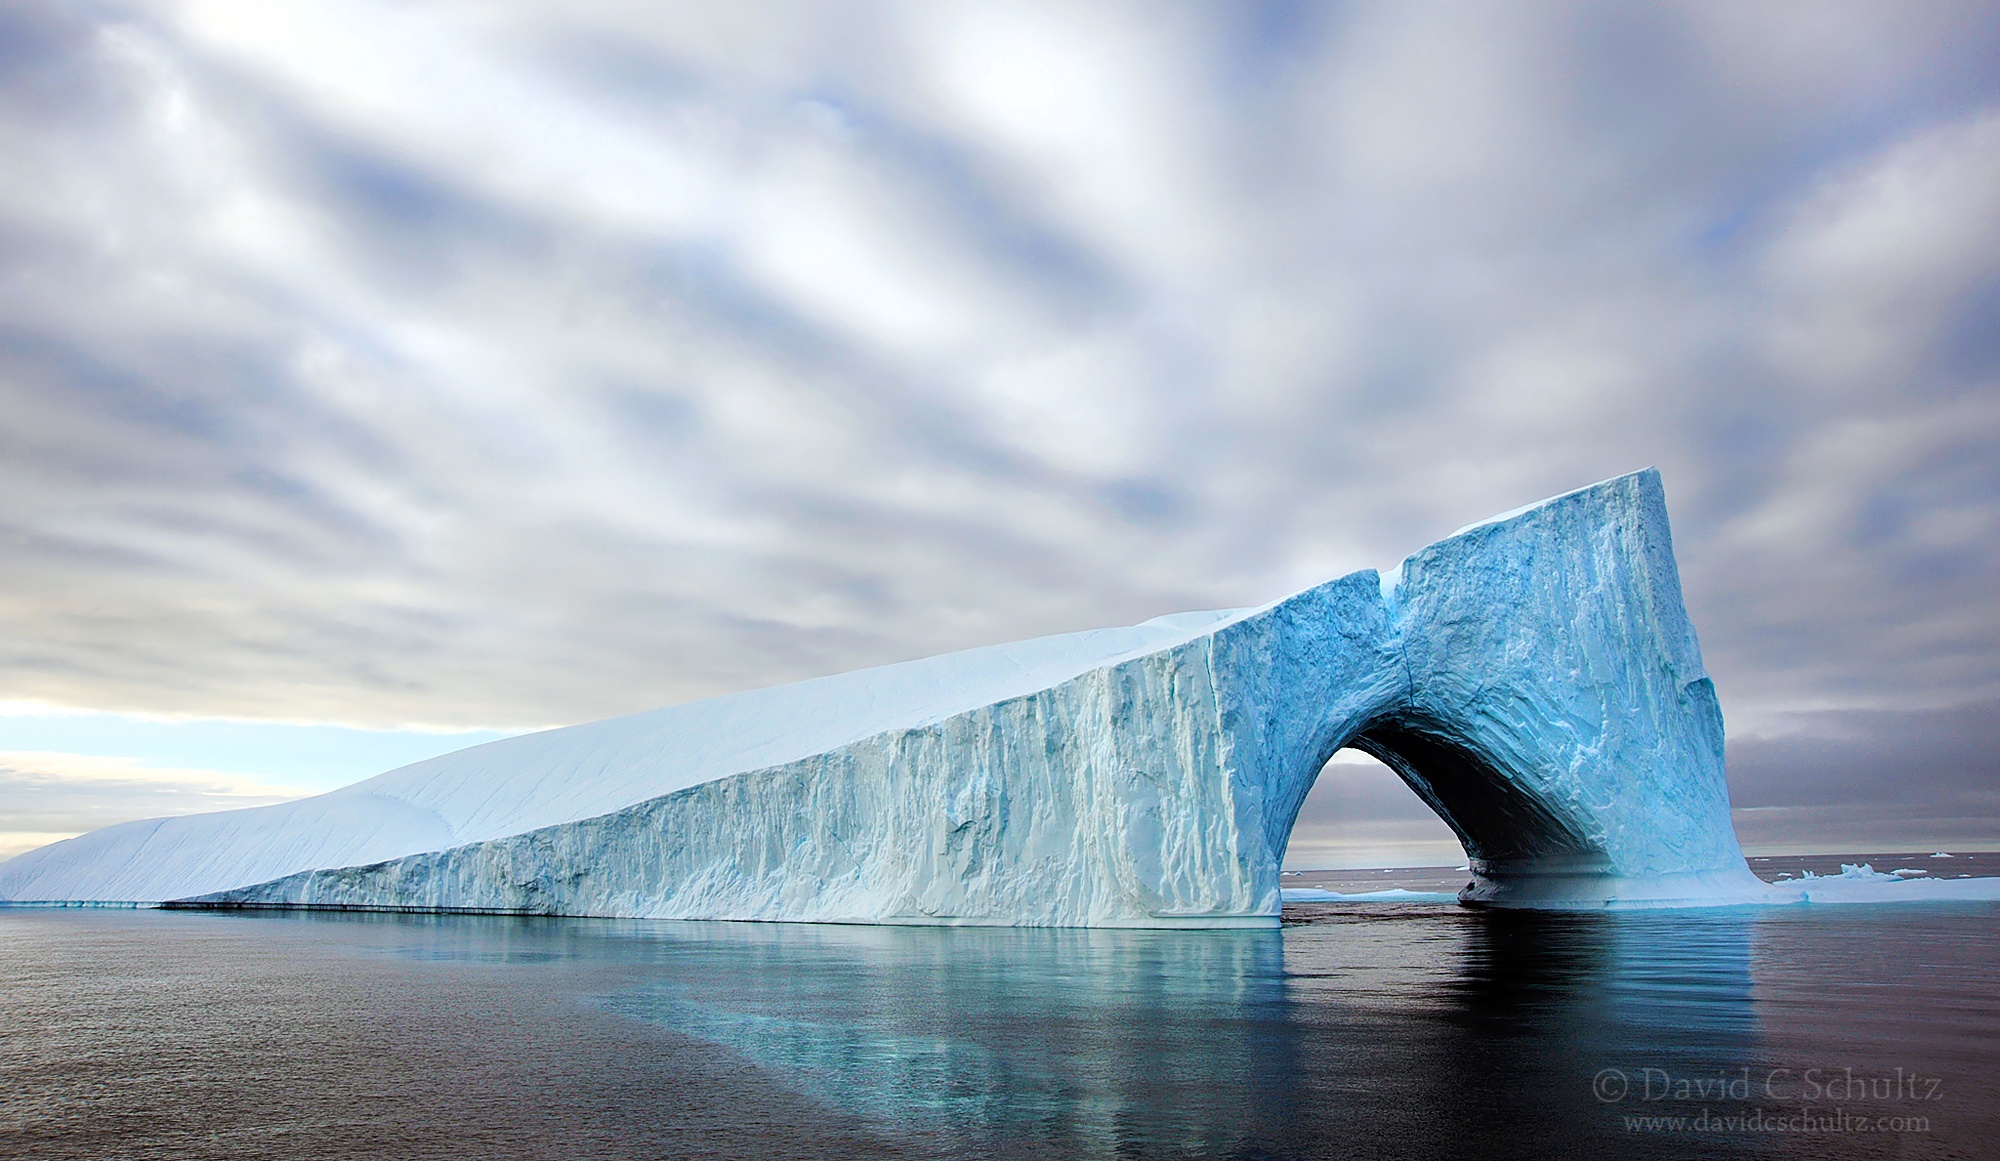
II. Photographing Icebergs

“The Ice” is such an appropriate nickname for Antarctic, where ice can reach 3 miles in thickness.

My first encounter with big ice was during a voyage South when the ship sailed into the caldera of a dormant volcano. This was Deception Island. A massive tabular iceberg almost blocked the entrance. The size was impressive but adding to that was the shape and the intense blue of the ice. The overcast sky with pockets of light shining though helped to add a more dramatic feel to the shot.

The many shapes, colors and sizes of the icebergs never ceases to amaze me. I’ve used everything from a 16mm to a 400mm lens to capture these images, including a macro for detail shots.

These patterns are caused by a number for factors including the grooves, called bubble rills, calving, tide lines or just thawing and re-freezing of the ice.


III. Polar Bears to Penguins: Photographing Subjects on Ice
With snow and ice—any subject that is predominantly white—you have to keep an eye on your exposure to make sure you’re not blowing out the details in the highlights.

Tip? Constantly check your histogram to make sure you’re neither over nor under-exposing the shot. Expose to the right without “clipping” the whites. It’s very common for people to under expose in these conditions, so instead of nice white snow of ice, they end up with it looking grey.

Adding another element, such as a penguin if one is available, will help make a shot a bit more interesting.

A polar bear will work too! Some are safer to work around.


IV. Various Ways of Photographing Ice

I’m always looking for objects to include that can either give a sense of the scale of the ice formation or a way where it can frame another subject.

You can see how in one shot the zodiac boat is framed by the ice giving the viewer a better sense of the size as well as adding a spot of color.

As I started a two-mile hike across the sea-ice to reach an Emperor Penguin colony, I noticed how our returning helicopter passed between two icebergs. I stopped and waited for it to make another pass so I could catch this image.

Later that day, I got the sun going down between the peaks of this very same ice formation at a different angle. I used an aperture of f16 to give a starburst effect if I was precise with the positioning of my camera.

Of course then, a penguin got curious and wandered over to see what I was up to! Bonus points!

V. Photographing Ice on Seascapes

No story about photographing ice would be complete without including Iceland. Not long ago, I held a Photo Tour there. For me, the draw was the black sand beaches and washed-up glacial ice near a place called Glacier Lagoon.

Over several days, I took advantage of the dramatic sky at sunrise. Using a tripod and slow shutter speed, I was able to show the motion of the waves washing ashore.

There are a lot of ice chunks on this beach which can take away from a good composition. But I was able to isolate a few single pieces. Adding to the interest of these shots was the warm backlight of the rising sun.
VI. Gear Guide and Equipment Tips
Along with the gear I previously mentioned, here is a list of other items I like to pack when I’m shooting ice:
1. A few pieces of an old flannel shirt. They’re nice, soft, and great for absorbing moisture when cleaning melted snowflakes off your lens.
2. A good blower bulb. You do not want to use your breath to blow off a lens or camera eyepiece, as it will usually just fog up, and freeze on or in the lens.
3. Small paintbrush. I also carry this to clean snow off the camera.
4. Extra batteries. Switch them out as they reach about half-full status. If you’re running low on power, go “old school” and turn off the image stabilization and autofocus.
5. Tweezers. When working with detail shots, I like having a pair a tweezers in my pack. That way, I can pick up something like the frosted leaves with less likelihood of disturbing the frost.
6. Hand warmers. These also have worked great when placed inside my hat. Thin glove liners, as well as heavier gloves or mittens.
Tip: When bringing your gear indoors, consider leaving it in the case for a while to slowly warm. It prevents condensation build-up.
We hope these tips, photos, and video inspire you to pack your gear and go on an icy adventure this winter.
To see more incredible icescapes, follow David C. Schultz on 500px. You can also connect with him on Facebook, Twitter, or Google Plus. You can also follow his videos on his YouTube channel.
Want to sign up for his upcoming photo workshop in Yellowstone? Visit “Winter in Yellowstone Photo Tour” info and schedules.
Got a question for David, or your own personal encounters with ice to share with us? Comment below!


Leave a reply