Lighting a portrait is a subtle science full of small details that together make a big difference. For example, the angle of a light or your subject’s pose can dramatically alter the way a person looks. This article will help train your eyes to spot the subtleties of portrait lighting.
Jake Hicks is an editorial and portrait photographer based in the UK. His photography is known for its slick use of colour and impeccable lighting. In this article, Jake has shared his favorite tips to help you avoid the most common mistakes and light your portraits like a pro.

I want to start off by saying that photography is a subjective field, and just like any other art form, there are going to be people who agree and disagree with what I class as “mistakes.” History lecturers, for example, will teach us that the Berlin Wall fell in 1989; mathematicians will tell us that 2 + 2 = 4.
I am going to highlight 5 key things that I see portrait photographers doing that I consider to be “wrong” and although there are no hard-and-fast rules to photography try to think of it as being similar to an instrument being slightly out of tune or a meal that’s perhaps too salty. These are glaringly obvious errors to the well informed but may not be so obvious to those who are just starting out.
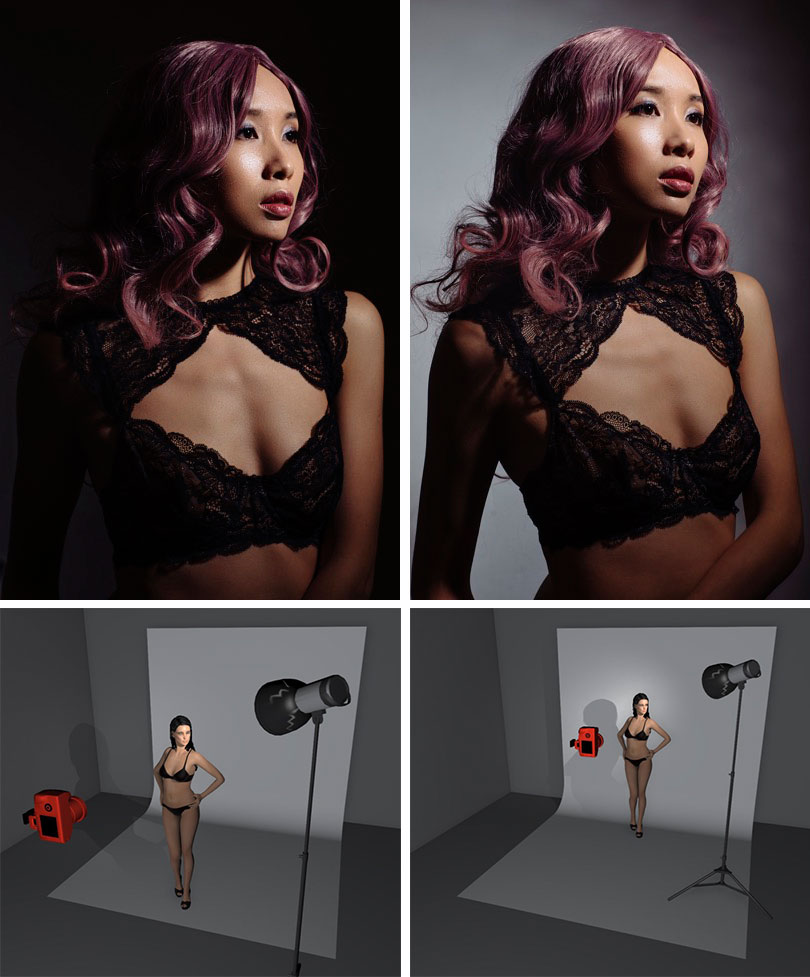
1.Placement of Catchlights
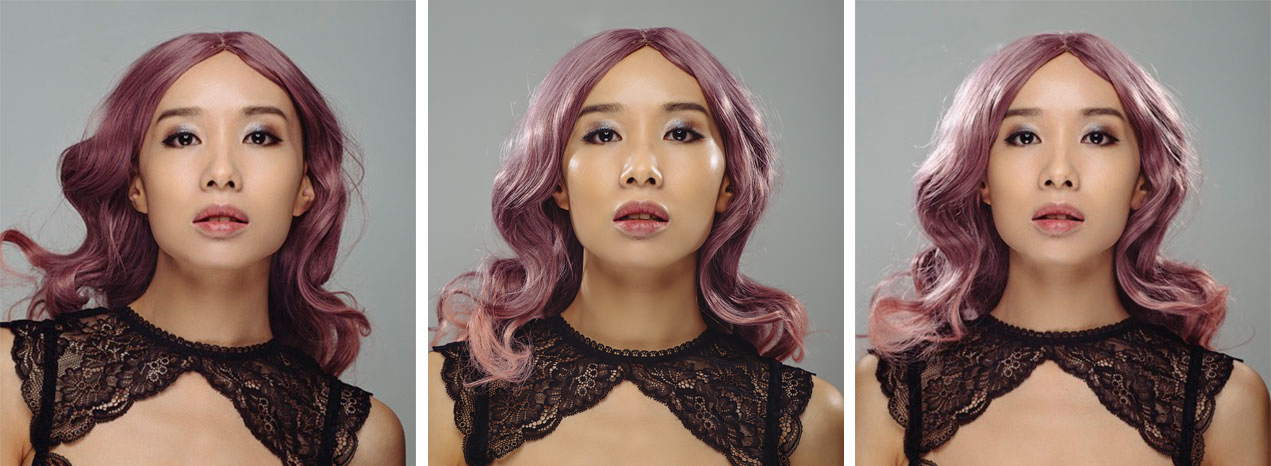
The first one is nice and simple to avoid once you know what you’re looking for, and thankfully, it’s super easy to know when you’ve done it not. It is, of course, catchlights in the subject’s eyes. Catchlights are the spectral highlights in eyes created by the direct reflection of the key light.

The image on the left barely has a catchlight at all and as a result the eyes look very dark indeed. By lowering the light and taking another shot you can clearly see that the lighting is not only more flattering but also adds a lot of light to the eyes.
Having these highlights present means that you’re giving the eyes shape, and without them, eyes can often look dead and lifeless. In fact, to further cement my point, I’ve seen filmmakers simply digitally remove catchlights to signify the death of a character on screen. Catchlights are certainly powerful signifiers of life, so correctly positioning the key light just above the model’s head and slightly in front will ensure the face is lit properly and that the eyes are receiving light to give them that tell-tale sparkle.These are what we refer to as facts—but in our world of the arts, we aren’t quite so strictly governed. I am going to highlight 5 key things that I see portrait photographers doing that I consider to be “wrong,” and although there are no hard-and-fast rules to photography, try to think of it as being similar to an instrument being slightly out of tune or a meal that’s perhaps too salty. These are glaringly obvious errors to the well-informed but may not be so obvious to those who are just starting out.
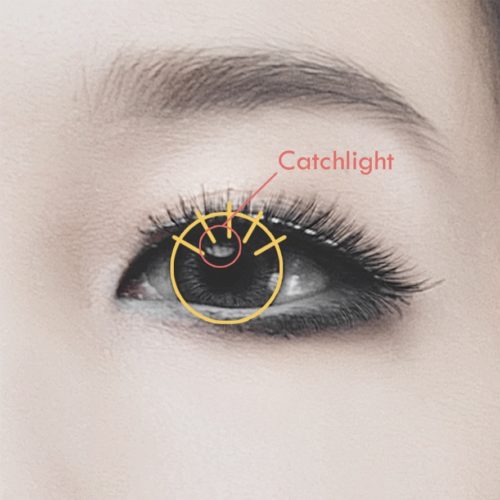
Catchlights should appear at 10 o’clock , 11, 12, 1 and 2. If they appear any lower at 9 and 3 o’clock then we start to get under-lighting which is another big lighting
mistake.
2. Under-lighting
Under-lighting is simply lighting that is coming from below the subject in relation to the camera. Think of those 1960s horror movies that needed to make monsters and creatures scarier—they’d simply light them from below.
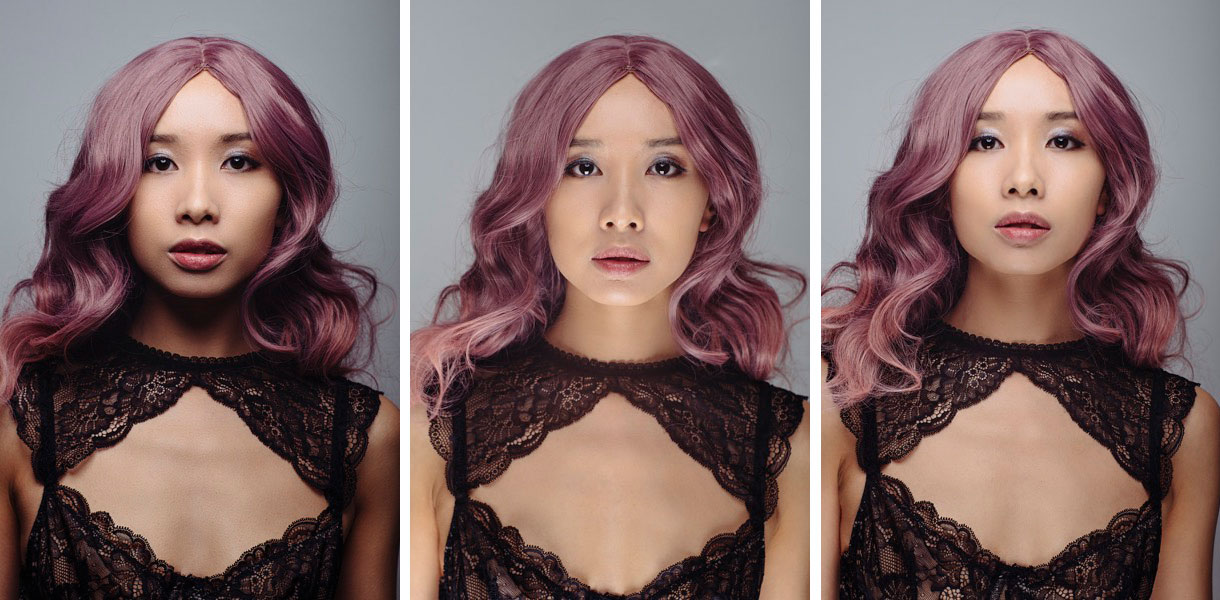
In the above images, you should be able to see that on the left we have no fill light. That’s not necessarily a bad thing but introducing a little light from underneath can add a lot of detail back into the shot just like we see on the far right image above. Add too much light from below and we start to get the under lighting effect like we can see here in the middle image.
The reason this looks so bad is because we’re used to seeing one another when we’re lit from above. We go outside and the sun is lighting us from above; when we’re indoors the lights are lighting us from above. In fact, this is so present in our visual recognition of the world that lighting from anywhere other than above simply tells our brains that something is wrong. So although this should be painfully obvious to us and very few of us would make the mistake of lighting a subject solely from below, I still see the same effect happening when photographers decide to introduce fill lights. The under-lighting effect happens when the fill light is actually casting more light on the subject’s face than the key light. I see this done all the time and often by apparent professionals. In fact, not too long ago, a corporate head of one of the world’s leading camera manufacturers released a headshot with horrendous under-lighting, so it’s not just enthusiasts that fall foul to this one. Thankfully it’s easy to fix: simply turn down your fill light. Yup, that’s it—simply turn the power down. To be extra safe, take some test shots at varying powers of fill light if you’re not sure and then choose the favored image and corresponding power. It’s very easy to see which you prefer when images are side-by-side in this way, so it’s definitely worth doing.
A simple small softbox below the model is all that’s needed to add a little fill-light.
PRO TIP: If you’re photographing a series of people, like a group of corporate head shots, PAY ATTENTION to each individual you photograph. If you’re photographing a 6’5″ man and then a 5’3″ lady afterward, adjust and move your key lights and fill lights accordingly. Failing to do so will mean that the young lady is going to be a lot closer to the fill light than the key light. And guess what? You’ll have created under-lighting by simply not changing a single thing.
3. Lack of Subject to Background Separation
This one could be argued as a little more based on preference, and I’ve seen it done well for effect in both instances—but as a rule, if you’re starting out with lighting, try to avoid it. This lighting technique is about showing shape and form with shadow or the absence of light.
The above lighting setup is exactly the same, the only thing that has changed is how far away you, the model and the light is from the background. You can clearly see how the model is completely lost in the background on the left-hand image, but by simply allowing your subjects light to spill onto the backdrop you immediately see a lot more shape and form being brought back to the model.
If you’re photographing a subject with only a single light, for example, and they’re a short distance away from the background, then that background will drop off into pure darkness just like the shadow side of your subject does. What happens now is that visually the background and the shadow side of your subject are indiscernible from one another, and the viewer’s eye is not able to tell where the subject ends and the background begins. More often than not, this leads to the subject appearing far larger in the shot than they might like.
This is one of those lighting techniques where you’re not necessarily doing anything wrong but you could definitely be doing something better. If you only have a single light, then move your subject and setup closer to the background and allow your light to spill over onto the surroundings so that it now appears in the shot behind the model. This is a very simple technique and obvious once it’s been pointed out, but incredibly effective at dramatically changing how a shot and your subject can look—especially if you only have a single light to work with.
4. Shadows
Again, this is a mistake that is quite subtle and sometimes tricky to avoid, but it always worth being aware of it. A basic rule of lighting for me is that you always want to create “clean lighting.” Clean lighting is lighting that doesn’t scream “Hey, look at me, I’m using 6 lights in this setup”—it’s lighting that compliments the subject and nothing more.
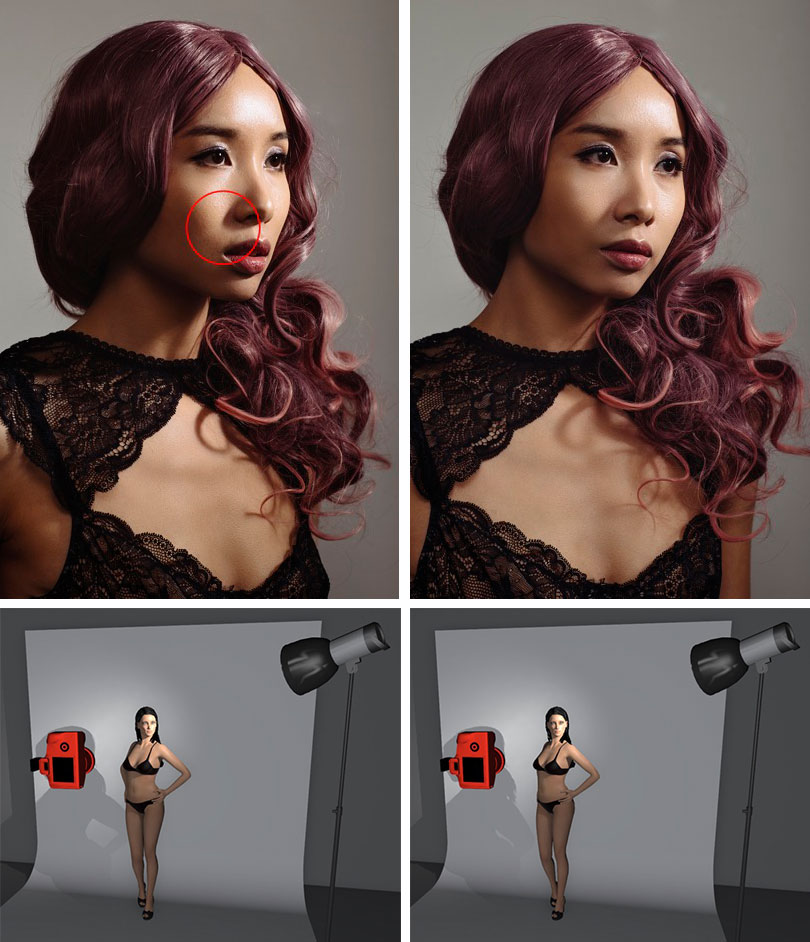
The idea of ‘clean-lighting’ takes a little more time to perfect because at first it may not be apparent as to what you’re looking for. As a general guide, joining up shadows on the subjects face is a good place to start. Sometimes it’s not even about the lighting placement at all but more about working with subjects pose. In these images, the shot on the left has a nose shadow that doesn’t join the cheek shadow, visually that can make the nose appear bigger than it actually is. Simply getting your subject to move their head a little can fix this and then you can join those shadows up and create a visually cleaner looking shot.
If you’re looking for an example of the cleanest lighting around, it can often be found in the hands of car photographers. Good car photography is arguably one of the hardest disciplines in our field to master. If you position a light in the wrong place when lighting a car, then the ultra-shiny surface of the car will lose its clean lines and shape instantly. Car photographers never use more lights than they have to, but each one is positioned with absolute precision. In fact, I’ve even seen some car photographers place lights solely to generate hub-cap catch-lights in the shot but not actually light the surface of the car in any way. They are indeed a patient breed.
For those of us that are photographing people, we often don’t have the time or the need to be that precise, but it’s still certainly worth knowing what looks good and why. One way to do this is to join up your shadows. Thankfully, this is easier to do that you might think; you just have to watch out for it. In this example image here, I’m using one light to illustrate my point, but every light you add to a scene should be under the same scrutiny. The one thing that we as portrait photographers have to contend with over car photographers is that our subject is often moving—but we can use it to our advantage if we’re clever.
In this shot, I am specifically looking at the shadow created by the nose: you should see that in one shot, the shadow ends and then some light cuts across the cheek, and then another shadow is created by the cheekbone itself. This is what I would refer to as messy lighting; it’s creating more distracting elements to a shot than necessary. In the other shot, we have no gap of light between the nose shadow and the cheekbone shadow. This lack of a gap essentially gives the impression of a single shadow area on the face, and this is what I refer to as “clean lighting.” It might not seem like much, but imagine this happening with fill lights, hair lights, and background lights in the mix—the lighting would start to look very messy and untidy, very quickly. Watch out for these additional shadows, and where possible, adjust your lights to avoid these shadows. Better yet, get your subject to move and pose to avoid them as well.
5. Poor Hair Light Placement
The placement of hair lights is another example of how something looks fine until you’re shown how it could look better. Firstly, you have to know why you’re using hair lights, to begin with—are you simply adding them to add a little shine to the hair, are you trying to accentuate shape in the hair, or are you just trying to create a strong separation between your subject and background? All of these are valid reasons, and with a little care and attention, your hair light placement can achieve all of these goals. For a lot of my portrait work, unless it’s a specific hair shoot where I would have multiple hair lights, my general aim is to show clear separation between the model and the background. Imagine you have a dark background and a subject with very dark hair; you’ll quickly see that the two will begin to merge into one another. Placing some hair lights can be a simple solution to avoid this.
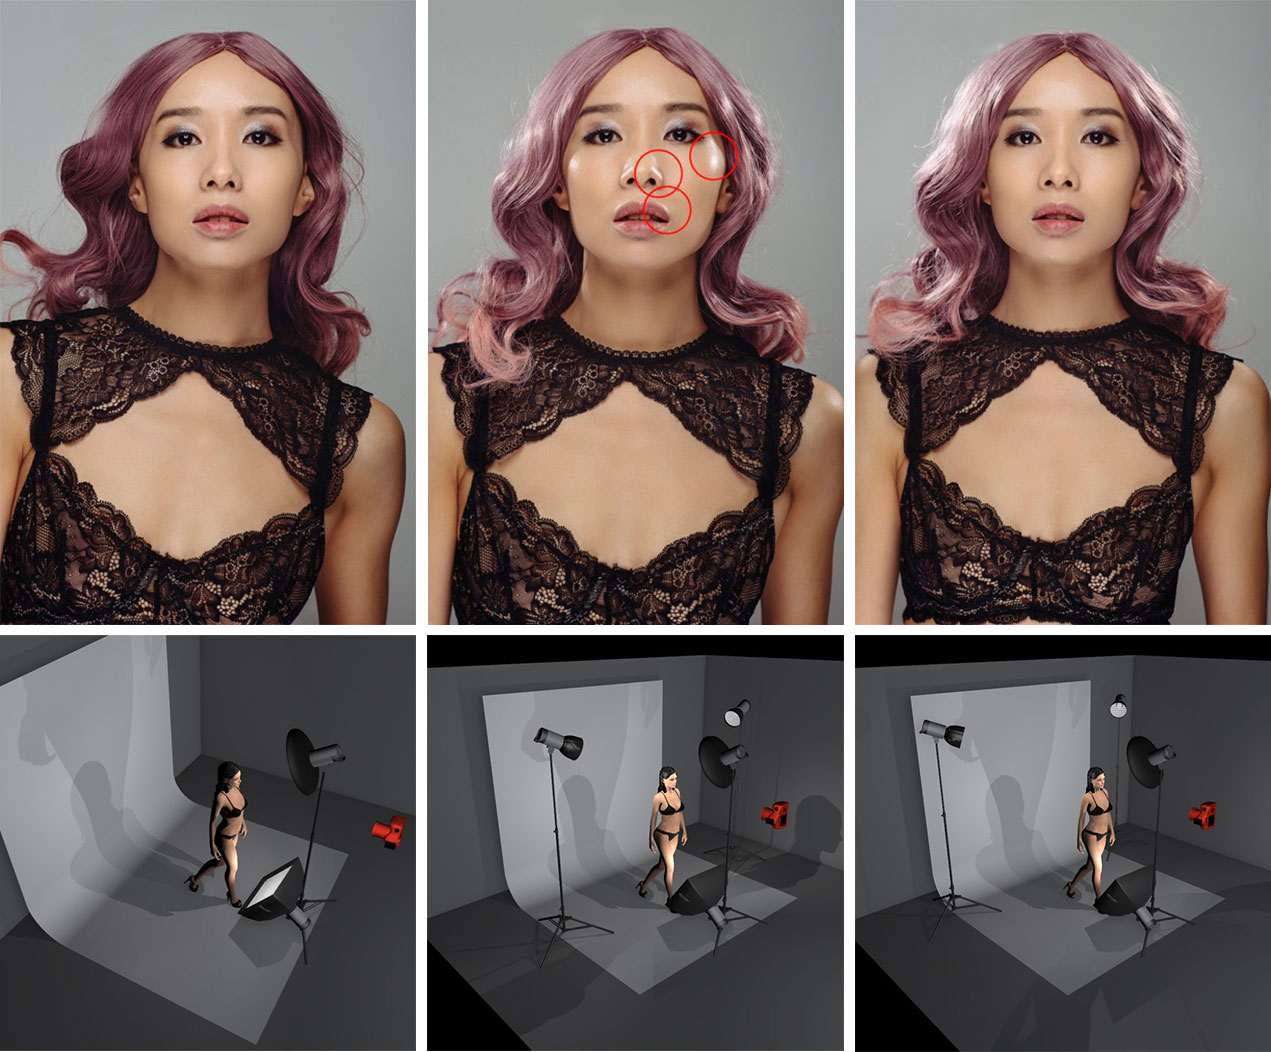
The image on the left shows a simple key and fill-light with no hair lights present. There’s technically nothing “wrong” with this shot, but I feel the addition of a couple of hair lights can add a lot of depth to the image. When adding hair lights be careful not to bring them too far forward so that they create unwanted highlights on the face like we can see in the middle image here. By moving the hair lights back we can remove the highlights from the face but still keep the shape and highlights on the hair like
So now that we know why we want to use the hair lights, what’s the best way to use them? First off is the placement of the lights, and this is crucial, as they won’t be in the same place for every subject you photograph. As a guide, the lights should be placed behind the subject and should be pointing forward towards the edges of the subject’s head. Next, they should be placed just far enough apart so that no light falls onto the front of the face and the tips of the nose and lips. This may sound incredibly obvious, but keep an eye out for how many shots you see where the hair lights are catching the front of the face and causing incredibly confusing and distracting lighting on the subject’s features. You have to ask yourself, “Which shot looks better—the shot with or without multiple highlights falling on the subject’s face?” It should be plain to see when it’s pointed out, but you’d be surprised how often you see professional portraits with this error.
The other key factor is the power of the hair lights, and as a rule, I tend to stick to as little amount of light as I can get away with. Remember, flash photography is never about “look at how many lights I’m using” but about adding lights to compliment the subject—so most of the time, these additional lights in the setup will require less power than you think.
So there you have it, just a few of the classic lighting mistakes that can often be avoided by those setting up portrait lighting. These are subjective and there is always an occasion to bend the rules with lighting, but if you want to attach commercial merit to what I’ve mentioned, then it’s worth pointing out that I was responsible for training new portrait photographers in a large studio for many years. It’s factors like the ones I’ve outlined above that when rectified significantly increased that photographer’s client average spend per shoot so take from that what you will.
My lighting philosophy is to keep the lighting as clean as possible. Does adding an additional light to the setup add an interesting element, or does it highlight a distracting one? Keep that in mind when you’re setting up each and every light, and you’ll be fine.
If you found these tips helpful and would like to know more about my thoughts on lighting and other photographic techniques, then please check out the “Techniques” page of my website. I also teach lighting workshops predominantly focused on my personal style and techniques involving gelled lighting. To find out more, please check out the “Workshops” page of my website.


Leave a reply