Jimmy McIntyre is a world-renowned travel photographer, educator, and 500px ISO contributor. His photos have been published in local and national magazines, including the BBC. His online courses on digital blending and post-processing, and his Raya Pro Panel, can be found on his official website
This post originally appeared on Jimmy’s blog, and is being republished with express permission.
Patience While Shooting
One thing I pride myself on in photography is patience. I believe that patience and planning are two immensely important ingredients to consistently creating good quality images. In the past I would jump around a location firing off hundreds of shots as the light changed, hoping to be lucky enough to come out with some decent images.
Over the years my workflow has changed to one of arriving very early, testing compositions (settling on one or two), and sitting for sometimes hours until the conditions become more favourable. My goal is to come out with one workable image per shoot. If I managed this every time I’d be a happy man.
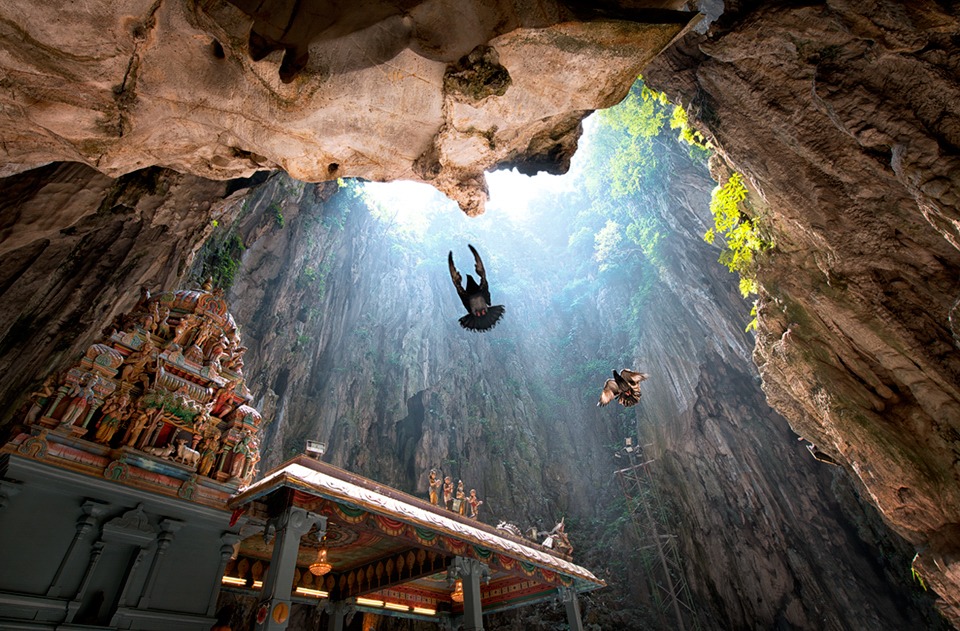
Shooting the Batu Caves required both patience and planning. After setting up my camera low to the ground, I sat down and chose a composition. There were three main elements I wanted in this photo: sun rays coming through, birds in flight, and for all of this to be framed by detailed rocky-walls and the temple to the left.
It became apparent, after deciding my initial composition, that capturing birds in flight would be a tricky process. I waited 20 minutes without success. I did notice, however, that there was an obvious flight path for the birds, which was 5 metres or so to the right of me, which led to a ledge on the wall behind.
I moved my gear directly below this flight path, wondering if my presence might discourage the birds from coming in this direction. I found a nice, heart-shaped composition (or at least it looks like a heart to me :D) created by the rocks and temple. I then sat… for an hour and a half… waiting for my bird to arrive.
I took 250 shots, missing out constantly on capturing the elusive pigeon. Then, without warning, a bird swooped down and seemed to linger ever so slightly in front of my camera. With my finger on the trigger, I fired off continuous shots, and just when I was about to release the trigger, another bird swooped down, slightly further away.
I quickly scanned my camera preview and saw that I’d finally captured the scene that I was desperately hoping for. Sitting on a bird poop-soaked floor for 2 hours in total had finally paid off.
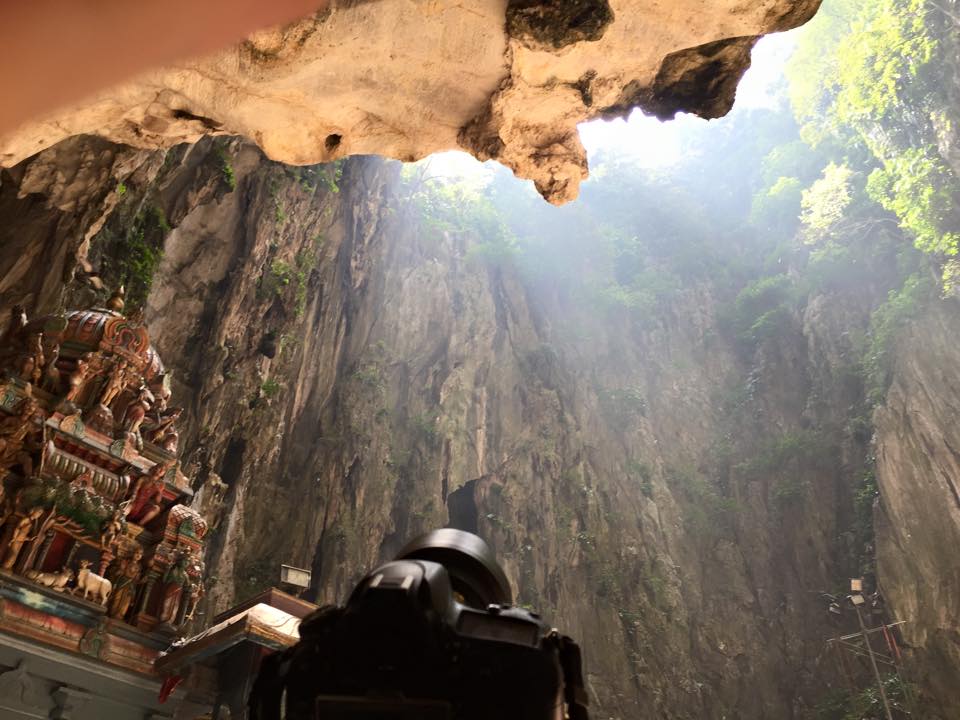
Here’s a behind the scenes shot of our little Batu Caves adventure.
The Cool Bits – Technical Info
Processing Time: 30 minutes
Exposure Blending method: Rapid Blend If
Number of Exposures: 3
EV Range: 0 & +2
Aperture: f/2.8
ISO: 500
Focal Length: 17mm
Lens: Nikkor 14-24mm f/2.8
Camera: Nikon D800
Plugins: Nik Color Efex
Luminosity Masks: Used to protect the shadows
Workflow Explanation – Swooping Rays; Birds At The Batu Caves
To learn my post-processing techniques, feel free to check out my courses: The Art of Digital Blending & The Art of Cityscape Photography.
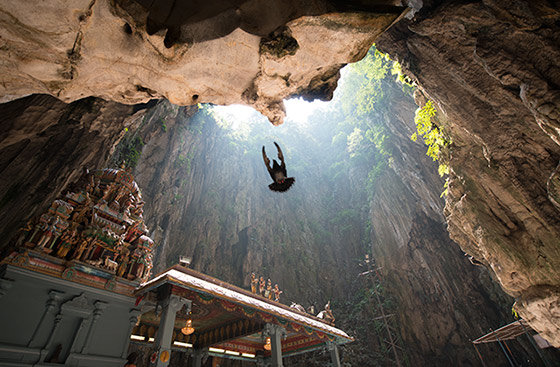
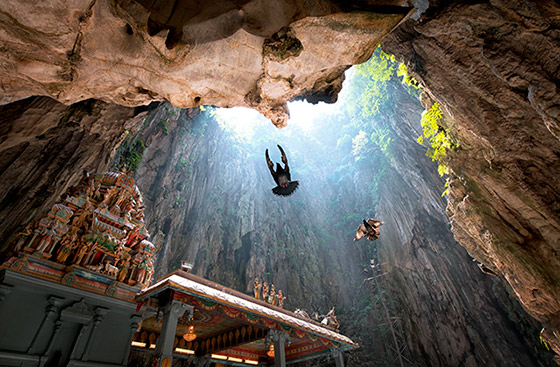
Most of this image is from a single frame, as you can see below. The second, further away bird, was added from an exposure 5 seconds after. I used one more exposure, 2 stops brighter, to bring some extra details into the shadows. I did this easily using the Rapid Blending If technique taught in my cityscape course.
In terms of shooting, since this was a cloudy day, the sun was coming and going fairly regularly. This meant that the cave went from being bright to dull throughout the shoot. This created an ongoing challenge when capturing the birds.
After experimenting a bit, I’d decided that 1/500 second would be a quick enough shutter speed to capture the birds crisply. This wasn’t difficult to achieve when the sun was shining. But when it wasn’t, and the cave become duller, the shutter speed would drop to around 1/200 or less. So I had to keep changing my aperture and ISO to match the conditions.
When the birds finally swooped down, the sun was shinning, so the shutter speed was fast (1/800). The challenge, however, was that the main bird swooped down literally feet from my camera. Shooting at f/2.8 meant that the cave was in focus, but the bird was slightly out of focus due to its proximity to the camera. The smaller bird, to the right, is significantly sharper.
This is just me being cynical about my own images. In reality, the captured scene is certainly acceptable by my tastes. So overall I’m happy with it.
In terms of processing, it was a very straightforward procedure. I layered the two bird exposures (with the main bird on top), which were identical apart from the bird positions. I placed a black mask on the smaller bird layer, and just masked in the bird.
Once I’d blended all three exposures, I applied a Detail Enhancer layer from Nik Color Efex, to bring out the wonderful textures in the rocks. I added some warmth to the image with a very gentle warm photo filter.
If you look at the point where to the bright sky meets the rock at the top, you can see that the edge is softened slightly. In the before image below, this softening is much stronger and there was a blue fringe in that area. To make the edge of the rock more solid, I first desaturated the blue fringe, and then used the Burn tool (on a new layer), to burn the midtones and shadows. This worked extremely well.
I enhanced the sun’s rays with the Dodge tool on a new layer. By choosing the highlights, and dragging down the direction of the rays (while holding Shift to paint a straight line), I was able to make certain parts of the sun’s rays more pronounced. I also dodged part of the rock to the right, and the temple, to brighten the highlights a touch.
On the before image, you will see that there is scaffolding to the bottom right. I was undecided about removing this, or adding a strong vignette to that corner to minimise its influence on the scene. Beboy, a friend of mine, said the scaffolding did indeed distract him and recommended I use a specific selection of the corner, and drag the scaffolding out of view using the Distort tool. I decided to take his advice and was glad I did.
I then made a couple of contrast adjustments with Curves layers, but protected the shadows each time with a Darks luminosity masks.
Finally, I painted in a vignette around the image to concentrate the eye towards the centre of the image.
Before/After Slider
 [/twentytwenty]
I’m always happy to connect with other photographers! You can visit me through the links below:
My website
My Facebook page
YouTube Channel for more videos
My photography newsletter Including The Free Easy Panel—sign up now!


Leave a reply