Tor-Ivar Naess is a night and landscape photographer based in Nordreisa, a municipality in Northern Norway. With a passion for beautiful scenery and the aurora borealis, Tor-Ivar has plenty to choose from in his region.
A former world-class World of Warcraft gamer who would spend 6-8 hours per day online, Tor-Ivar “career” quickly took its toll on many levels ofn his life. Realizing that he needed a healthier hobby, he purchased a camera that was so expensive he couldn’t afford not to learn how to use it.
Hiking and photography quickly became the healthy solutions Tor-Ivar was looking for, a perfect combination to get back to a healthier self, both physically and mentally. Looking back at the «career» as an online-gamer, Tor-Ivar says that at least he developed his persistence and hunger to become the best he could be.
You can find more from Thor-Ivar on his 500px, website, Instagram, and Facebook. This article originally appeared here and is being republished with express permission.

Aurora Borealis Photography Tutorial
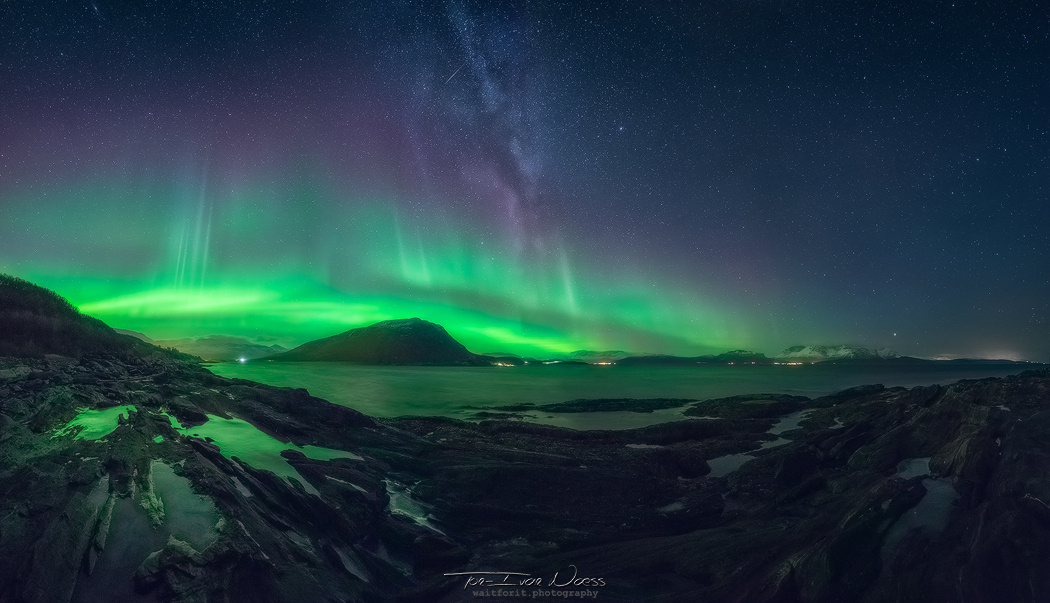
The season is upon us now and I would love to teach you the way I photograph the aurora borealis, also known as the northern lights.
I’ve been chasing this phenomena for a few years and my first captures were with the Nikon D7000, a cropped sensor DSLR. Today I photograph the aurora borealis with a Nikon D810, a full frame sensor. I’ll explain the difference between the two later in this post.
This season I set a personal record(!) I was able to spot the aurora borealis during the last days of August.
Within the arctic circle the night is fairly bright until the end of July, when the sun finally goes below the horizon, making the night gradually darker each day.
(For a month and a half during summer, the sun doesn’t go below the horizon line, hence the midnightsun.)

“An aurora is a natural light display in the sky, predominantly seen in the high latitude (Arctic and Antarctic) regions. Auroras are produced when the Magnetosphere is sufficiently disturbed by the Solar wind that the trajectories of charged particles in both Solar wind and magnetospheric plasma, mainly in the form of electrons and protons, precipitate them into the upper atmosphere (thermosphere/exosphere), where their energy is lost. The resulting ionization and excitation of atmospheric constituents emits light of varying colour and complexity. The form of the aurora, occurring within bands around both polar regions, is also dependent on the amount of acceleration imparted to the precipitating particles. Precipitating protons generally produce optical emissions as incident hydrogen atoms after gaining electrons from the atmosphere. Proton auroras are usually observed at lower latitudes.” – Wikipedia
Since most of us aren’t astrophysicists, there are several websites and apps that have forecasts that becomes very useful. These apps and websites gives us an indication about expected activity, it’s important to know that these are predictions and you might not get the light show you were expecting. This goes both ways though – especially at higher latitudes, since even a low activity level might be enough to light up your sky in green “flames”. As photographers we know that light changes depending on the weather, this is also true for spaceweather.
The activity level is very often referred to as KP-Index. The index is an indication of the geographic size of the aurora borealis. Low index numbers means the northern lights will be visible only at higher latitudes, but as the number increased the visibility of the lights will stretch further south. (See the illustration below to get an idea).
When looking at a forecast like mentioned below in the preparation-section, I am very interested when I read about solarflares, specifically M and X-flares, as well as coronal mass ejections (cme) heading in Earths direction. These events on the surface of the sun might ignite geomagnetic storms in our atmosphere—providing us with a colorful light show. Usually these geomagnetic storms provide us with a high Kp-index. Other aspects to pay attention to is the velocity and density of the proton levels. As you can imagine, there are several aspects in the science of the aurora borealis and geomagnetic storms.
“The March 1989 geomagnetic storm caused the collapse of the Hydro-Québec power grid in seconds as equipment protection relays tripped in a cascading sequence.Six million people were left without powerfor nine hours. The storm caused aurorae as far south as Texas. The storm causing this event was the result of a coronal mass ejected from the Sun on March 9, 1989.” – Wikipedia
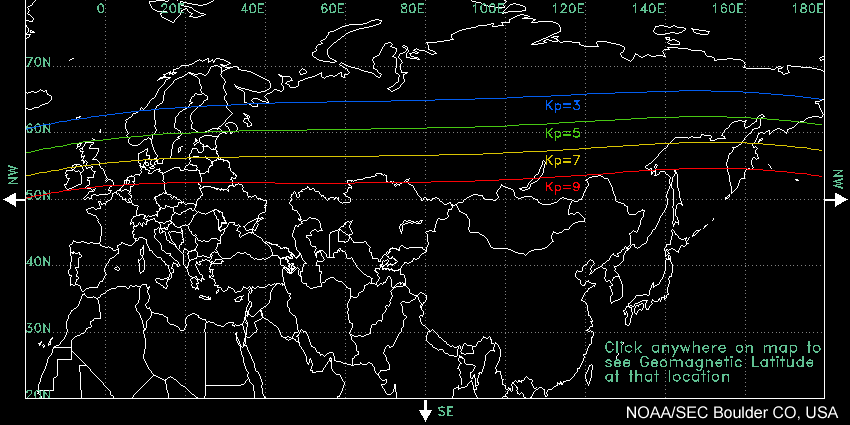
An illustration of the KP index. (Source: Softservenews)
Preparation, or: How Do I Find the Aurora?
As mentioned, apps and websites can help you increase the chance of success. I currently use these:
- Spaceweather – I use this page to get an idea of what activity to expect the coming week and to stay updated on potential solar flares.
- VirtualTromsø, Space Weather Prediction Center, and Softserve News for my aurora forecast.
- I also use Yr, a Norwegian weather service for the cloud forecast in the area. The page is in Norwegian, but the essence of the page is not language dependent.
- For apps I use Aurora Forecast (iOS/Android) and Nordlysvarsel (Android).
- Also worth mentioning is The Photographer’s Ephemeris (iOS/Android), an app to plan the location of your shot.
Finally, a couple of things to consider before venturing out in the arctic at night:
- Dress accordingly, it is cold and you are likely to be stationary for a hours.
- Bring a head lamp. This is useful to find a foreground you like as well as avoiding to stumble in the dark. If you are with a group, be kind, don’t use the head lamp unless it’s necessary—this can ruin both their photo and night vision!

What Gear Should I Bring?
1. Your camera, obviously. Be sure you know how to use it! It is preferable to have a camera that can do manual mode.
2. A tripod, this is long exposure photography and keeping your camera still is crucial.
3. A remote trigger is highly recommended, also to make sure your camera remains undisturbed on your tripod. Pressing the shutter yourself will move your camera.
4. If you don’t have a remote trigger, you can make due with the self-timer solution.
5. This is landscape photography at night, so you would be best served with a fast wideangle lens. Here are few examples of great lenses for aurora photography: Nikon 14-24mm f/2.8, Samyang 14mm f/2.8, and Sigma 35mm f/1.4.
What Settings Should I Use?
Aperture: You are best served capturing the aurora using an aperture between f/1.4 and f/4.0. I personally shoot mostly at an aperture of f/2.8.
Shutterspeed: I like to have a shutter speed within the range of 3-10 seconds (hence the tripod and remote shutter). This is because I like to “freeze” the aurora as much as possible.
ISO: This depends very much on your camera’s sensor. Generally, a cropped sensor camera will become too noisy above ISO 1000. Most full-frame sensors will allow you to shoot at ISO values between 1600-3200 without too many noise problems. There are obviously plenty of exceptions here, like the Sony A7S, a mirrorless camera designed specifically for low-light shooting.
If you aren’t comfortable with noise-reduction in post-processing, I do recommend using your cameras built-in function for it.
White Balance: Anything below 5000k really. I like my auroras to be on the colder side—it seems more Arctic to me—so I tend to stay at around 4000k or below. I shoot in the RAW format, but I still set my white balance in-camera to get a better idea of what my photo will look like when I bring it to Lightroom and Photoshop.
If you photograph in JPEG, I recommend setting your white balance to 5000k and working your way down from there.
Focus: This should be done manually. Unless you plan to focus stack like a champ, focusing on the stars (infinity) will give you the best results.
Exposure: As a general rule, I overexpose my shots by 2 full stops, but pay attention to your histogram! If the aurora is powerful you are likely to blow out your highlights!

Thanks for reading my loosely written guide on how to photograph the aurora borealis! As a final treat, here’s a short time-lapse I put together by capturing the aurora in Nordreisa and some nearby municipalities.


Leave a reply