Christian Hoiberg is a Norwegian landscape photographer with the urge to travel. His lust to explore has given him the opportunity to photograph many unique and beautiful places. Through his website he teaches the techniques he uses when creating images. Christian always shares his knowledge and is happy to educate photographers of all levels.
To see more of his work, follow him on 500px, visit his website, or check him out on Instagram, Facebook, and Google+.
Ever since I began photographing I have been drawn to water in motion. Whether it’s the ocean or a waterfall, I have a fascination with the beauty of moving water. In this tutorial, I’ll share my favorite techniques for taking gorgeous photographs of waterfalls.
The Equipment
Photographing waterfalls can be challenging in many ways. Often, you find yourself standing in a river, in the middle of a “splash zone,” where both you and your gear get soaked! Many people are used to just snapping a couple shots and walking away, but to really capture a waterfall’s beauty, this is the equipment I use and recommend:
A Sturdy Tripod
The long exposure technique is very popular when photographing waterfalls (I’ll come back to this later). Keeping your camera steady for several seconds is impossible without a solid tripod. Using a tripod will hold your camera steady and ensure that you get a sharp image of the waterfall.
Note that I wrote “a sturdy tripod,” not just “a tripod.” The reason I emphasize that it should be solid is the fact that you often find yourself standing in strong streams. Look at the picture of me standing in a river below. To keep my tripod steady, I struggled to get the legs between rocks and I had to hold tight for every shot I took. While setting up my tripod, its legs would be pushed back… and I have a very solid tripod. A cheap lightweight tripod will not be able to stay still in strong currents.

Filters
Using filters can greatly benefit your end results. Either you use a filter to reduce glare and reflections, or to blur the water. A polarizer works excellent for both removing unwanted shine from sun and allowing a longer shutter. Using an ND Filter is also great for photographing waterfalls. This allows you to get a longer shutter speed, but it does not remove any shine from the water.
Accessories
A tripod and filters may be the most important equipment, but there are some accessories that, in my opinion, are crucial to the equation. They will definitely make it easier for you, and also help you capture am image that is as sharp and clear as possible.
Remote Shutter Release – This may be a given for many people. I never shoot a waterfall without using my remote shutter. As I’ve explained in previous articles like Essential Photography Equipment, the use of a remote shutter reduces the amount of friction in your camera when taking a picture. You will see a big difference in the sharpness of your image when beginning to use a remote control.
Microfiber Cloths – A common challenge when photographing waterfalls is facing the splashing water. Whether you are standing in the middle of the river, at the side of a waterfall, or close up to the waterfall, you will notice some degree of spray. Sometimes it’s barely noticeable, while other times you struggle to keep the lens dry for even one second. Using a microfiber cloth will help you in having a dry and clean lens while removing any drops of water on it. This makes the post-processing easier too, as you don’t need to spend that much time on spot removals.
Air Blower – The air blower is a very underestimated tool. Most people use this as cleaning equipment, but it can do so much more! Another common challenge is condensation. Your lens or filter may be covered in dew and you see next to nothing on your images! Using the air blower combined with the cloths will keep your lens free for dew and water spots.
Rain Cover – Using a rain cover may not be necessary every time, but every now and then it could be extremely important. It won’t keep the glass of your lens dry, but it will protect your camera and reduce the risk of walking home with a dysfunctional SLR or lens.

The Techniques
Let’s just make one thing clear right away: There is not one correct technique to take a picture, no matter the subject. What is beautiful in my eyes may not be the same for you. The techniques explained below are my approach to photographing waterfalls — the techniques I use. Use this as a guideline, not a blueprint!
Finding the Perspective
Changing your perspective can drastically change the image you are taking. A high perspective will be a completely different image then a low perspective. The best perspective often depends on the location and scenery, but I generally like a low perspective better, as this often leads you more into the picture and gives the possibility for a exciting foreground.
Walking around the area of the waterfall, looking for compositions and perspectives, may be a good idea when arriving at the location. When you find a spot you like, try looking through the camera from ground level and up to eye lever or higher. By doing this you will quickly see what works for this place.
As I mentioned, I prefer using a low perspective and getting close to the water. This often reveals exciting possibilities for composition that will differentiate your image from others.
In the image below, my camera was less then 10cm above the river. By using such a low perspective I could fully utilize the little stream in the foreground. This low perspective changes the image, and also does good for the composition.

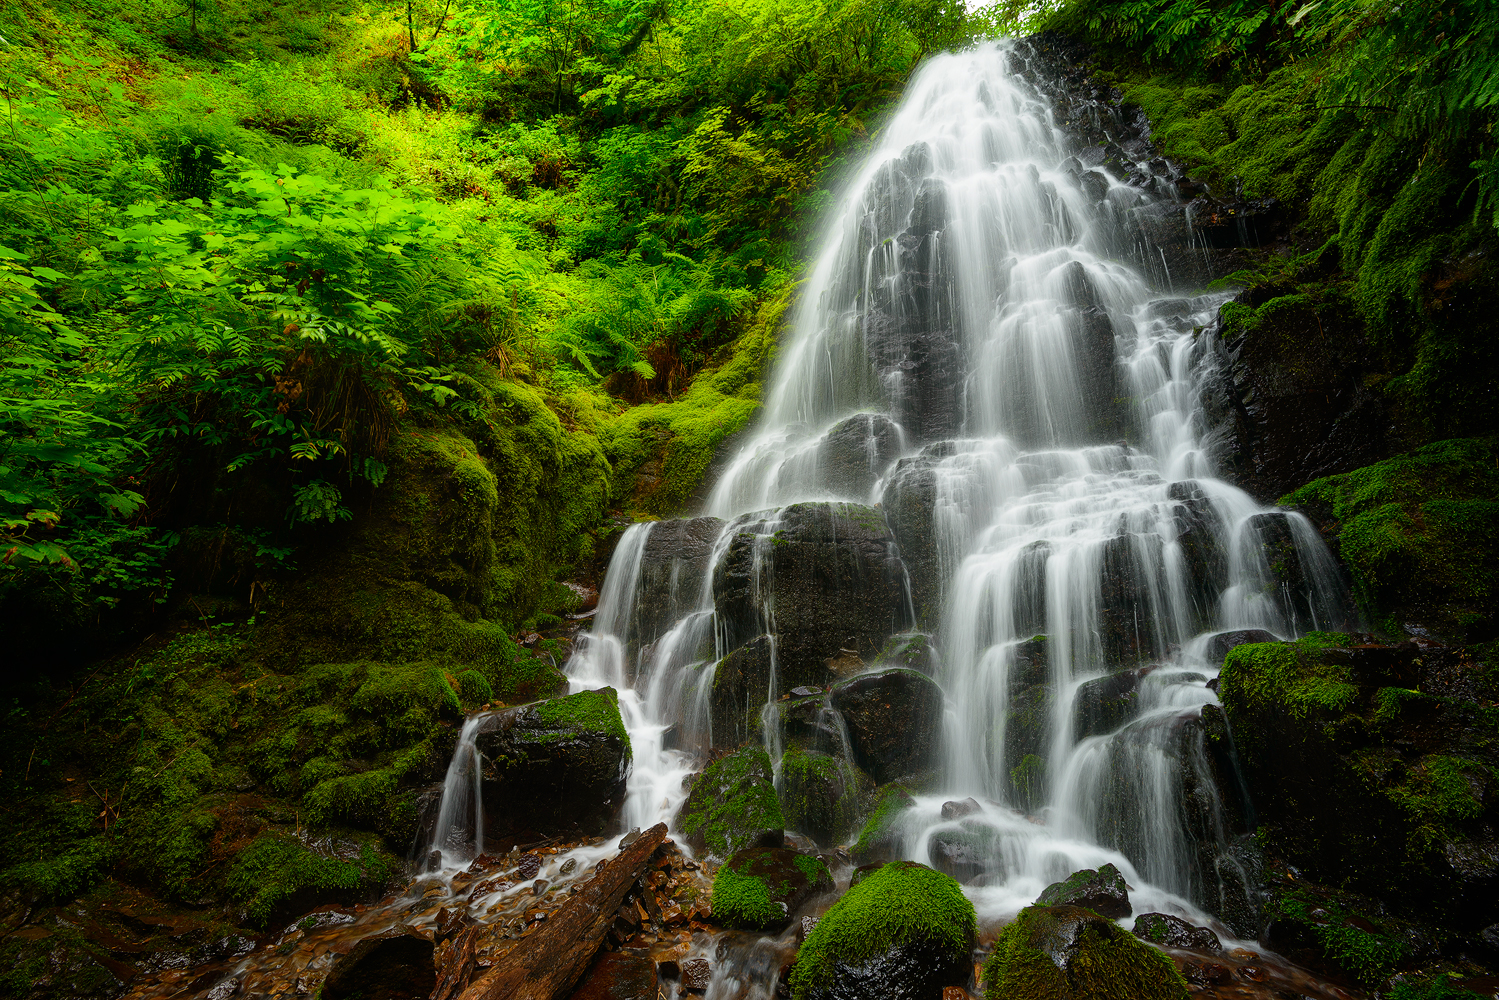
The next picture, taken at Fairy Falls in Oregon, has a much higher perspective. At this point my camera was around 1-1.5 meters above ground. Due to the lack of interesting foregrounds and tight possibility for a composition, a higher perspective worked better for this image.
By using the element around you, like in this case the natural framing from the bushes, you manage to still fill the frame with interesting subjects.
A common mistake is to always go for a low and dramatic perspective. I, as many others, love the low wide-angle perspectives, but it doesn’t always work. The foreground must be filled with something interesting when doing this approach. Look at the image below. What do you see below the waterfall? Nothing. Just rocks. Had there been water rushing around those rocks, it could have been a very exciting foreground, but there wasn’t.

Try filling the frame with what you think is beautiful. This is the reason you should take your camera off the tripod and look through it from different perspectives. Maybe a high perspective fills the frame with much more beauty then a low one, or the other way around!
Dragging the Shutter
I am sure you at some point have seen an image with a white, silky waterfall, and wondered how that is possible. I have been there myself, wondering if it’s even real! I have a much more complete guide on this technique called Long Exposure in one of my most popular guides, The Ultimate Long Exposure Photography Guide, but I will teach you the basics of using this technique when photographing waterfalls.
Let’s take a look at the equipment I mentioned in the beginning of this guide. I mentioned three pieces of equipment that are important for this effect. Tripod, remote shutter, and polarizing/ND filters. It is possible to do this without filters if you are shooting during dusk or dawn, but often it is good to have filters if it is getting brighter outside. This technique is not possible without a tripod.
The silky effect on the water is made by leaving the shutter open for a longer period of time. Depending on the desired effect, this could be anything from a second to hours! Just achieving a shutter of 1 second may be challenging if you are photographing during daytime, even if you shoot with an aperture of 22 (A small aperture as f/22 lets less light inn allowing a longer shutter while a open aperture of f/4 allows much more light inn making it harder to have a longer exposure).
You can get away with using high f-stops, but this hurts your image quality. Therefor, I prefer using a filter to reduce the amount of light getting in, while maintaining my sharpest aperture. As mentioned earlier I vary between a CPL (Circular Polariser) and a soft ND filter.

How long your shutter time should be varies on how fast the water flows and what your desired effect is. In the image above I only needed 0.4 seconds to get the soft effect as the water was falling hard. On other occasions you may need a shutter of up to a second before you get a properly blurred waterfall.
Using a long exposure doesn’t come without challenges though. Often, when shooting in a river, you notice that the leaves, bushes, or trees around you are moving in the wind. Even though you have a nicely blurred waterfall, you may also get a blurry surrounding that you don’t desire. Fixing this isn’t an easy task, but there are a couple of ways to do it.
Wait for less wind – Need I explain? You can always try to wait and hope that the wind eases. Some times you could be able to get a couple seconds where it is completely still, which is just enough to capture your shot.
Change your shutter speed – You may try to shoot with a quicker exposure, hoping that this will freeze the motion of the surrounding nature. Doing this will however risk loosing the silky effect of the waterfall, and you should choose whether you desire a silky waterfall but some movement in the surroundings, or no motions in surroundings but also not a silky waterfall. Try to set the shutter speed to the point were you just get the desired effect on the water, and see if the rest is sharp.
Capture multiple exposures – This technique is more advanced, and demands knowledge in editing software such as Photoshop. First, you take one exposure where the waterfall is exactly how you want it; then you take another shot where you use a quicker shutter speed that freezes the surroundings. You then blend the two images together in Photoshop, and you’ll get a perfect waterfall and a sharp image.

Time of Day
Just like any other part of landscape photography, the light is very important to get a good shot. Normally most photographers shoot only at dawn or dusk, is it the same for waterfalls?
Yes and no. Did you learn something from that answer? I doubt it, so let me explain!
The light is always at the best during sunrise or sunset, due to the sun’s low position in the sky giving a soft light. When photographing a waterfall in broad daylight, you will find that the water is shining and may even have a metallic look. The surroundings also have hard light on them, which results in a lot of less attractive glare. This is not a problem when the sun is low in the sky, as you then get soft light and not that ugly hard light everywhere. So yes, dawn or dusk is a great time for photographing waterfalls.

You’re still wondering about the “no”? Fine I’ll explain that too. Even though sunrise and sunset is optimal, you can often photograph waterfalls during midday. However, the weather should be cloudy, so you avoid getting the hard light from the sun. If it is overcast, the sun won’t create a hard light and nasty glare on the water, so it is perfectly possible to take great pictures.
I’ve got many pictures of waterfalls during overcast days that I’m pleased with, but I still believe that the most magic light is achieved during sunset or sunrise. It’s at those times you can get the golden light everybody loves in your picture.
Staying Dry!
I mentioned earlier that when you are photographing waterfalls, you may find yourself in the middle of a “splash zone.” This leads to a wet camera and a wet you! Here are some tips to keeping your camera safe and avoiding unwanted spots on the images.
A lens cloth, or microfiber cloth, is something I always recommend to bring when you’re photographing waterfalls. You will often be doing the “wipe-shoot-wipe” technique, meaning you wipe your lens clean of any spots, take a picture, then wipe it again before taking the next picture. If you are shooting with another person, taking turns shooting and wiping each other’s lenses might be a good idea.

The shot above is a typical example of when the “wipe-shoot-wipe” technique is used. I was standing in the middle of a splash zone, with the wind blowing right at me, and both my camera and me were soaking wet. Even though I was wiping between every shot and using a shutter of less then one second, I had a lot of wet spots on the shot that needed to be removed in post processing. I did manage to reduce the amount of wet spots by using a quicker shutter speed and keeping my lens covered as much as possible.
Since I was basically standing in a shower, the use of a rain cover may have saved my camera from a early death. Using such protective gear may ensure your camera has a longer life, and save you a lot of money. Well worth the investment, and you don’t even need to buy the most expensive cover.
Summary
Let’s have a quick recap of what we’ve learned.
Having the right equipment is important if you want to walk away with a good picture of a waterfall. A sturdy tripod is the most important piece of gear, as this makes sure the camera is steady and reduces vibrations. A remote shutter release will also decrease any vibration. Bringing a lens cloth and an air blower will help you get a clean, sharp image, as well as making your job of post-processing easier.
You can either use a filter or shoot with a narrow aperture to lengthen the shutter speed and get silky smooth water. To keep image quality high, I recommend using filters such as a CPL or ND Filter rather than an f-stop of f/22.
Photographing waterfalls is best done during sunrise or sunset, but is also acceptable during overcast days. Photographing during midday in harsh light will destroy the image.


Leave a reply