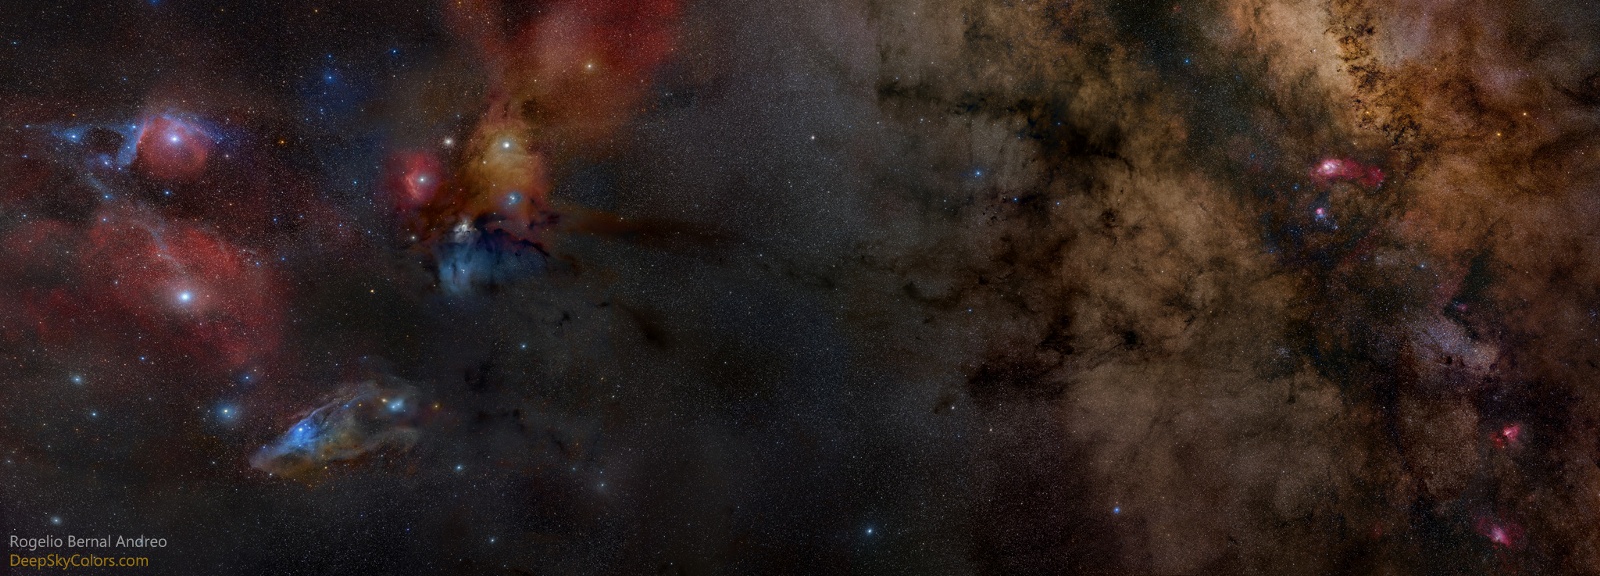
Rogelio Bernal Andreo is a Spanish-American astrophotographer. He is considered by many as one of the most influential astrophotographers today, having received numerous international awards. His astrophotography work has been featured in television shows (notably, the 2014 revival of Carl Sagan’s “Cosmos” series; plus, BBC, National Geographic, Discovery Channel), international publications, museums, and even in motion pictures such as IMAX Hubble 3D. To date, his images have been selected more than 30 times for NASA’s Astronomy Picture of the Day.
In this exclusive, three-part tutorial series, Rogelio shares everything you need to know about creating Deep-sky images—from gear to techniques. Read on for the final installment of the series. Below, you’ll learn how to improve your workflow and enhance your astrophotography with some step-by-step post-processing tips and tricks. Scroll down!

In the Darkroom
by Rogelio Bernal Andreo
Don’t miss out on the other parts of this tutorial! Check out the links below:
PART 1: GEAR
PART 2: SHOOTING
PART 3: POST-PROCESSING (Scroll down & read on!)
In the last two tutorials of this series, you read all about the budget-friendly astrophotography gear and shooting tips and techniques for your first Deep-sky photo session. Now, in this final tutorial, let’s take your workflow to the next level by enhancing your images with some post-processing techniques.

The tasks
Pre-processing and post-processing a deep sky image is very different than processing a daylight image or even night shoots. In particular, pre-processing is a very rigorous process with no room for creativity. At this point, you don’t have an image, you have data.
Here are the steps to produce a Deep-sky image from a stack of “subs”:
1. Calibrate your subs: dark subtraction and flat field correction
2. Register (align) your subs
3. Stack (integrate) your subs. The image generated is called the “master light”.
4. Crop
5. Remove gradients
6. Color balance
7. Deconvolute your data (sometimes, we won’t cover it)
8. Delinearize your image
9. Time to have fun: histogram, curves, contrast, saturation adjustments, etc.
Assuming you already have a photo editing software such as Adobe Lightroom or Adobe Photoshop, you can do most of these tasks without having to purchase new software. Let’s break it down a bit.
We will use data from a picture of the Horsehead and Flame nebula that I captured back in September 2008, when I was still using a DSLR camera (I’ve only used CCDs for Deep-sky imaging since December 2008). This is the image data:
Camera: Canon 40D
Telescope: TeleVue NP101-is
Exposure time: 40 minutes total (4×10: 4 minutes per subexposure. 11 subs).
ISO: 800
Sky darkness and conditions: Very dark (21.4+), clear, average seeing.
Creating your Master Light
To perform steps 1, 2 and 3, you can use DeepSkyStacker. DeepSkyStacker is not the most sophisticated tool to generate your master light image, but it’s free and for that price, it’s an amazing software and very easy to use. Rather than rushing you through a crash course in DeepSkyStacker, it is much more recommendable that you visit the site and check the software’s documentation. There is a wealth of information there, and while I know you’re probably eager to see how your first Deep-sky image actually looks like, please remember that the calibration, registration and stacking processes are extremely important, and they will make a big impact in your final image, so take your time to learn. It will be worth it.
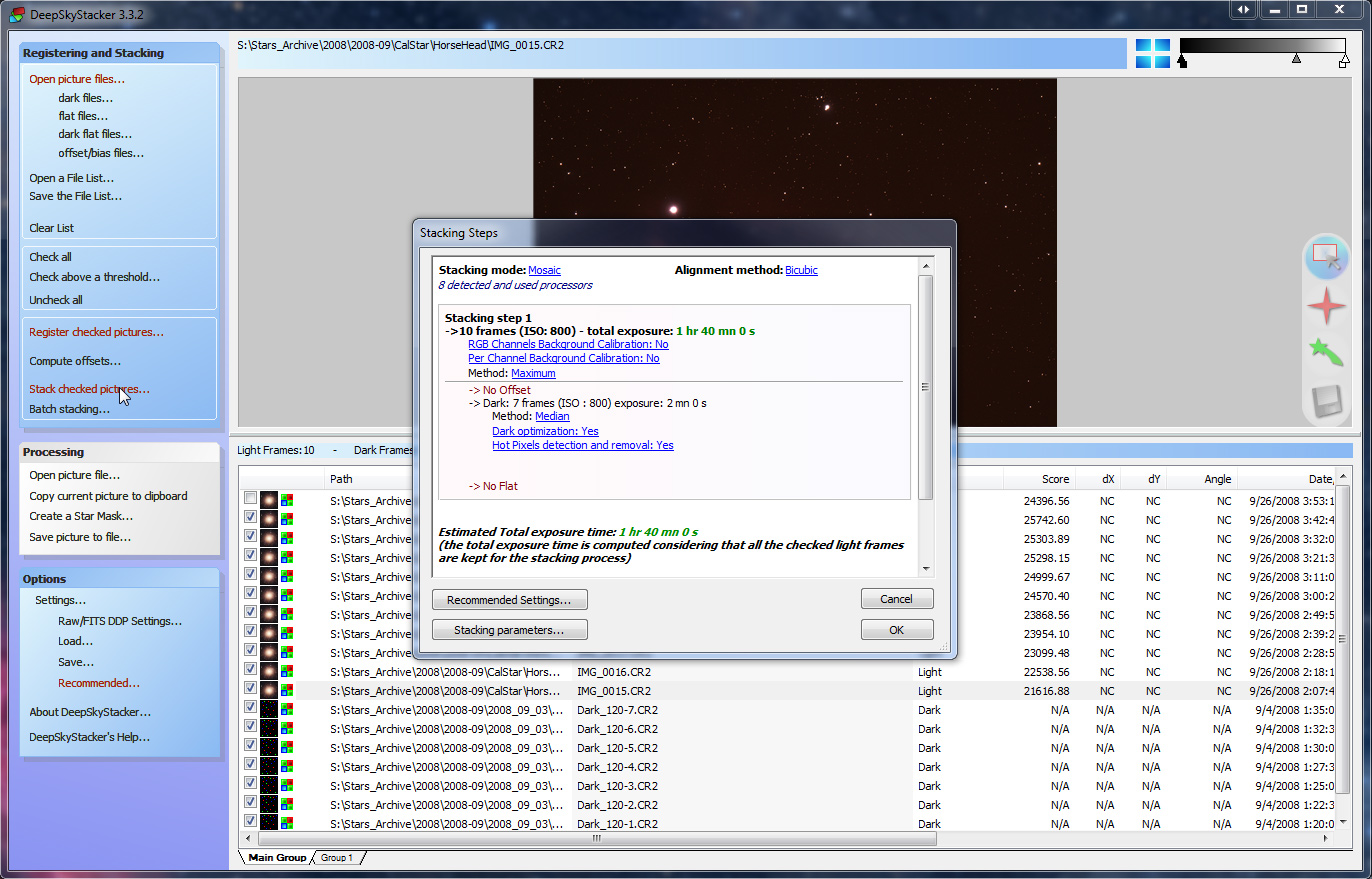
DeepSkyStacker is an easy way to produce our “master light” image.
Once DeepSkyStacker has finalized the calibration, registration and stacking processes, it will generate a new image: your master light!
Where is my nebula/galaxy?
Assuming your master light was in TIFF format (you can configure DeepSkyStacker to produce a TIFF or a FITS format, FITS being a format commonly used in the astronomy field), you probably rush to load it into Lightroom or Photoshop, only to realize that your image is mostly black, with the histogram extremely narrow and all the way to the left.
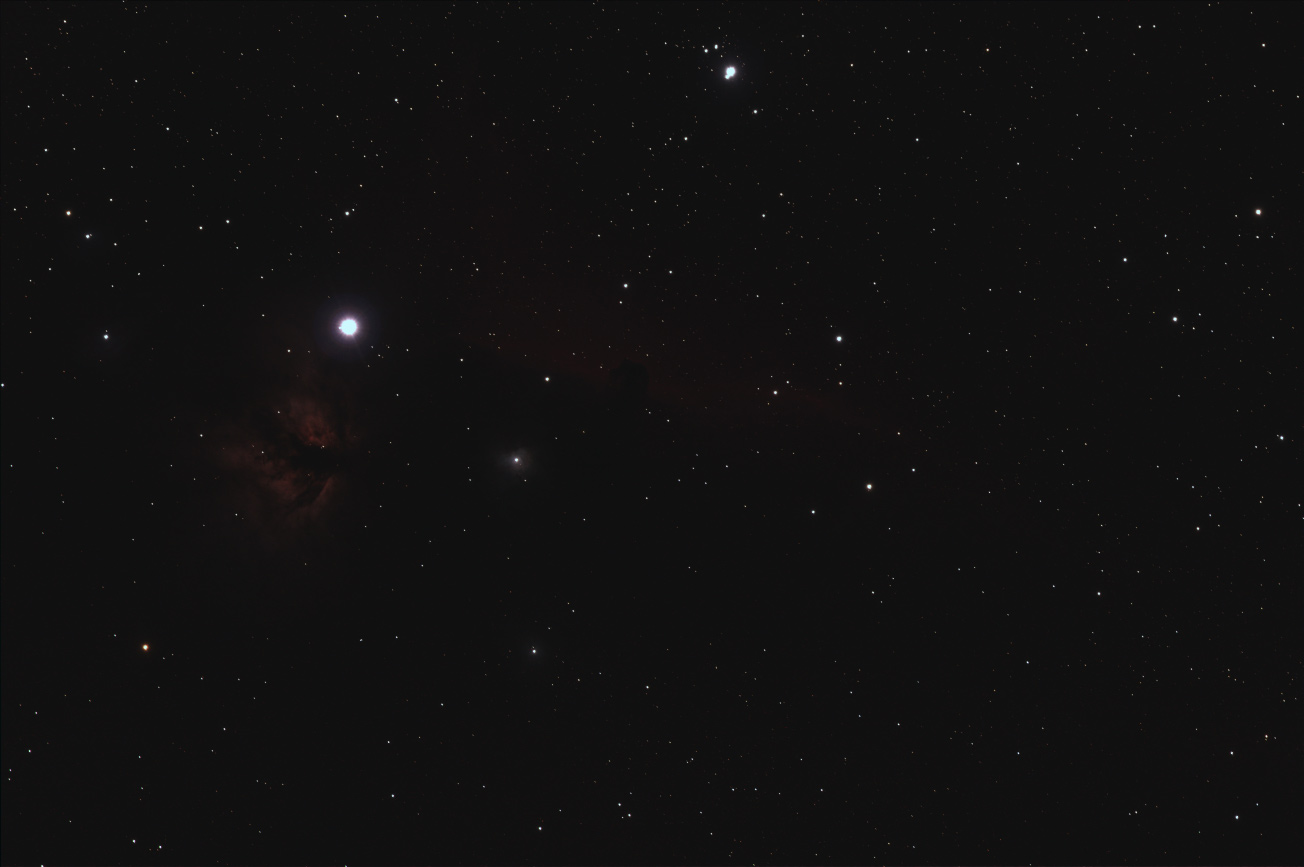
RAW Deep-sky images are usually extremely dark.
You can, and I won’t stop you, skip steps 4 to 7 and instead pull the Levels tool and adjust the histogram by moving the midtones slider to the left and possibly adjust the black point. This should start to reveal some of the faint signal you just captured and you might be tempted to just continue making adjustments to brightness, contrast, noise reduction, color saturation, etc. Again, I will not stop you. However, if you want to get the most out of your data rather than a quick fix, don’t do it. Stay with me, and you will already be ahead of many Deep-sky photographers who once chose to ignore these steps.
Linear Processing
Your master light contains linear data. A linear image is an image where the brightness of a pixel is proportional to the amount of light that was recorded by that pixel. As mentioned before, astronomical images are very dark, and while our instinct would be to break the linearity of the image (that’s what you do when you move the midtones slider in the Levels/Histogram tool) to see what’s there and continue beautifying our image, there are a number of things that must be done, and can only be done properly when the image is still linear.
The problem is, software applications such as Photoshop or Lightroom cannot show us what’s in those images unless we “stretch” the histogram, breaking the linearity. Welcome to the mother of all Deep-sky image processing applications: PixInsight.
PixInsight is a software application available for Windows, MacOS and Linux specifically developed to solve the problems we typically find in Deep-sky images. While a course on everything PixInsight can do would require a lengthy book, I will guide you through the basic steps. You will have to download an evaluation version from PixInsight.
We open our master light image in PixInsight. We go Process > IntensityTransformations > ScreenTransferFunction and click on the yellow atomic symbol. This will auto-stretch our image on the screen, but without actually modifying our data. We now can “see” our data in linear form! It may not look pretty, but that doesn’t matter at this point. This process of being able to stretch our image on the screen without altering the actual image is commonly referred to as screen stretch or, in PixInsight-speak, STF (for ScreenTransferFunction).
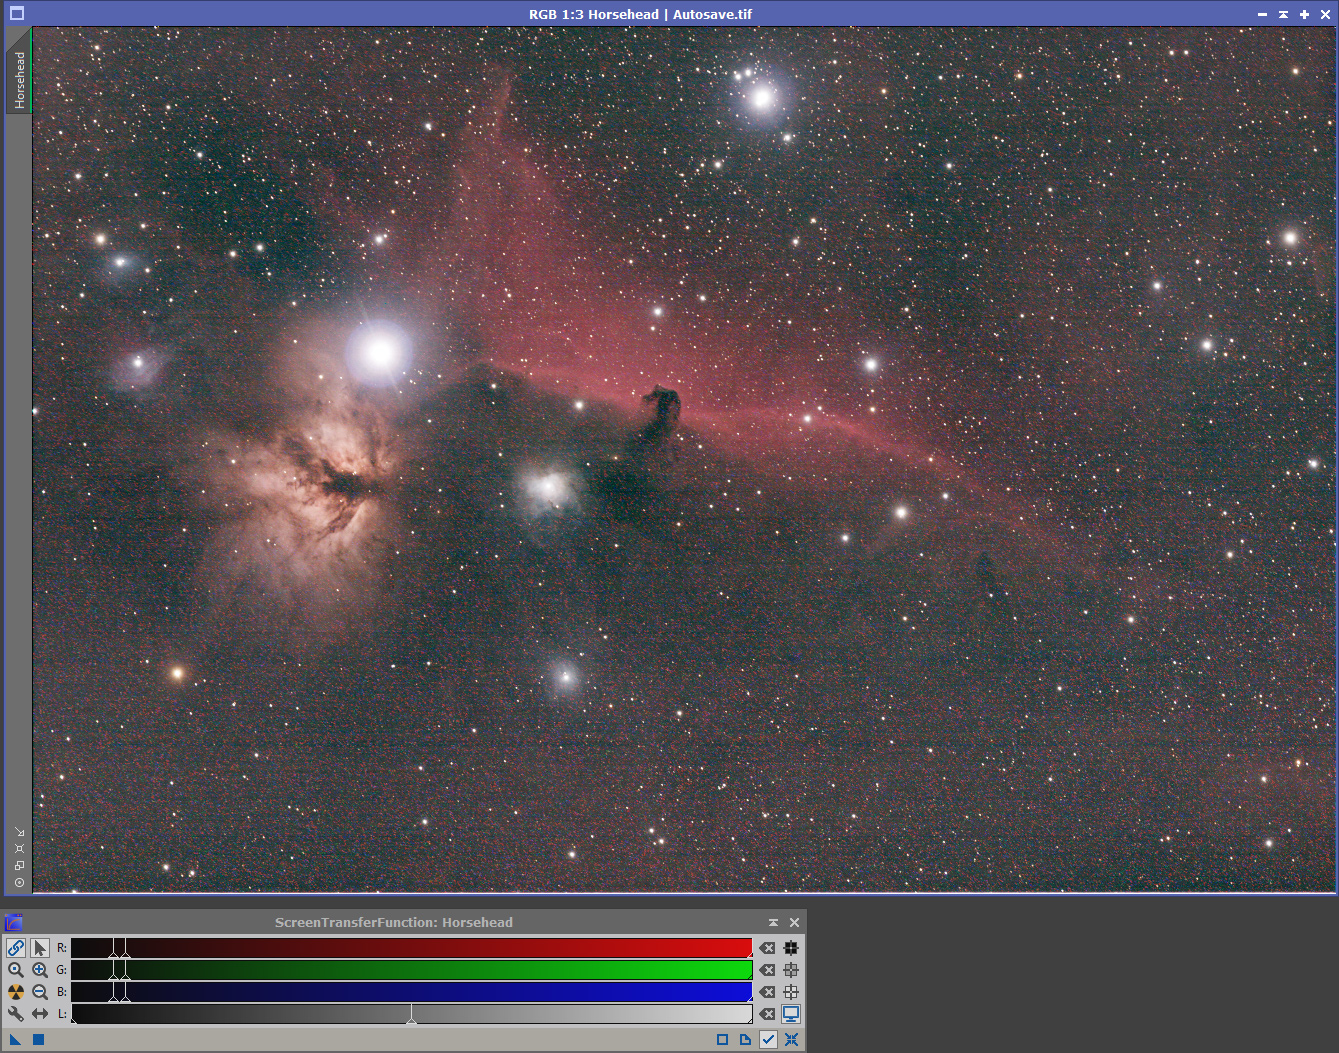
With one click, STF allows us to see what’s in our image without modifying it.
We now may see the borders of our image out of alignment, due to the registration and stacking of several images we previously did. To crop those out we do Process > Geometry > DynamicCrop , draw the area we want to crop (you can adjust it after you’ve defined it), and click the green checkmark in the DynamicCrop dialog to apply. We can now close the DynamicCrop dialog. After that, let’s click on our image and press Ctrl-A (Cmd A on the Mac). This does a new screen stretch of our image, based on its current values.
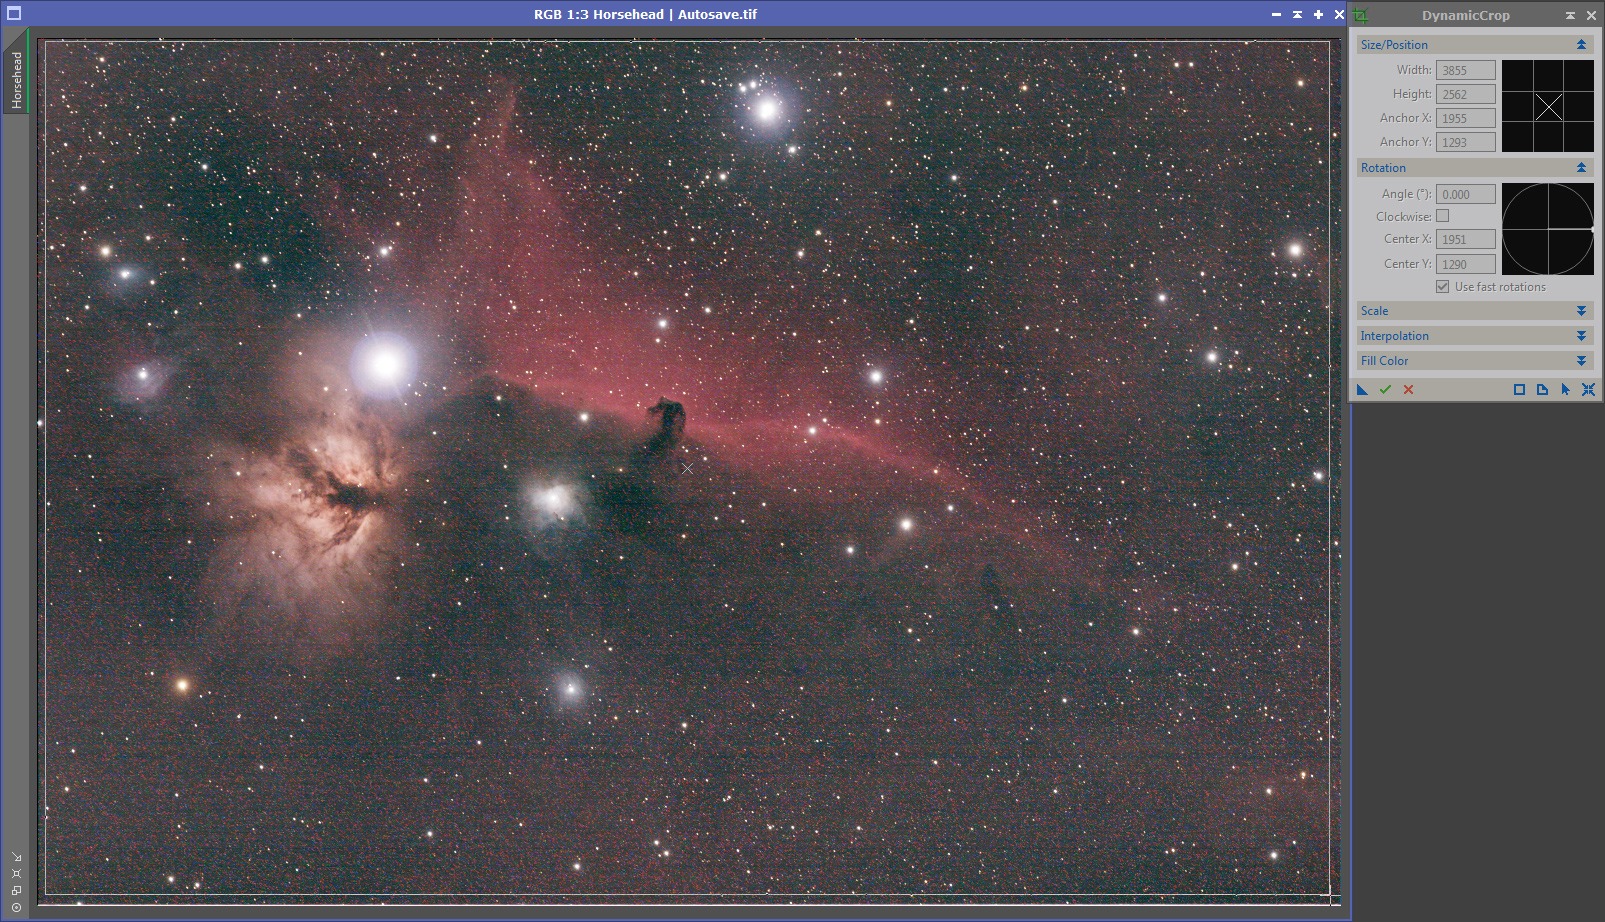
We use DynamicCrop to remove “bad” edges.
The next step is to remove from our image a very common problem in Deep-sky imaging: gradients. A gradient is unwanted signal added to our image that comes from the natural or artificial brightness of the sky. Chances are you have gradients in your image, or worst, vignetting. Flat fielding corrects vignetting, but the only way to correct gradients is by using a background modeling tool to replicate the gradient, then subtract it from our original image.
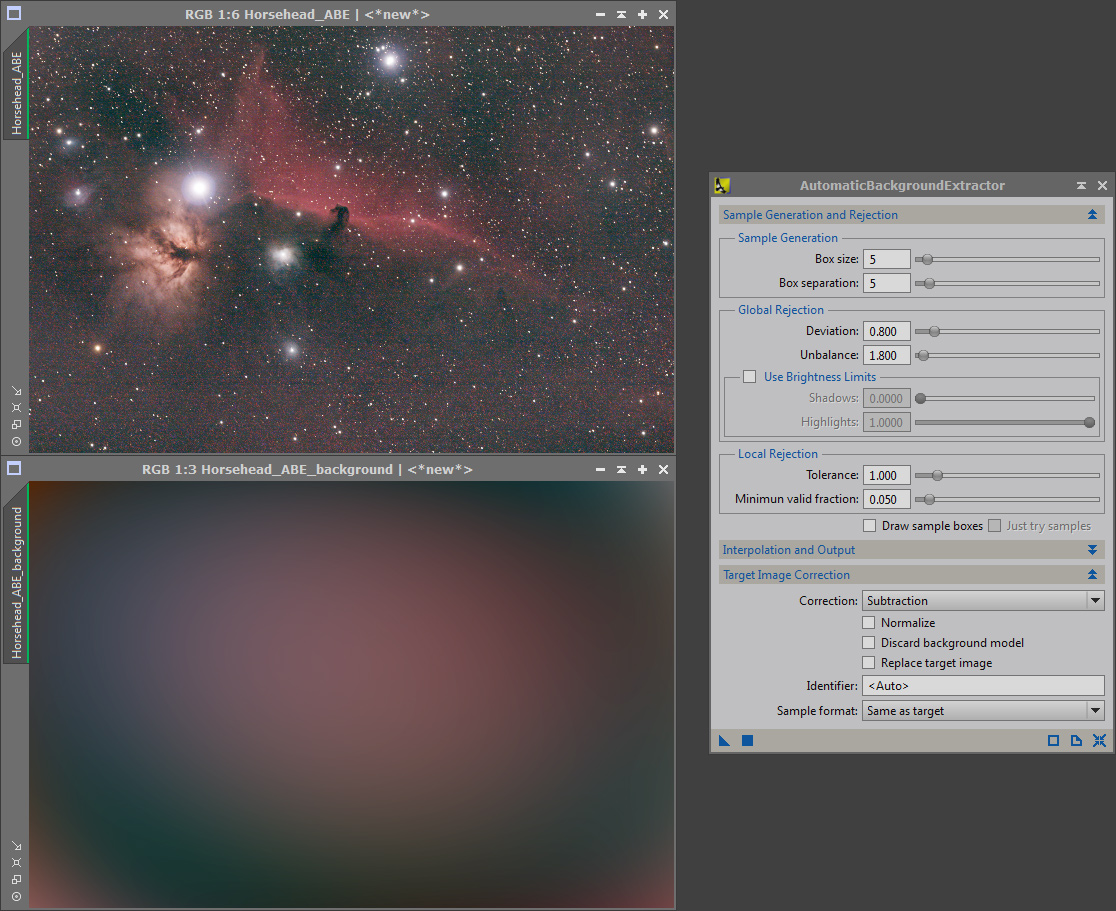
ABE creates a background model of a gradient in our image and subtracts it.
Luckily, PixInsight offers two excellent tools that deal with gradients: AutomaticBackgroundExtractor (ABE) and DynamicBackgroundExtraction (DBE). ABE does most of the thinking for you, while DBE is a lot more sophisticated. We’ll use ABE for now by going to Process > BackgroundModelization > AutomaticBackgroundExtractor. In the dialog box, we click on Target Image Correction and change the option Correction to Subtraction and then we drag the small blue triangle on the bottom-left corner of the dialog box and drop it over our image. When ABE is done, it would have generated two images: the background model it created and the corrected image. In order to see the results we’ll have to screen-stretch the image, so we do STF again (Ctrl-A) with the new image selected. That was easy!
You can STF the background model as well. Even though it won’t look like much, it’s always interesting to have an idea of what has been subtracted from our image.
In the process of removing the gradients, the image created by ABE also has a more neutral background, producing a more accurate color balance. To further refine color balance in the image, we run the ColorCalibration tool (Process > ColorCalibration > ColorCalibration) and simply apply the default values by dragging the blue triangle over our image. Of course, it would be beneficial to understand all these and many other tools PixInsight has, and what all those parameters mean so we can fine tune our results, but for now, the default values tend to do a decent job most of the time.
At this point we can start to get a bit more wild and into the artistic side of Deep-sky photography, finally!
Nonlinear Processing
Now that we’re done processing the image maintaining the image’s linearity, we deactivate STF (Ctrl-F12, Ctrl-S on the Mac) and do our first midtones (non-linear) histogram adjustments. We go Process > IntensityTransformations > HistogramTransformation. The HistogramTransformation is an amazing tool compared to Photoshop’s Levels tool. You can zoom in and out of the histogram and do many other things. Click on the icon that looks like a folded page (right-bottom corner, second icon from the left) for comprehensive documentation on histogram adjustments and this particular tool.
We click on the circle icon (bottom-left corner) to open the Real-time preview window and typically you will move the black point to the point where the histogram starts to rise from the left, and move the midtones to the left until the image looks sufficiently pleasing for a first adjustment. Don’t go too far with either the midtones or the black point or the noise will start to be too obvious. To apply, close the Real-time preview window, drag the blue triangle in the HistogramTransformation dialog box and drop it on your image.
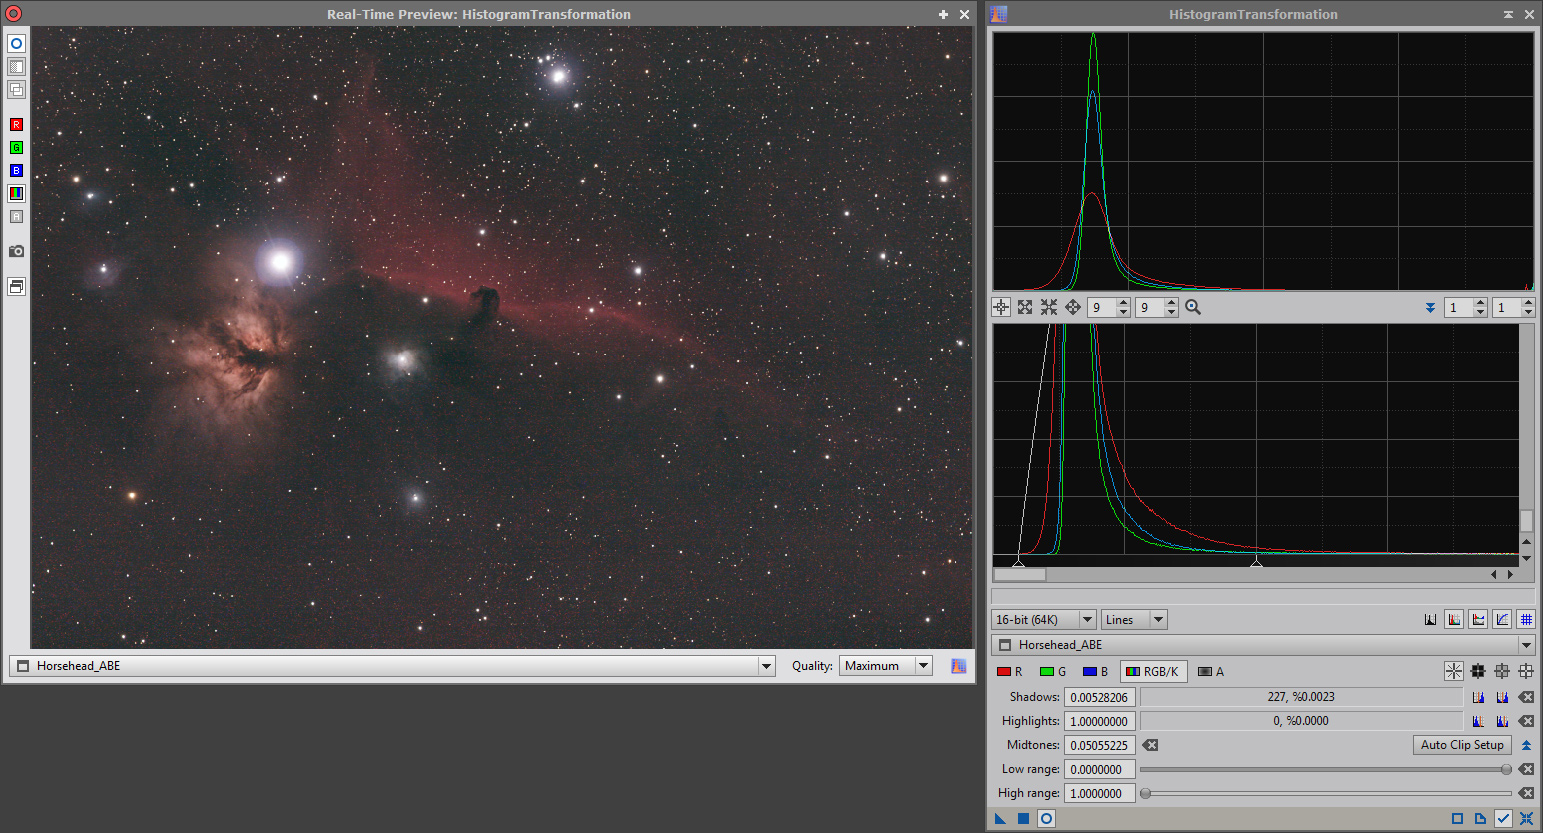
PixInsight’s powerful HistogramTransformation tool
By now you may have noticed that PixInsight uses an object-oriented environment, where a process – such as HistogramTransformation – does not depend on any image. While it may feel a bit unusual at first, most people agree that with a bit of practice, it’s a much more productive and fun environment to work with. Your mileage may vary, of course!
At this point you have a plethora of tools and procedures you can use to further improve your image. You’re probably familiar with some of them: noise reduction, sharpening, color saturation, contrast, etc. Other procedures very specific to Deep-sky imaging will eventually become evident as you demand more quality from your images: generating star masks for a number of tasks such as increasing color in stars or increasing/reducing brightness, removing “green noise”, etc.
While I would recommend that you learn PixInsight and continue your post-processing using PI (as it is commonly abbreviated, not Pix, Pixi or Pixel Insight), if you’re tempted to move your image to another application, I recommend saving the image as a 16 bit int TIFF file in PixInsight and using that version in the other application. If you continue your processing in PixInsight, your image will remain at 32 bit floating point.
After the histogram adjustment we just did, I continued processing the image with some controlled noise reduction, color saturation, star brightness adjustment and final overall contrast, and this is the final image:
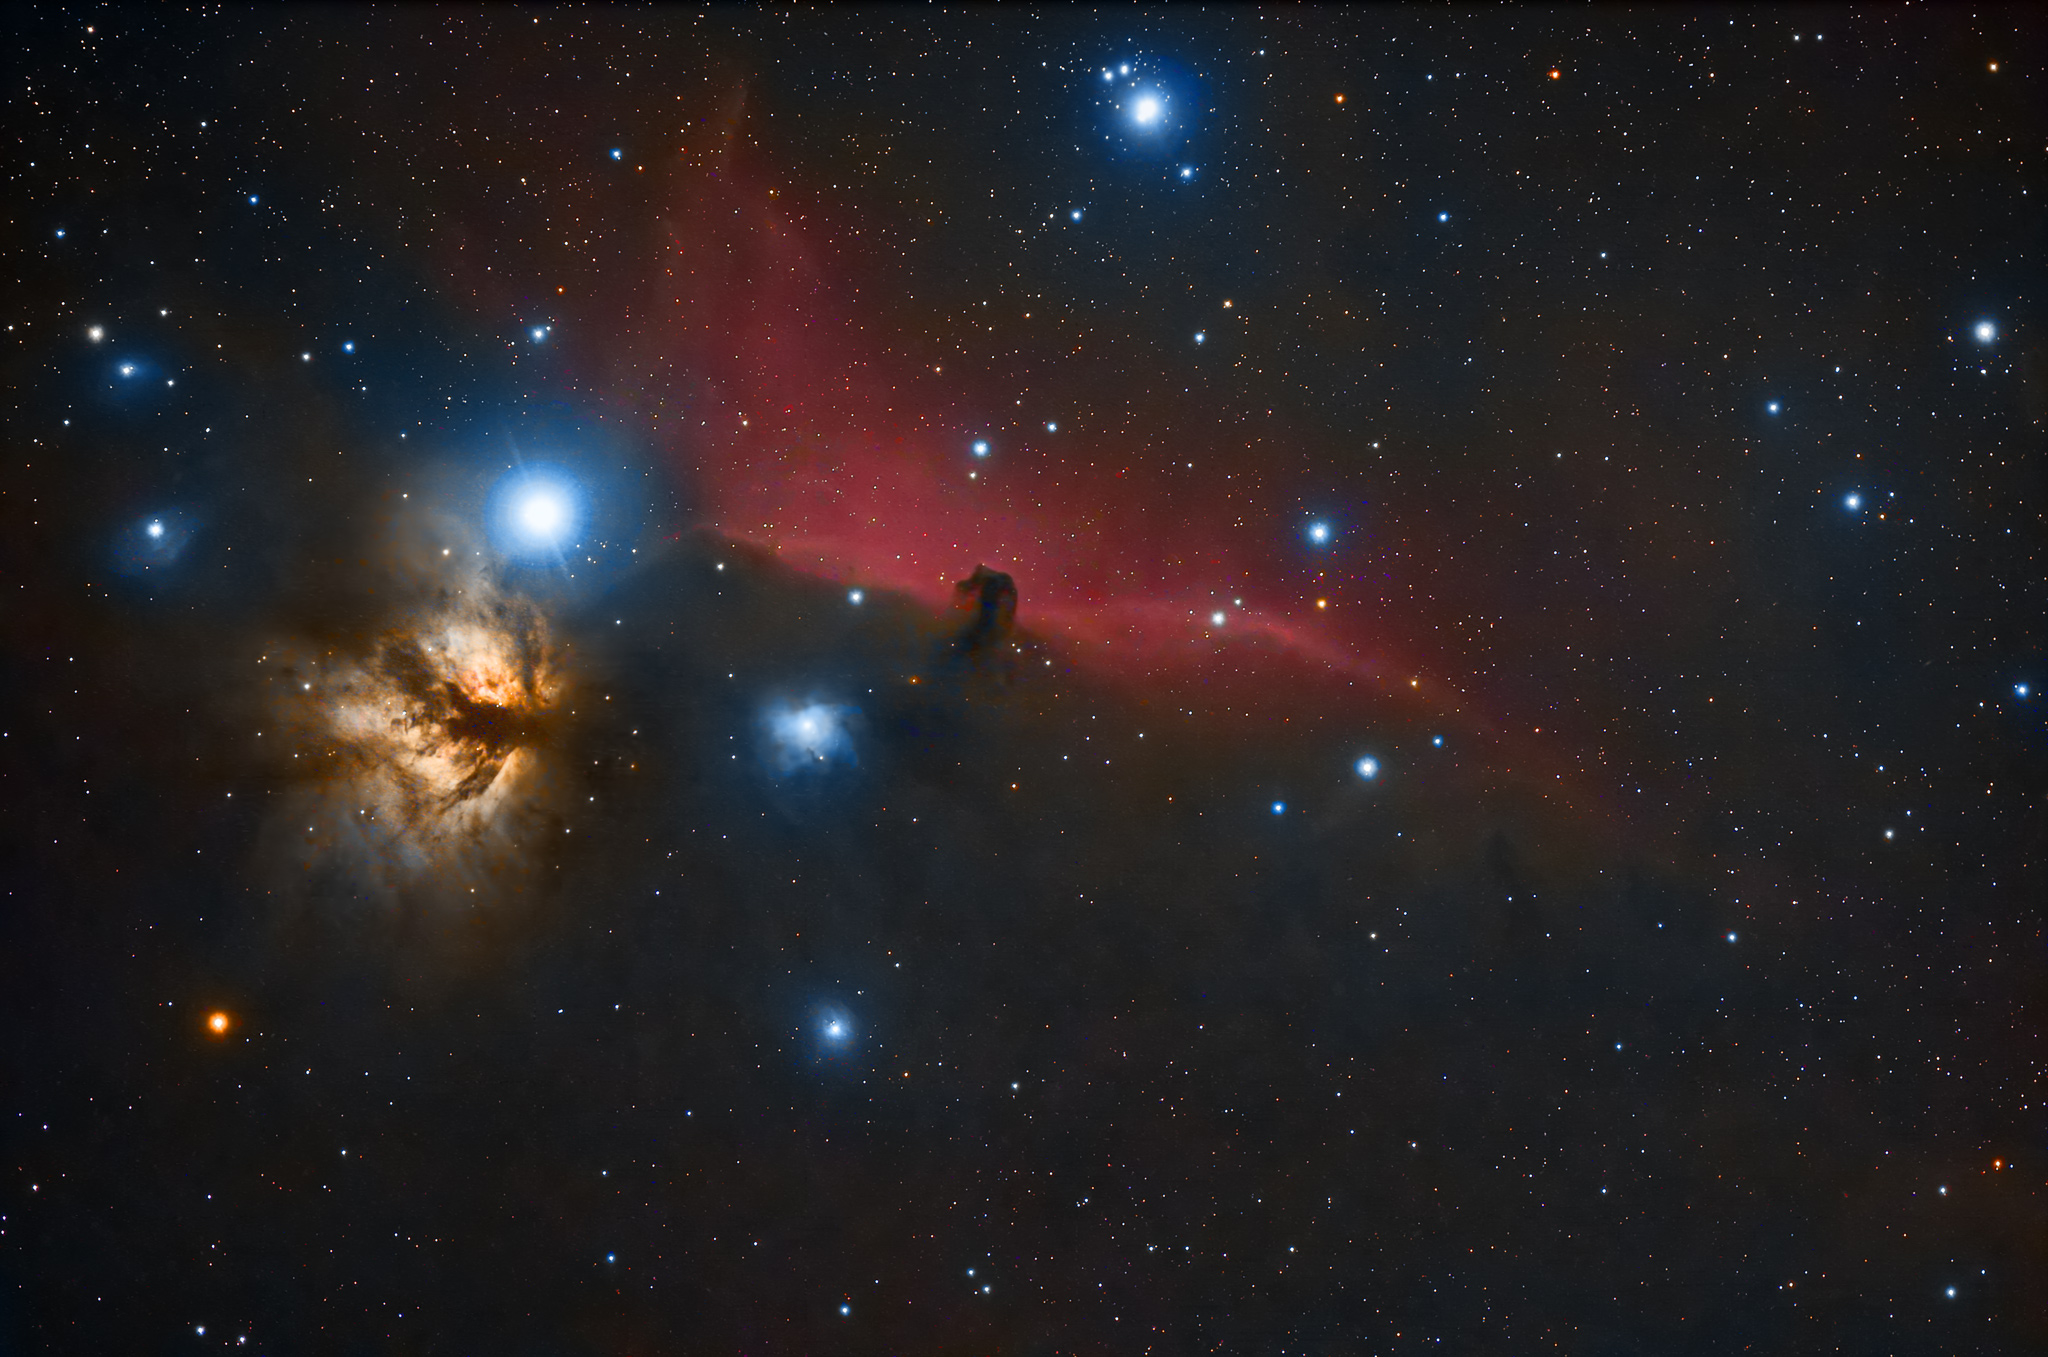
It’s no match for a Hubble picture or even for some fantastic work being produced by many people, but isn’t it amazing? By the way, don’t be disappointed if your first image doesn’t even match this one. Mine didn’t! As you have seen, in Deep-sky imaging there is a great deal of time spent doing things that don’t require much creativity. This means that as all you need to become better at those things is practice, both in the field and in the “dark room”. This practice will lead to capturing better data and to produce a better base image from where your artistic skills can take over to create images much more amazing than this Horsehead nebula.
Congratulations! You’ve just created your first Deep-sky image!
If you have any questions for me about post-processing Deep-sky images, or want to share your first Deep-sky images, leave a comment for me below.
To see more of my work, follow me on 500px, or check out my official website. You can also connect with me on my Facebook page.


Leave a reply