Rogelio Bernal Andreo is a Spanish-American astrophotographer. He is considered by many as one of the most influential astrophotographers today, having received numerous international awards. His astrophotography work has been featured in television shows (notably, the 2014 revival of Carl Sagan’s “Cosmos” series; plus, BBC, National Geographic, Discovery Channel), international publications, museums, and even in motion pictures such as IMAX Hubble 3D. To date, his images have been selected more than 30 times for NASA’s Astronomy Picture of the Day.
In this exclusive, three-part tutorial series, Rogelio will show you how to create stunning Deep-sky images, covering everything you need to know to get started—from a gear guide to post-processing techniques. Read on for Part 1 of 3, where you’ll learn first-time shooting tips and techniques to photograph nebulae, star clusters, galaxies, and other heavenly bodies—from planning to equipment setup!

Shooting Your First Photo Session
by Rogelio Bernal Andreo
Don’t miss out on the other parts of this tutorial! Check out the links below:
PART 1: GEAR
PART 2: SHOOTING (Scroll down and read on!)
PART 3: POST-PROCESSING
In my first article of this series, you read all about the gear and equipment you’ll need for a Deep-sky photo session. Now you’re ready to start the shooting process. Below are some essential beginner’s tips and techniques to consider during your first astrophotography shoot.

Time and place
To take Deep-sky images, you need dark, clear skies. Therefore, you will need to plan your first outing on a night around New Moon, and hope that the weather cooperates. Partly cloudy skies don’t work in Deep-sky photography.
Also, unless you already live in a rural area with nice dark skies, you will need to find a dark location within reasonable driving distance and suitable for astronomy. If you are not aware of any such locations, check your local astronomy clubs for the locations they visit, find how to access them, etc. Never park next to a road, no matter how remote. Besides being dangerous, you will be exposed to car lights ruining your long exposures. A secluded area with low horizons and some elevation works best.

Finding a dark location suitable for astronomy can be tricky. Check with your local astronomy clubs.
The object
It’s time to decide which Deep-sky object you’re going to image. This means you need to know what’s up in the sky on the night you’ll go to take your pictures. There are cell phone apps such as Sky Safari or Google Sky that might help you. Ultimately, you may want to invest in a planetarium software such as The Sky X or Starry Night. They will come very handy when you move to controlling your telescope from a computer – which you will eventually do if you seriously pursue this discipline – but for now they’d be excellent tools to research what’s up at any given night or even how suitable any given target is for your equipment. Don’t worry if you have zero experience trying to find Deep-sky objects in the night sky. The mount will know where to find them. You just need to know their names and a rough idea about how they look like.
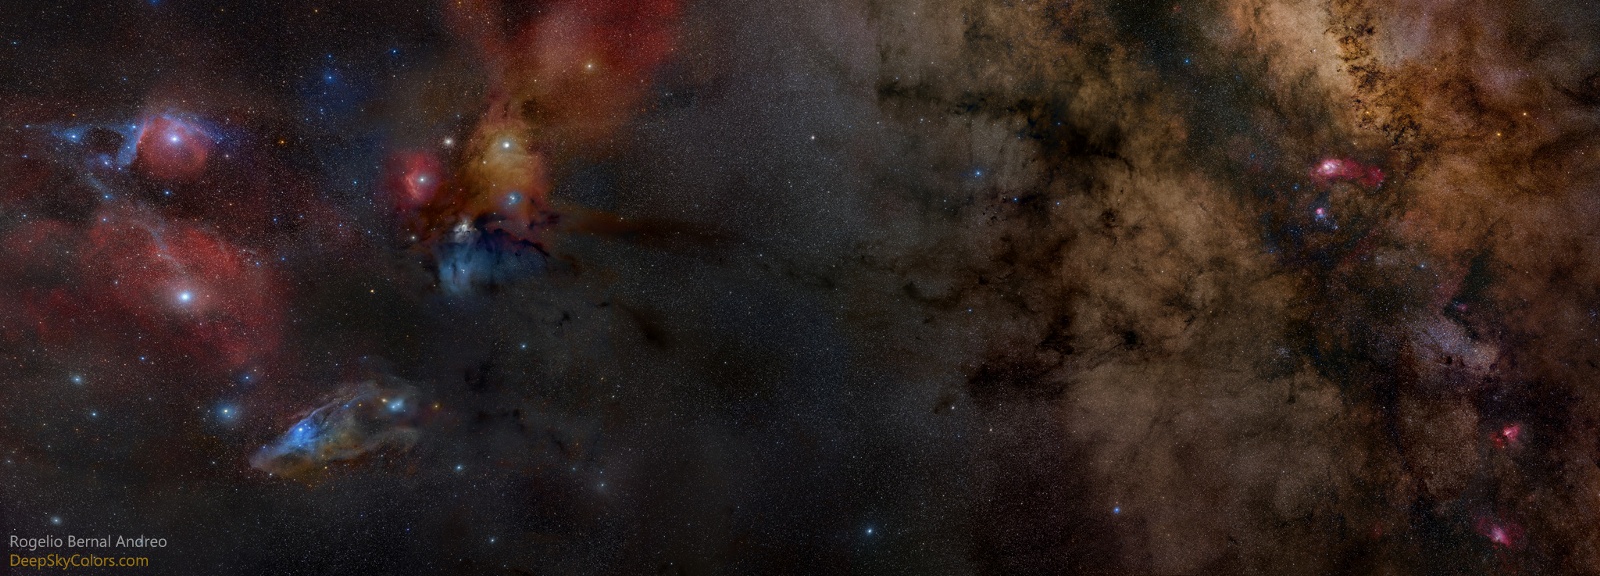
If you live in the Northern Hemisphere, here’s a quick list with a few popular targets and the seasons you can find them in the night sky:
Spring: Leo Triplet, M81 and M82, Virgo Galaxy Cluster
Summer: Lagoon Nebula (M8), M21, M16, Rho Ophiuchus
Fall: Andromeda Galaxy (N31), The Pleiades (M45)
Winter: Orion Nebula (M42), M78, Witch Head Nebula
All these targets are perfectly suitable for unmodified DSRL cameras and a 80-100mm refractor.
Some of these objects can also be found in the seasons before and after per the list above, either in the early or the latest hours of the night, respectively. Of course, in addition to this short list there are countless objects out there! The sky is, literally, the limit! (Sorry, I had to say it.)
You will need to do all this planning ahead: date, location, and object. You can certainly improvise objects as the night goes by, but it’s always better to have a plan.
Setting up
Setting up your rig requires knowing about a few things. You will need to “polar align” your mount, which basically means aligning the rotational axis of your mount with Earth’s rotational axis. Since each mount offers their particular way to do polar alignment, you will need to check your mount’s documentation to learn the process. The goal is to roughly point your mount to Polaris, the Northern Star – so start practicing looking for it at night, use a cell phone app as I mentioned earlier, if it helps – and look through the polar scope which usually displays some star patterns that you’ll need to recognize and match with what you see in the sky. Again, check your mount’s manual.
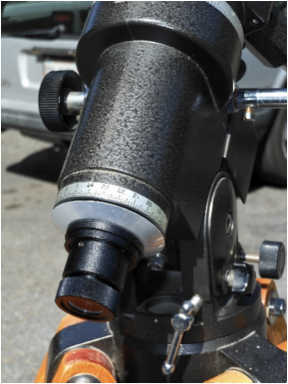
A mount’s polar scope
When you’re polar aligned—or at least as close as you could—you will switch on your mount and the mount will start tracking, that is, moving at sidereal speed, following the stars as they “move” across the night sky.
Next up is aligning your mount. (Not polar-align—we’re done with that.) This process helps the mount learning where it is and where things are in the sky – so that later when you order it to point to a particular object, the mount knows exactly where to point. Once again, each mount has a different alignment procedure, and you will need to read your mount’s documentation for specific instructions about your mount. Most mounts use a two-stars or three-stars alignment procedure, which consist of instructing the mount to point at a known bright star, and after the mount roughly slews to the star, then you make manual adjustments until the star is perfectly centered, and the process is repeated once or twice more. Generally, you don’t need to know where exactly these bright stars are at first. Once the mount slews near the target star, you will usually know which one it is because it’ll be much brighter than any other star nearby. When you’re done with alignment, you’re almost ready to start shooting!
Focusing
Most Deep-sky astrophotographers that have been at it for over one or two years have a very simple method to obtain absolutely perfect focus within one minute, and it only involves slewing the mount to a mid-sized star (magnitude 3 to 4 star) and clicking on a button that says FOCUS from a software program running on the laptop that they have connected to the mount, camera, and electronic focuser. Within one minute, the telescope would be in perfect focus, no guessing involved.
When you’re starting in this discipline, though, things are a bit more, um, elaborated. Still, if your camera has a LiveView LCD screen on the back – as most do nowadays – you should be able to achieve accurate focus within a minute by pointing your scope to a bright star, putting a Bathinov mask on your telescope (here comes another accessory!) and manually focus until the “Bathinov spikes” reveal that your telescope is as perfectly focused as it can be, doing it manually at least.
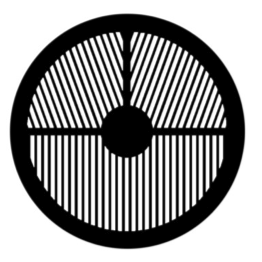
A Bathinov mask, precise focus, fast
Slewing and…shooting!
Now that you’re ready, using your mount’s control pad, instruct the mount to slew to your target, and go for a test shot. You want to make sure your target is in the frame, especially if you had a particular framing in mind.
What camera settings should you use? Being a test shot, just crank up the ISO to its highest and go for 10-15 seconds. If you don’t see anything in the test image that resembles your target, check you didn’t leave the Bathinov mask on the scope! Trust me, it will happen to you sooner or later, as it has happened to almost everyone I know.
When you manage to take a successful shot, hopefully, at least some part of the object should be visible. Otherwise, your mount alignment was not good and it would probably be a good idea to realign it. You can also make manual adjustments to the mount and repeat test shots until you’re happy with the framing. Do not expect these test shots to look amazing, by the way (or maybe yes, it’s a subjective thing). This is also a good time to check the focus by zooming in, using the camera’s LCD screen. Too high ISO may not produce an image clean enough to recognize accurate focus visually on the screen, but it can give you an idea.
We’re now ready to start shooting. First, lower that ISO setting. Since same ISO numbers behave differently in the amount of signal boost, noise and dynamic range produced by different cameras, recommending one ideal ISO number for everyone is impossible. As a general rule, be conservative and target a low ISO number such as 800. If you know your camera behaves like a champ at higher ISO numbers, try them out. Do not go for something too high though. Noise is the worst enemy of Deep-sky imaging. In fact, the main goal of deeps-sky imaging is to obtain the best signal-to-noise ratio (SNR) we possibly can. Warm temperatures also contribute to noise, so you may want to use lower ISO numbers in summer and more aggressive values in winter.
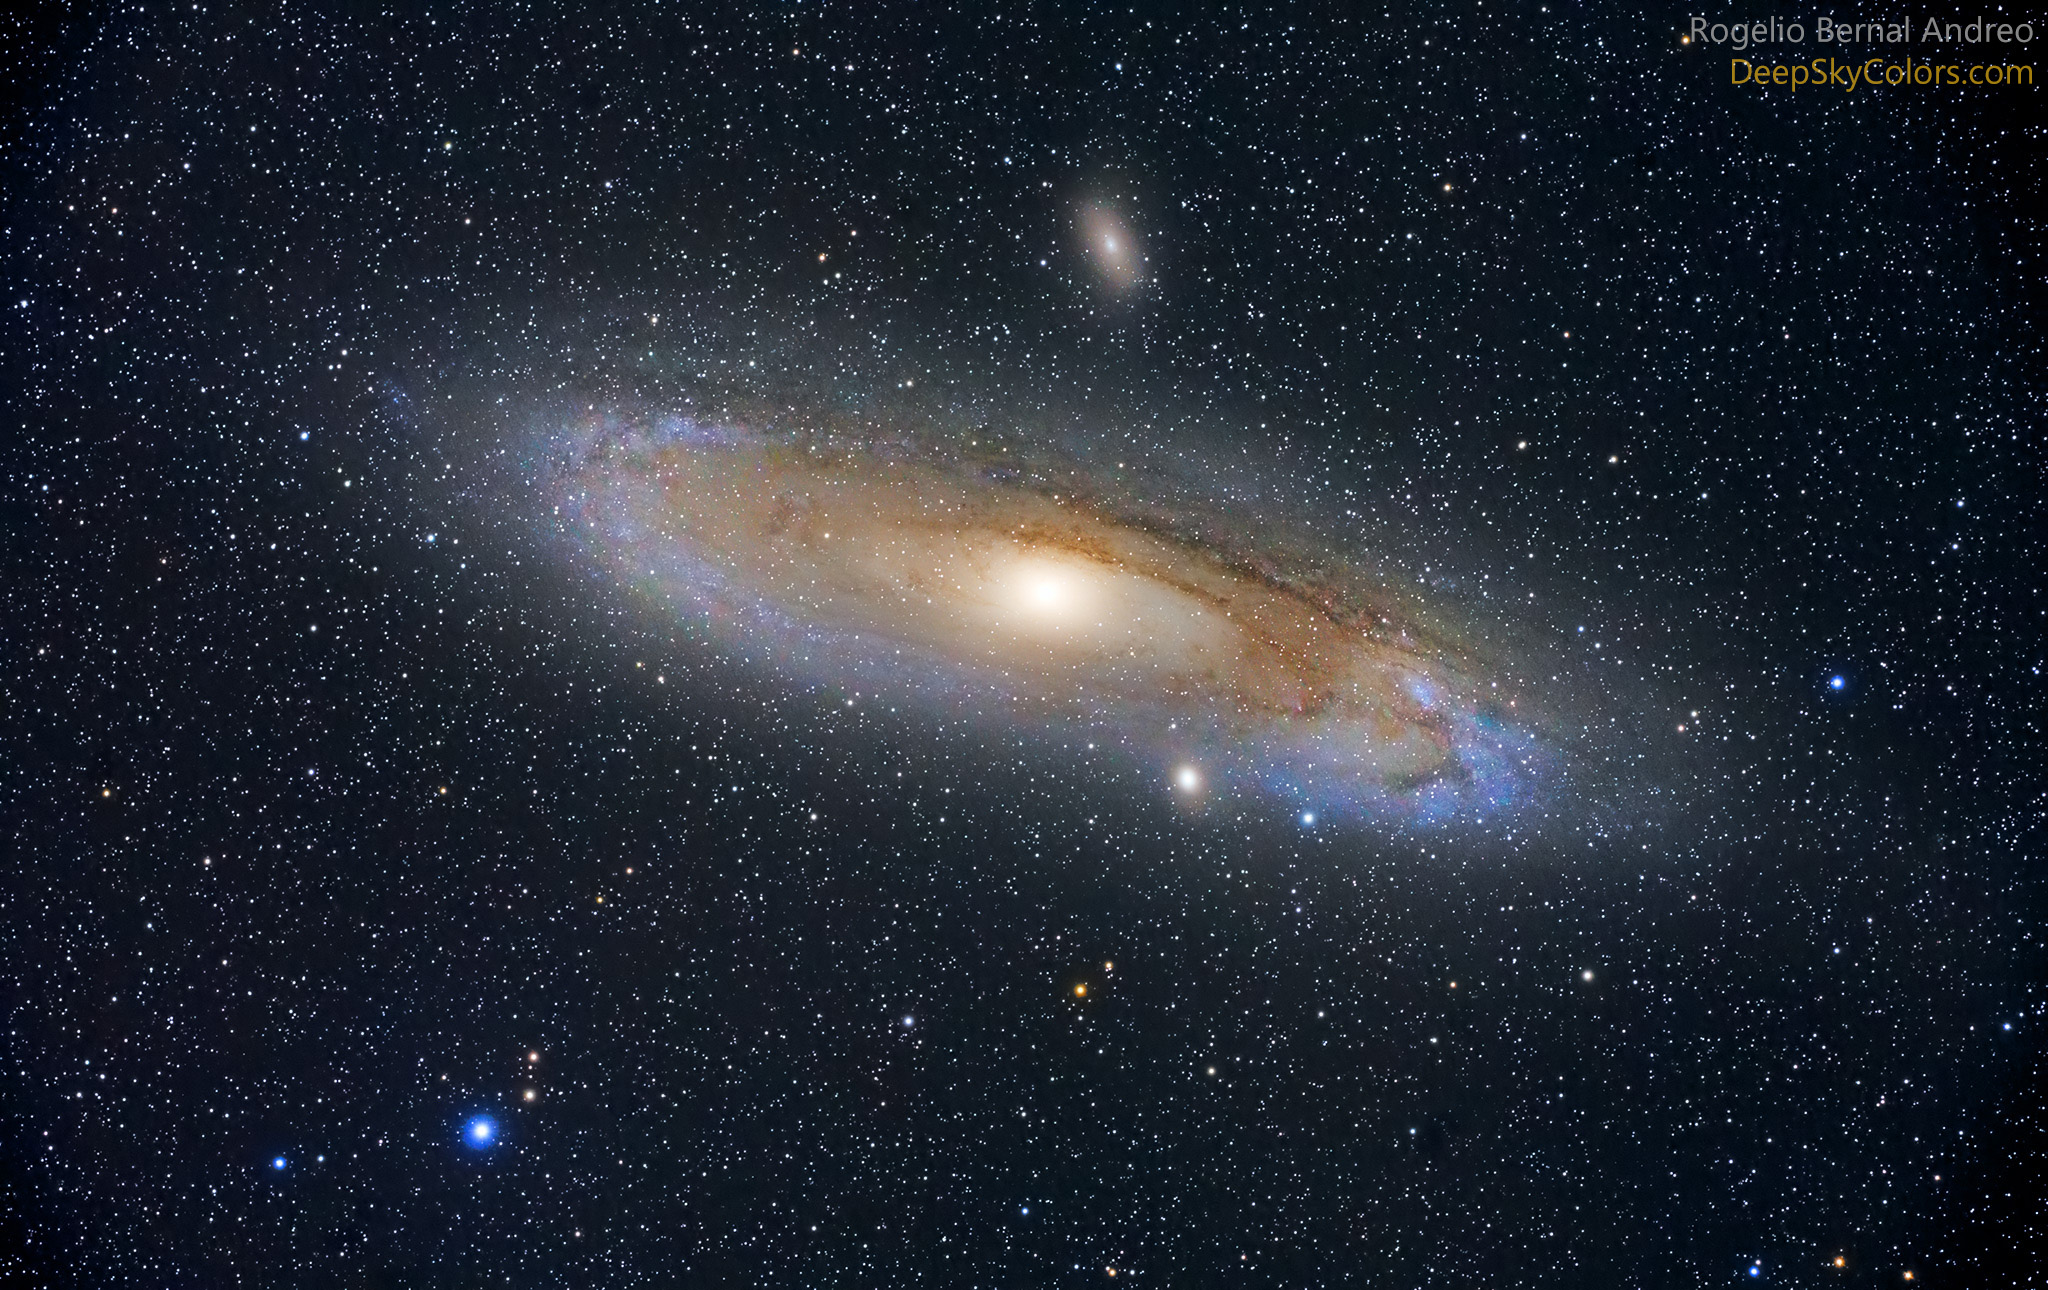
This image of Andromeda was taken with a 5D Mark II and a 500mm Refractor telescope. 20 subexposures, 3 minutes each.
The only other parameter we need is the exposure times. How long should you go? The question is, actually, how long can you go? You’re not limited by your own will, you’re limited by the brightness of the sky and your mount’s ability to track.
Your mount is turned on and it’s tracking—following the sky as it “moves”. This allows you to take images with pointy and round stars with a longer exposure than if your mount was “off”. You will discover, however, that if you take an exposure “long enough”, your stars will start to trail regardless. What? Aren’t we tracking? Yes, but tracking isn’t perfect, mounts aren’t perfect, and here is where you start to get your money’s worth. Remember when I told you to invest 70% of your budget in the mount? At this point you will understand why I said that. Better mounts will be able to track accurately for a longer time than less expensive mounts.
In fact, just by tracking, you probably won’t be able to take exposures longer than 2-3 minutes, maybe a bit more, reaching perhaps five minutes if your mount happens to be working remarkably well. There’s one fairly easy way to overcome your mount’s limitations, and that’s auto-guiding, which allows astrophotographers to take exposures that are many minutes long, sometimes even 30 or more minutes, despite the imperfections of the mount’s tracking system. I won’t cover auto-guiding in this article, but auto-guiding is something that you can look into after having done some unguided (track only) shots. Don’t wait too long, though.
With a track-only setup, try a two minutes exposure and see if the stars are trailing. If they look good, you may want to increase the exposure time to three minutes, and so on. You’re looking for the longest exposure that gives you pinpoint stars. If the stars are trailing, try two more test shots to confirm the trailing, and if so, see how decreasing exposure time affects the trailing. Anything less than two minutes is too short of an exposure. Worst case scenario? Do your best to stay above one minute.
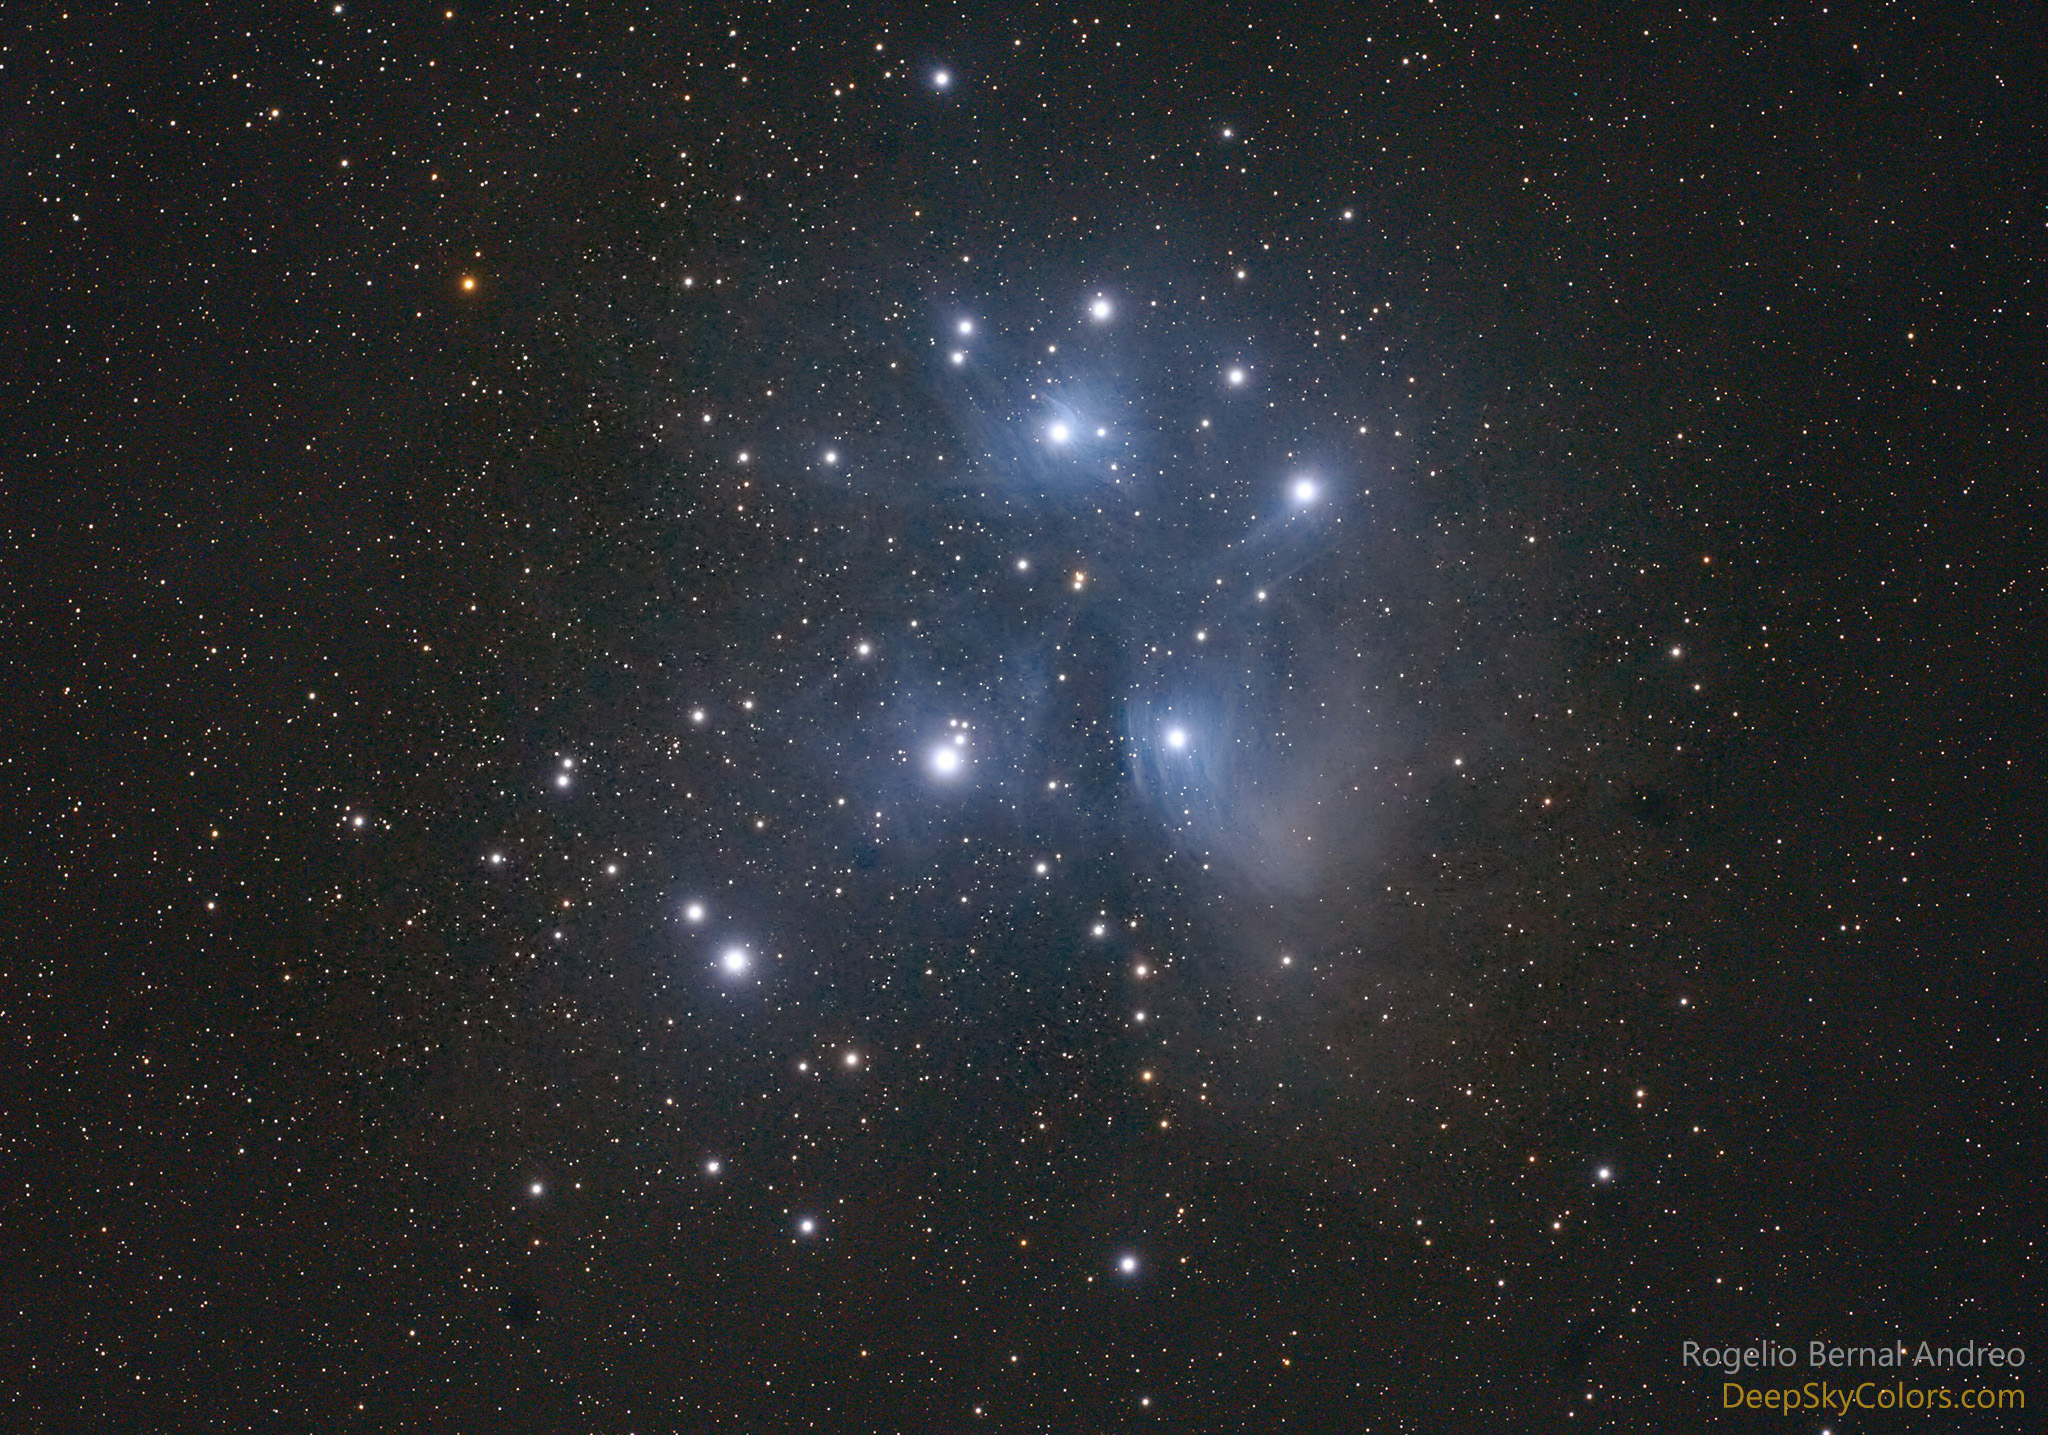
M45 captured with a 5D Mark II and a 500mm Refractor telescope. 12 subexposures, 3 minutes each.
Once you’ve found an exposure length that works, program your intervalometer to take a number of shots at that exposure time. How many? As many as you can! Ten, twenty, thirty! The exposures are short, so don’t fear sitting for two, three hours or more just shooting at this target. Do leave a few seconds between exposures (10-15), do not use in-camera noise reduction, and do not use in-camera dark subtraction. Locking the mirror is also more than just a good idea. Also, check your “subs” from time to time between exposures on the camera’s LCD screen.
When you’ve collected a good number of subexposures, you’ve captured your first Deep-sky image. Congratulations!
This would be a good time to take some flat field shots (commonly known as “flats”) if you happen to have a flat box or a flip-flat, or similar. Google “flip-flat” for more details. However, I will skip taking flats on this first Deep-sky imaging tutorial, but keep it in mind for the next one.
What we will not skip is taking some “darks”. Darks are images of the same exposure time we used to shoot our Deep-sky object, but with the shutter closed. In other words, they’re pictures of absolute darkness. We will later use these darks to subtract dark current “noise“ from our images. You could leave your camera taking darks while you take your rig apart, for example. The temperature also needs to be the same as during the imaging session. Note: if your camera uses a Sony sensor, do not take darks. Sony sensors have very low noise and dark current, and subtracting darks might actually deteriorate your image.
Now that you’ve got the shot, ready to take your astrophotography knowledge one step further, and enhance your images with some post-processing tricks? I will show you how in the third installment of this series:
“Deep-Sky Photography Guide Part 3: Post-Processing Workflow”

To see more of my work, follow me on 500px, or check out my official website. You can also connect with me on my Facebook page.
In the meantime, if you have any questions for me about the shooting process of Deep-sky photography, leave a comment for me below!


Leave a reply