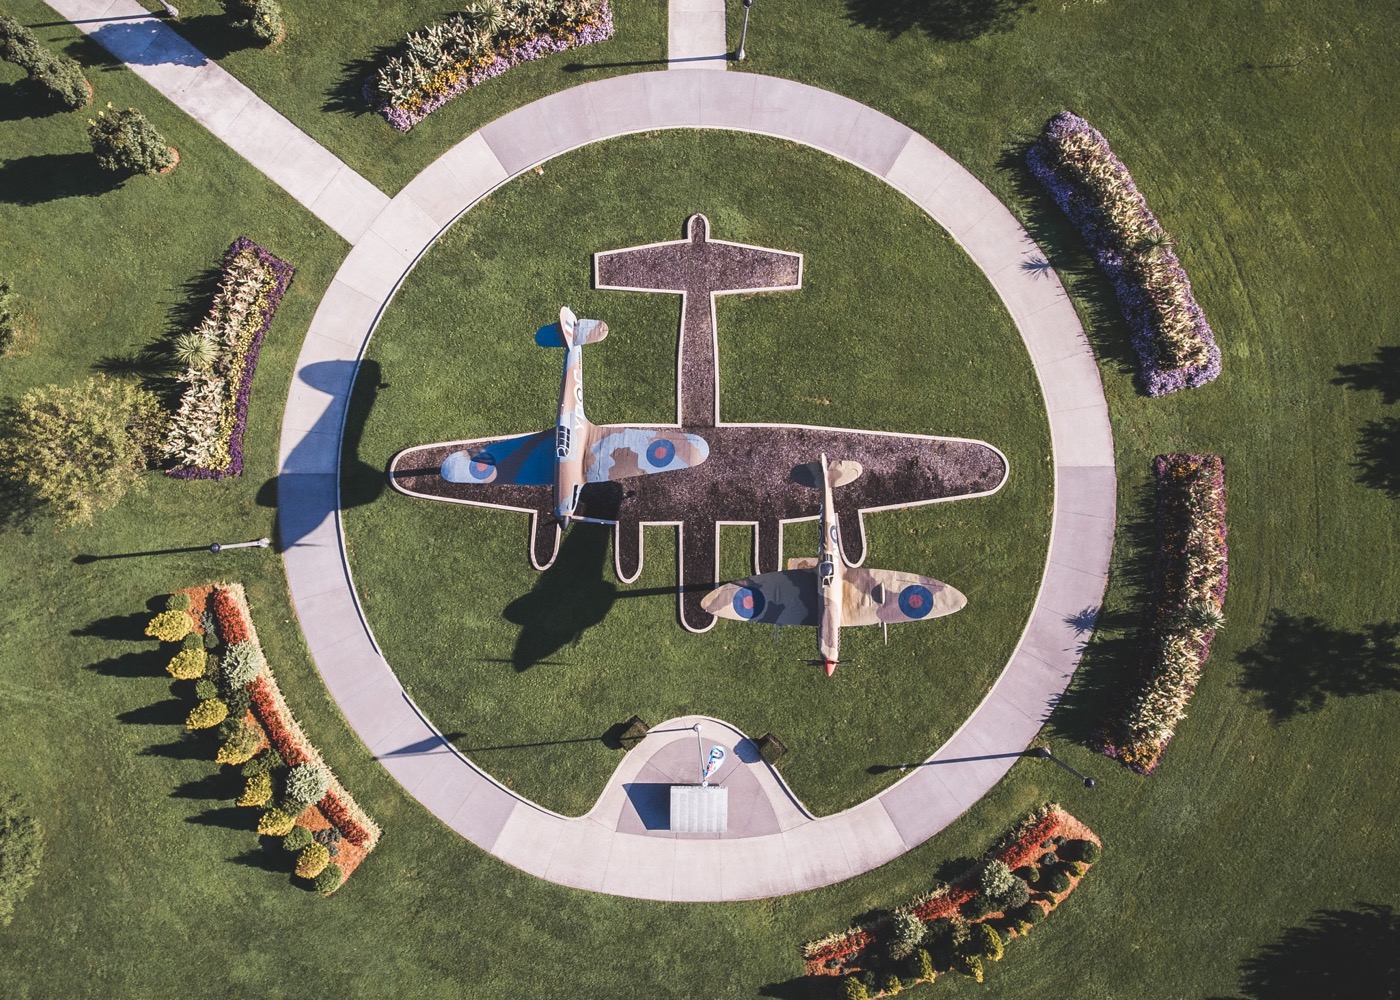
Cover photo: Windsor Spitfires by Michael Tighe
Finding new and unique perspectives is a great way to create interesting and engaging photographs. Sometimes it’s a different emotional or cultural perspective. In the case of drone photography, however, it’s quite literally a new angle on the world around us. Everyday scenes and locations become fresh and fascinating as we see them as we’ve never seen them before—and, in many cases, as they were never intended to be seen.
I started getting into drone photography about a year ago, and to be honest, I regarded it at first as a bit of a fad. I was dead wrong. As I began to come across more and more amazing images shot from drones, I couldn’t resist taking the leap and getting one myself. I haven’t regretted it for a second! It’s been a breath of fresh air, a huge challenge, and a lot of fun. Here are a few tips that I’ve picked up along the way.

1. Be prepared
It’s very important that you’re 100% comfortable and confident flying your drone so that you can concentrate on getting the shot instead of worrying about crashing into the nearest tree and/or lake. Take it slow when you’re first learning. Be sure to understand all of the features and settings of your drone, especially flight and control settings.
If your drone supports changing the control configuration, try the alternatives to see what feels natural to you. I set my Phantom 4 remote to match my usual gaming controls, and it made a huge difference.
You should also get to know any alternate flight modes which can help you out. DJI has a course lock mode which can ensure that your drone always moves in the direction you push your stick, no matter which way it’s facing. This can help avoid a lot of confusion, especially if you’re new to flying.
Finally, know how to correct your gimbal alignment. Sometimes it can get into a weird position, and you’ll want to be able to quickly correct it to straighten out your horizon.
You also need to have your gear prepared before heading out. Make sure your batteries are charged (and preferably you have one or two spares), your firmware is up to date, your tablet or phone is charged, and you have the cables needed to hook them up.

2. Find great locations
A lot of locations and subjects which seem run-of-the-mill or overdone can make for great drone photography subjects, so the best advice is really to not rule anything out until you’re in the air. That said, scouring Google Maps/Earth can be a great way to scout for locations which could make for good aerial shots, since you essentially get a preview of what you could capture.
Personally, I’ve found success building mini road trips around drone photography. Get out of the city and explore. Take the scenic route. Keep your eyes peeled for interesting locations, and stop frequently. As with more conventional photography, timing also matters. Shooting during golden hour will make your drone shots look great, and long shadows can look particularly dramatic.
But before you head out, don’t forget to check your weather forecast and make sure it’s not too windy to fly!

3. Be a good citizen
Drones are still very new, laws are still developing, and people aren’t quite sure what to make of them yet. First off, know the laws and restrictions in your area. But more than that, just be a good citizen. Don’t fly where you know you are unwanted, invade anyone’s privacy, or put anyone in danger.
When taking off and flying around other people, I’ve found that talking and engaging with them can make a huge difference. Ask if they mind if you fly your drone for a few minutes, and let them know that if they find it too disturbing you will stop. Show them the live feed from your drone once you’re in the air. They’ll probably be just as fascinated with it as you are, and it will make your life easier.

4. Nail the exposure
Getting the correct exposure with your drone can be a bit tricky. The cameras on most consumer-level drones aren’t up to the standards you might be used to with your regular gear, so a bit more care is needed. Besides the typically lower resolution and more limited dynamic range of the camera, you’ll also be composing your shot on a phone or tablet, in sunlight, with a heavily compressed live video stream from the drone. Not ideal. With a few precautions, though, you’ll be alright.
First off, always shoot RAW. If you miss the exposure, you’ll need that extra room to fix it up after the fact.
If your drone supports exposure bracketing, use it. Bracketing sets your camera to take 3 or 5 exposures for every click of the shutter—one at the current exposure settings and extra shots a stop or two above and below. You’ll end up with a lot more photos to comb through in the end, but you’ll be much more likely to have a perfect exposure.
Finally, if it’s possible to show a histogram on your screen, do it. It will give you a much more accurate idea of how well exposed your shot will be than your phone screen.

5. Look for simple shapes and patterns
Shooting from high above with a wide angle lens—especially when shooting straight down—means that big objects like trees, cars, or even buildings are going to be a lot smaller. This can create some great patterns and textures. It can also create a confusing mess with no clear subject. I find that looking for large, simple geometric shapes and patterns is a great way to make a clear and understandable image.
A winding road carving a line through an ocean of trees. A coastline neatly dividing land from sea. A solitary car breaking the grid pattern of an otherwise empty parking lot.
There is a lot to take in from high above the ground; simplifying it with basic shapes and contrasting textures will help your viewer digest what they are seeing. Show your viewer larger shapes and patterns that are hidden from view with two feet on the ground.

6. Fix your lines in post
Getting your composition just right straight-out-of-camera can be a bit more challenging when your camera is hovering 50 meters above the ground and you’re looking at a small screen in sunlight. Drones are very good at keeping still in the air, but not perfect, especially in wind. Couple that with a tendency for the gimbal alignment to go out and give you a crooked horizon, and getting a clean, straight shot becomes quite a task.
Be sure to correct your horizon and other lines in post. Fixing up your symmetry and doing some perspective correction can make a dramatic difference.
When you’re shooting, leave a bit of space around the edge your shot to allow you to do some rotation and perspective correction without having to ruin your composition. Be careful not to go too far, though, since the relatively low megapixel count on drone cameras means your cropping can only go so far.

7. Bring a friend
Sometimes it can help to have an extra pair of hands and eyes when you’re out shooting with your drone. Besides speeding up your setup and takedown time (depending on which drone you own), a friend can help keep an eye on the drone while you focus on what’s coming in from the camera. Also, if you’re on rough terrain, your friend can catch your drone for landing. It might sound a bit scary, but it’s quite easy, especially with larger drones like the Phantom.

I hope these tips will help you along your journey to great drone photography, whether it’s your main focus or just another tool in your photography arsenal. I’ll leave you with one final tip, which is common to all photography, and art in general: Find great drone photographers to inspire you, follow their work, and try to learn from the best!
Michael Tighe is a senior software developer at 500px in Toronto, Canada. He has also worked on the side as a freelance photographer and videographer over the past 15 years. Follow Michael on 500px and check out his Instagram page.


Leave a reply