Daniel Laan is a landscape photographer and writer from the Netherlands. Taking his camera on hiking trips through nature, away from the hustle and bustle of modern life, he quickly realized that capturing landscapes has a meditative effect on him. He considers the camera and post-processing as tools for portraying the light, the land, and fleeting moments, and as a way to also share some of his thoughts.
I think my fascination with mountains began quite early in life. I remember this one holiday as a kid quite vividly. My family brought me to this amazing rocky outcrop on the Greek isle of Crete when I was about 9 years old. When a couple of vultures started circling in the valley below us, I knew instantly what I missed back home. My home country of the Netherlands isn’t that mountainous at all. We have this one mountain in the south which stands just short of 1060 ft (323 m) above sea level and it isn’t even completely Dutch: We share it with both Belgium and Germany.

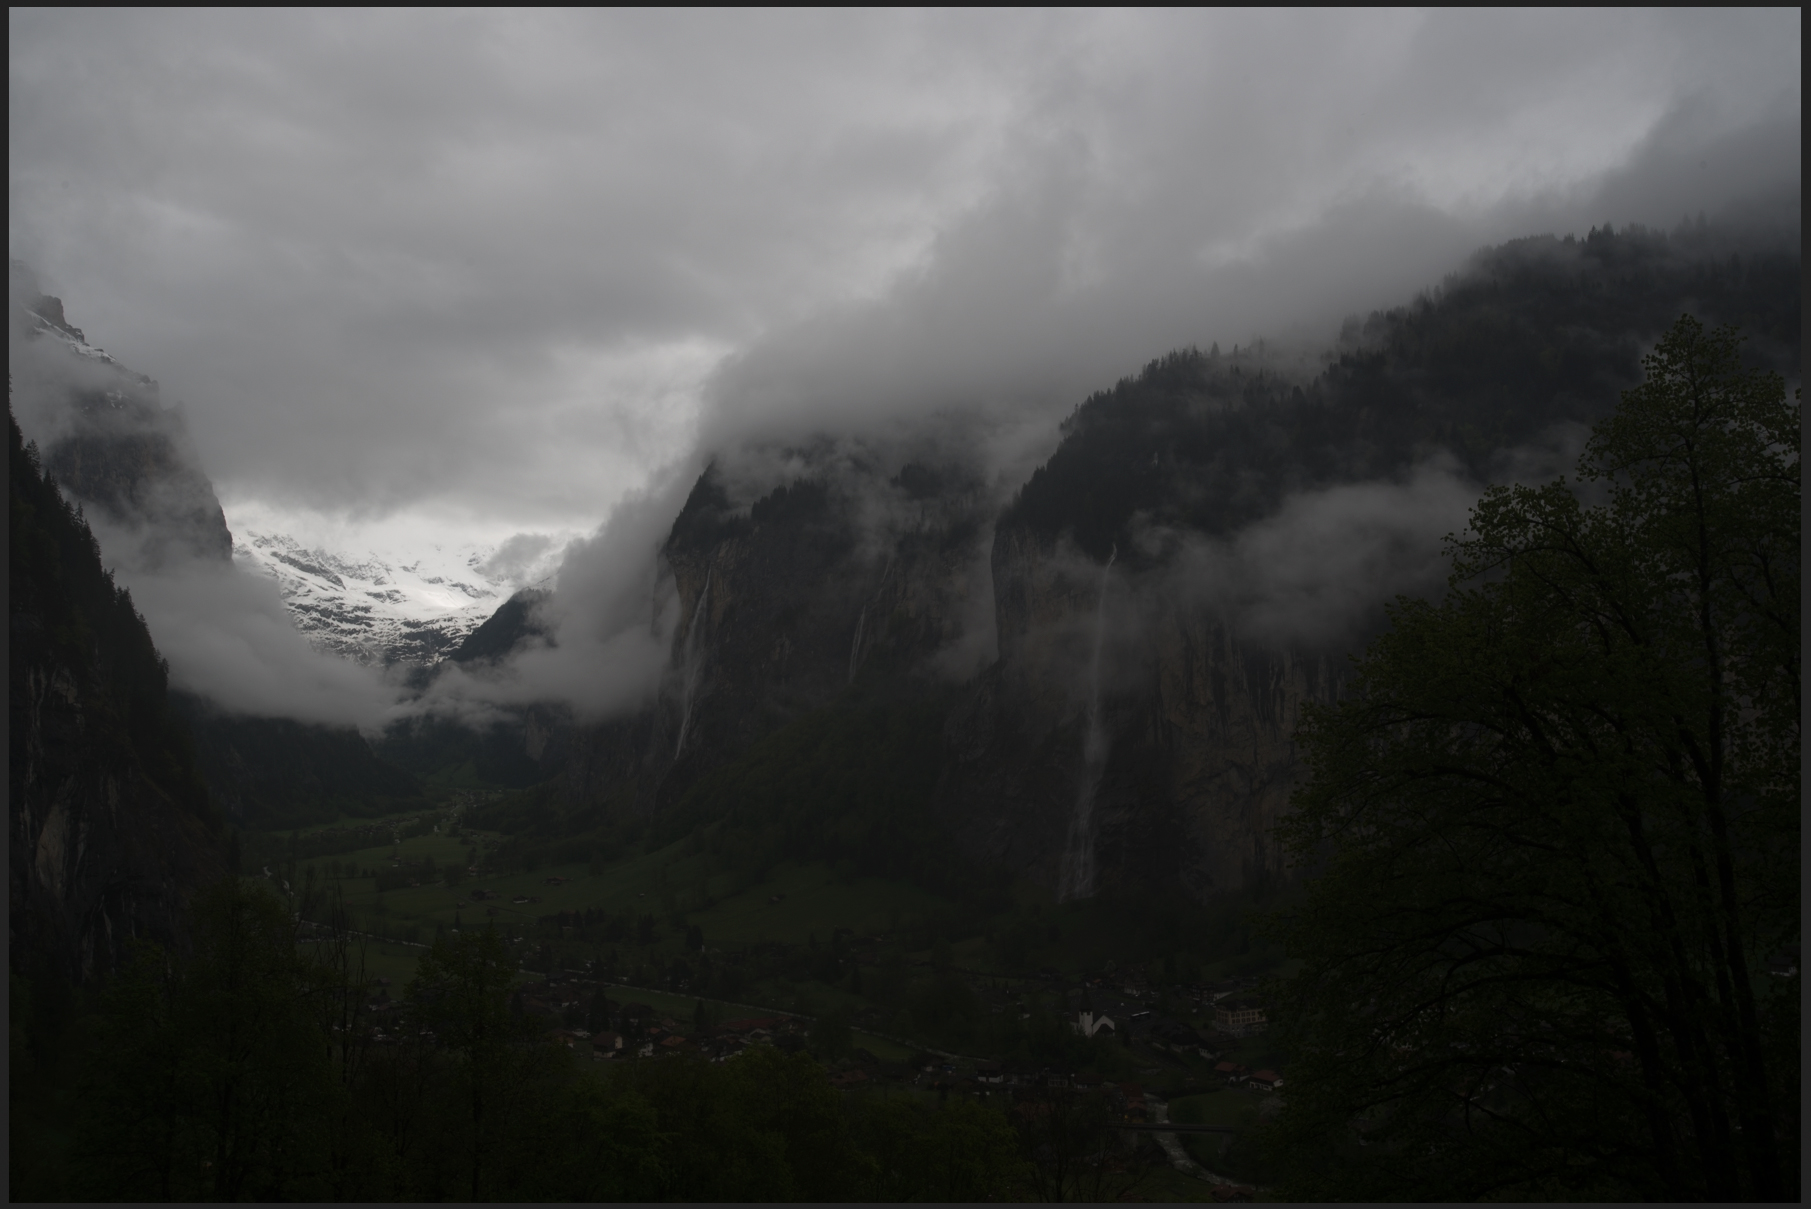
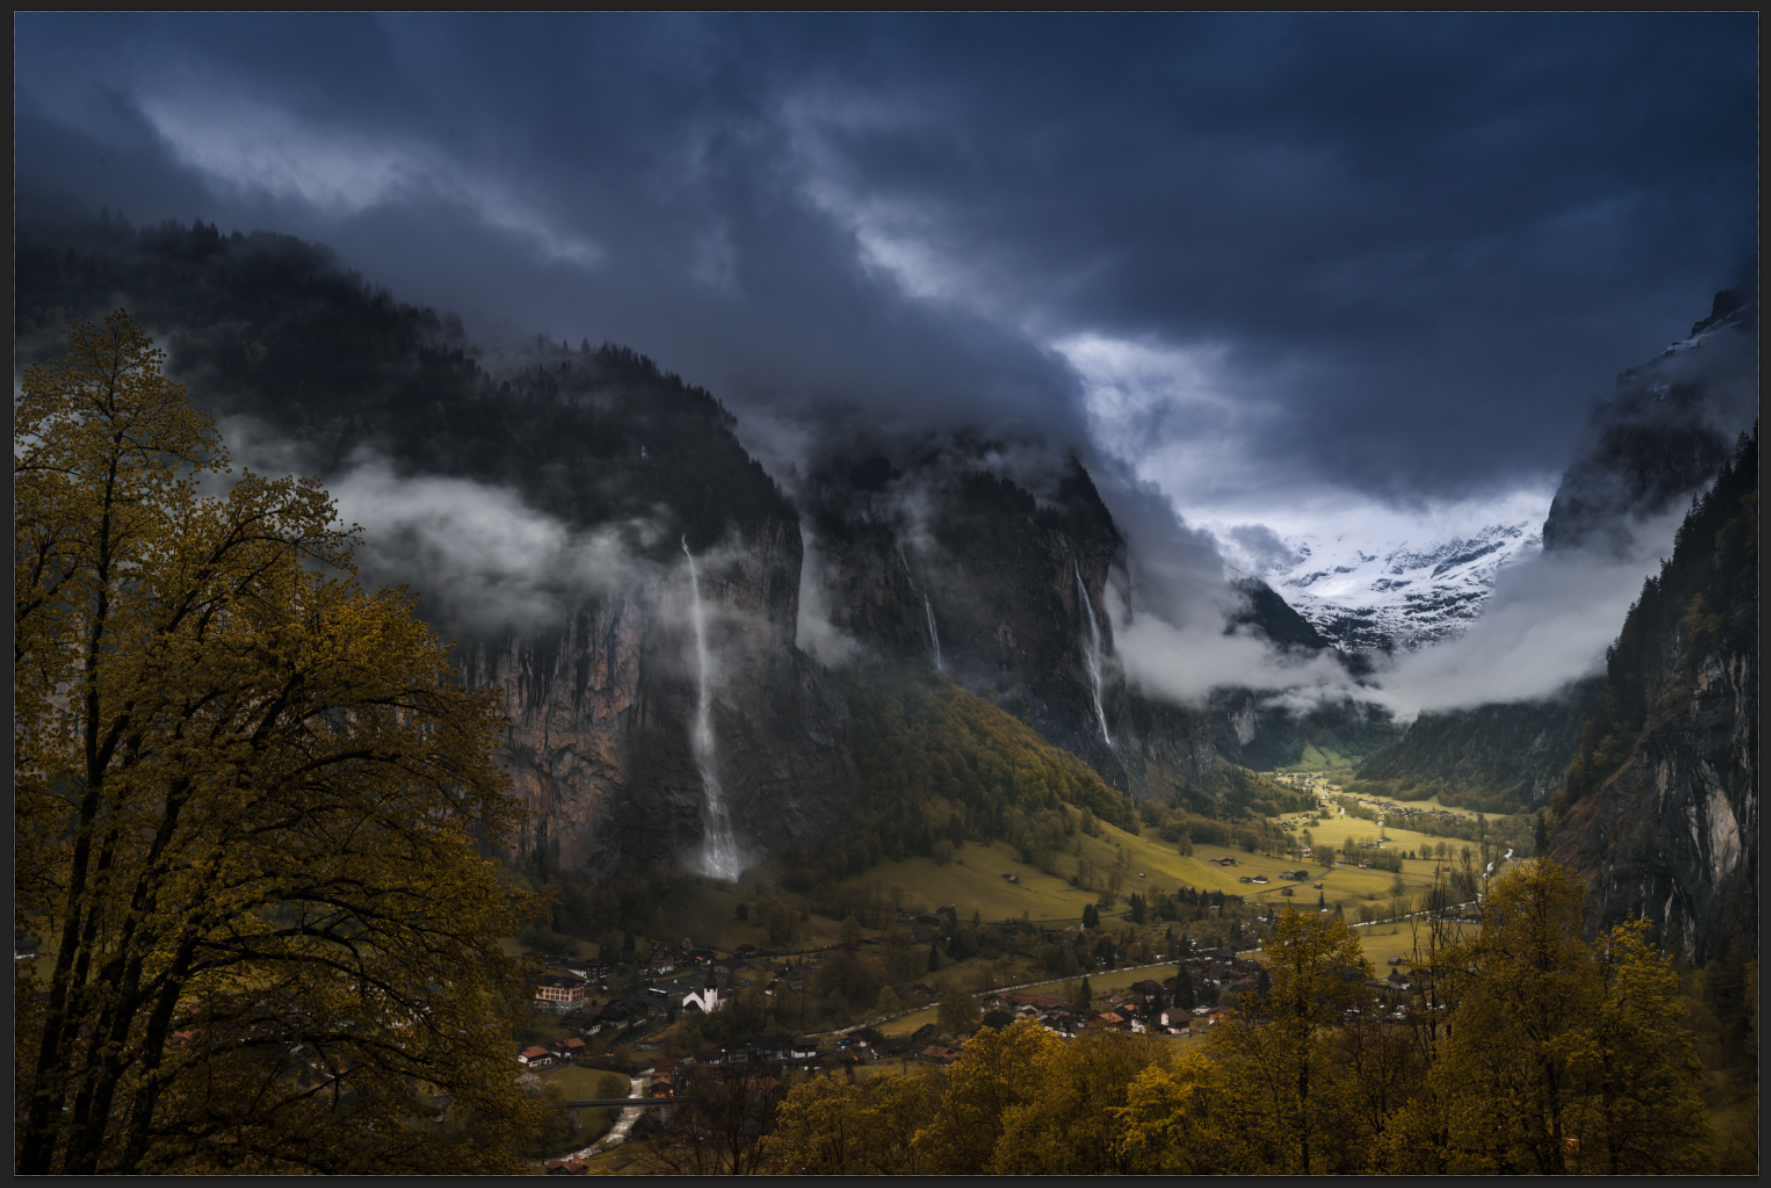
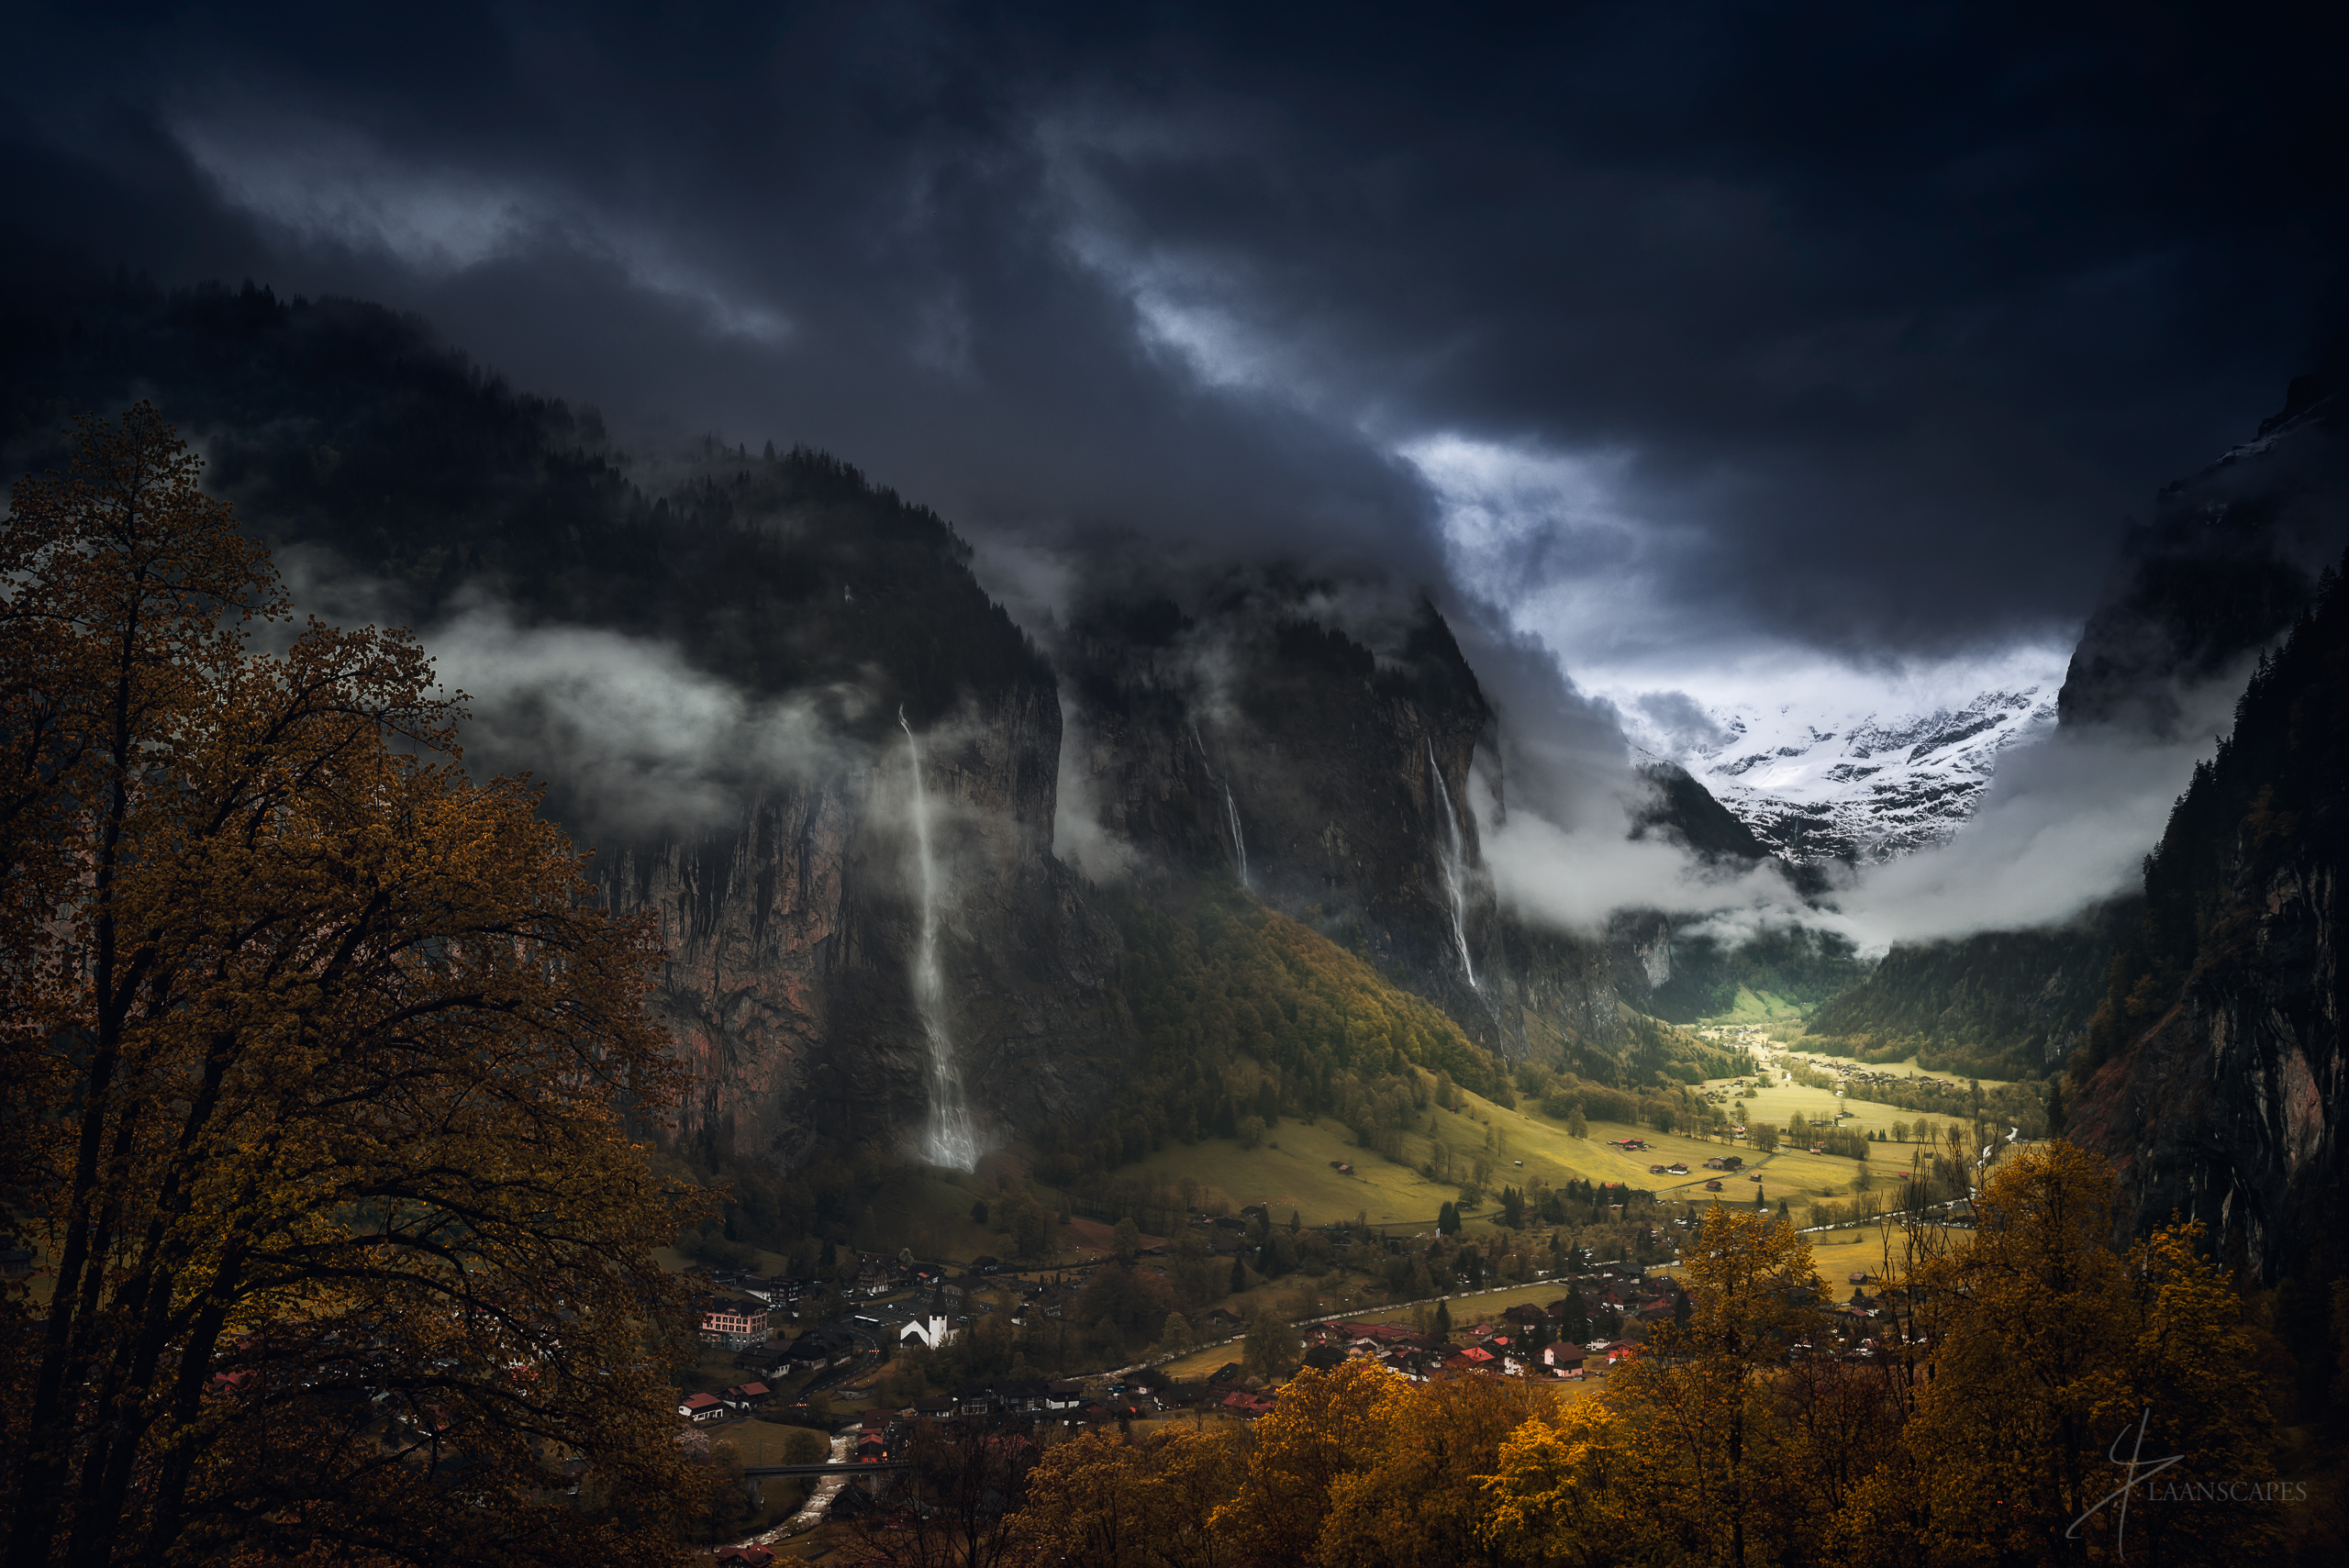
Imladris | 99.2 / 545 | 32mm ƒ/14 ISO 100 – bracketed
Mountains and waterfalls
From that moment on, I started longing for mountains. When The Fellowship of the Ring hit movie theatres in 2001, that longing became yearning. Bilbo’s line from the same movie, “I want to see mountains again, Gandalf; mountains!” is certainly applicable to me. Last year, when three likeminded friends got together to plan for another backpacking trip to the Alps, we learned that J.R.R. Tolkien had spent some time there in 1911. There are sources that link one of the book and film’s fictional location Rivendell to the U-shaped glacial valley of Lauterbrunnen. Naturally, we had to go there.
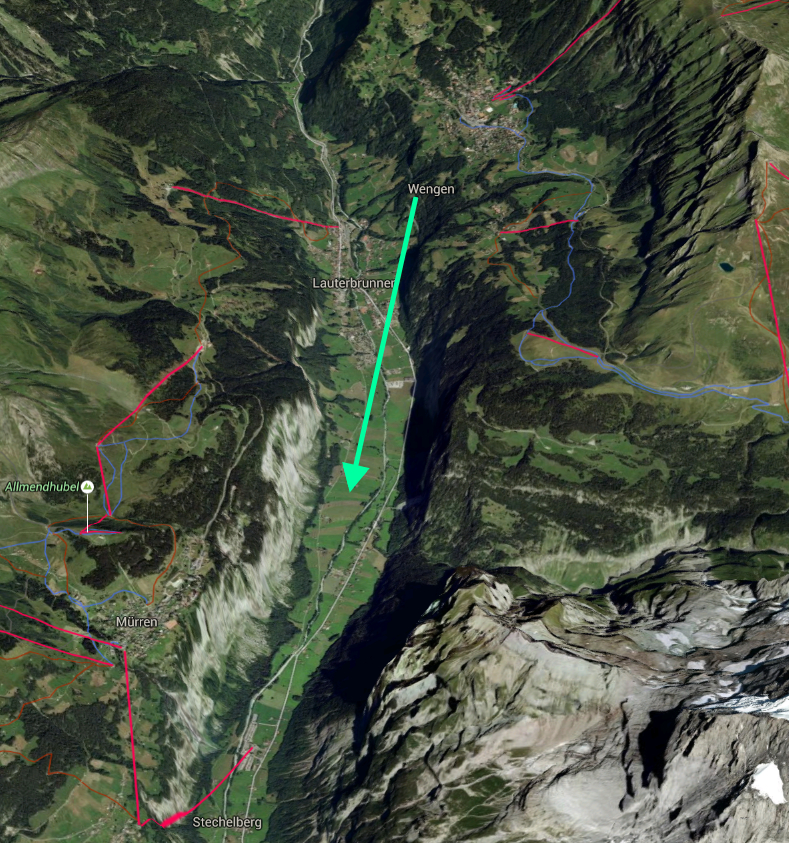
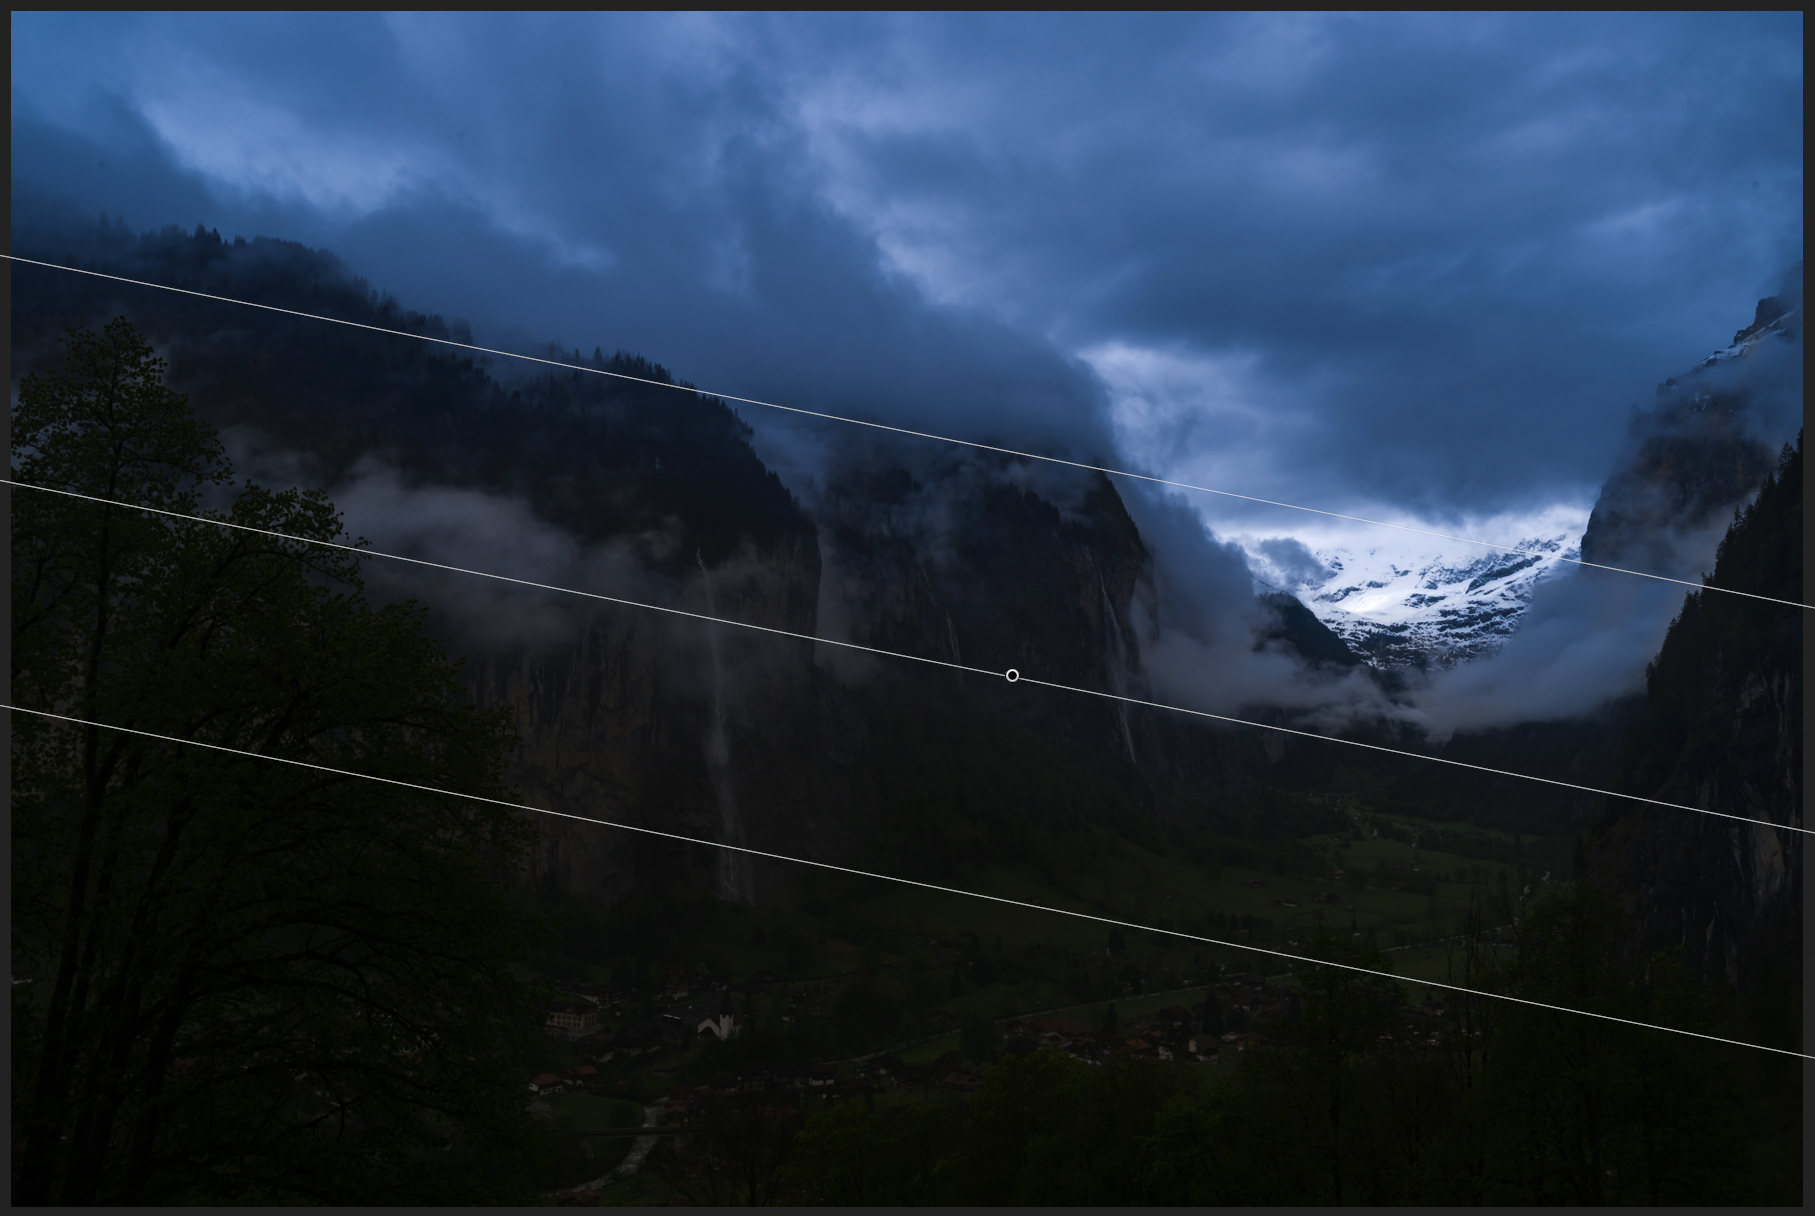
When we got our own little fellowship going on during our stay amongst the 72 waterfalls of this breathtaking valley, we looked for a way to capture the length of the valley in one image. And while it took some planning, we decided to hike back down from a village named Wengen to Lauterbrunnen. That would certainly include a Swiss equivalent of “Tunnel View”. Below is a screenshot from Google Maps that we used to plan for this composition.
Gear and Conditions
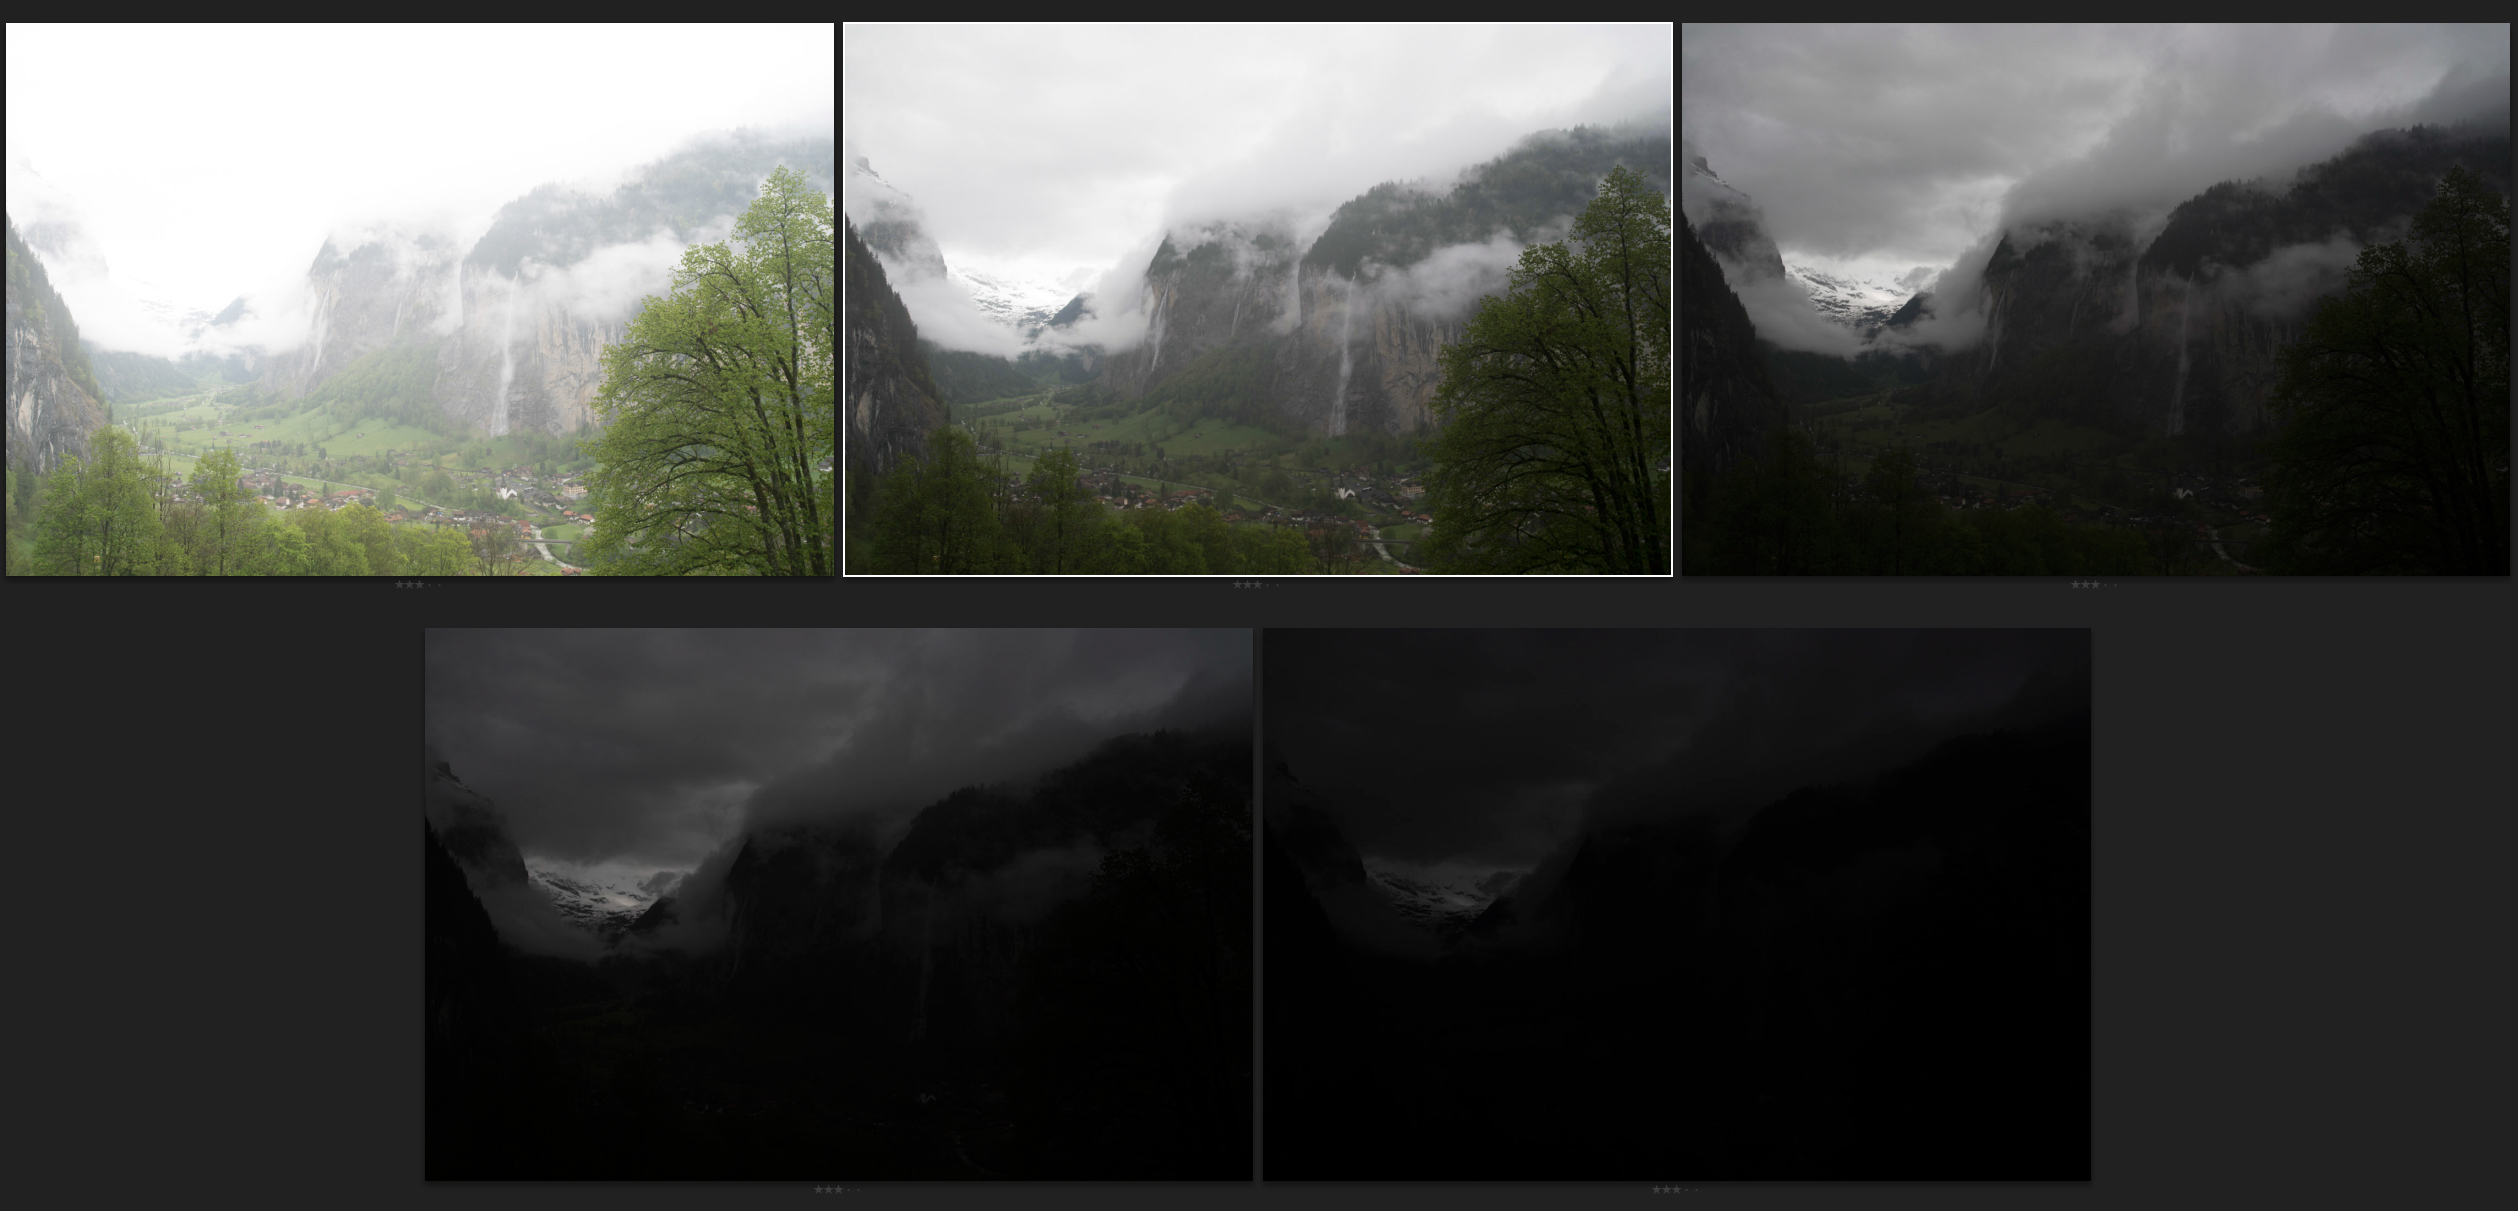
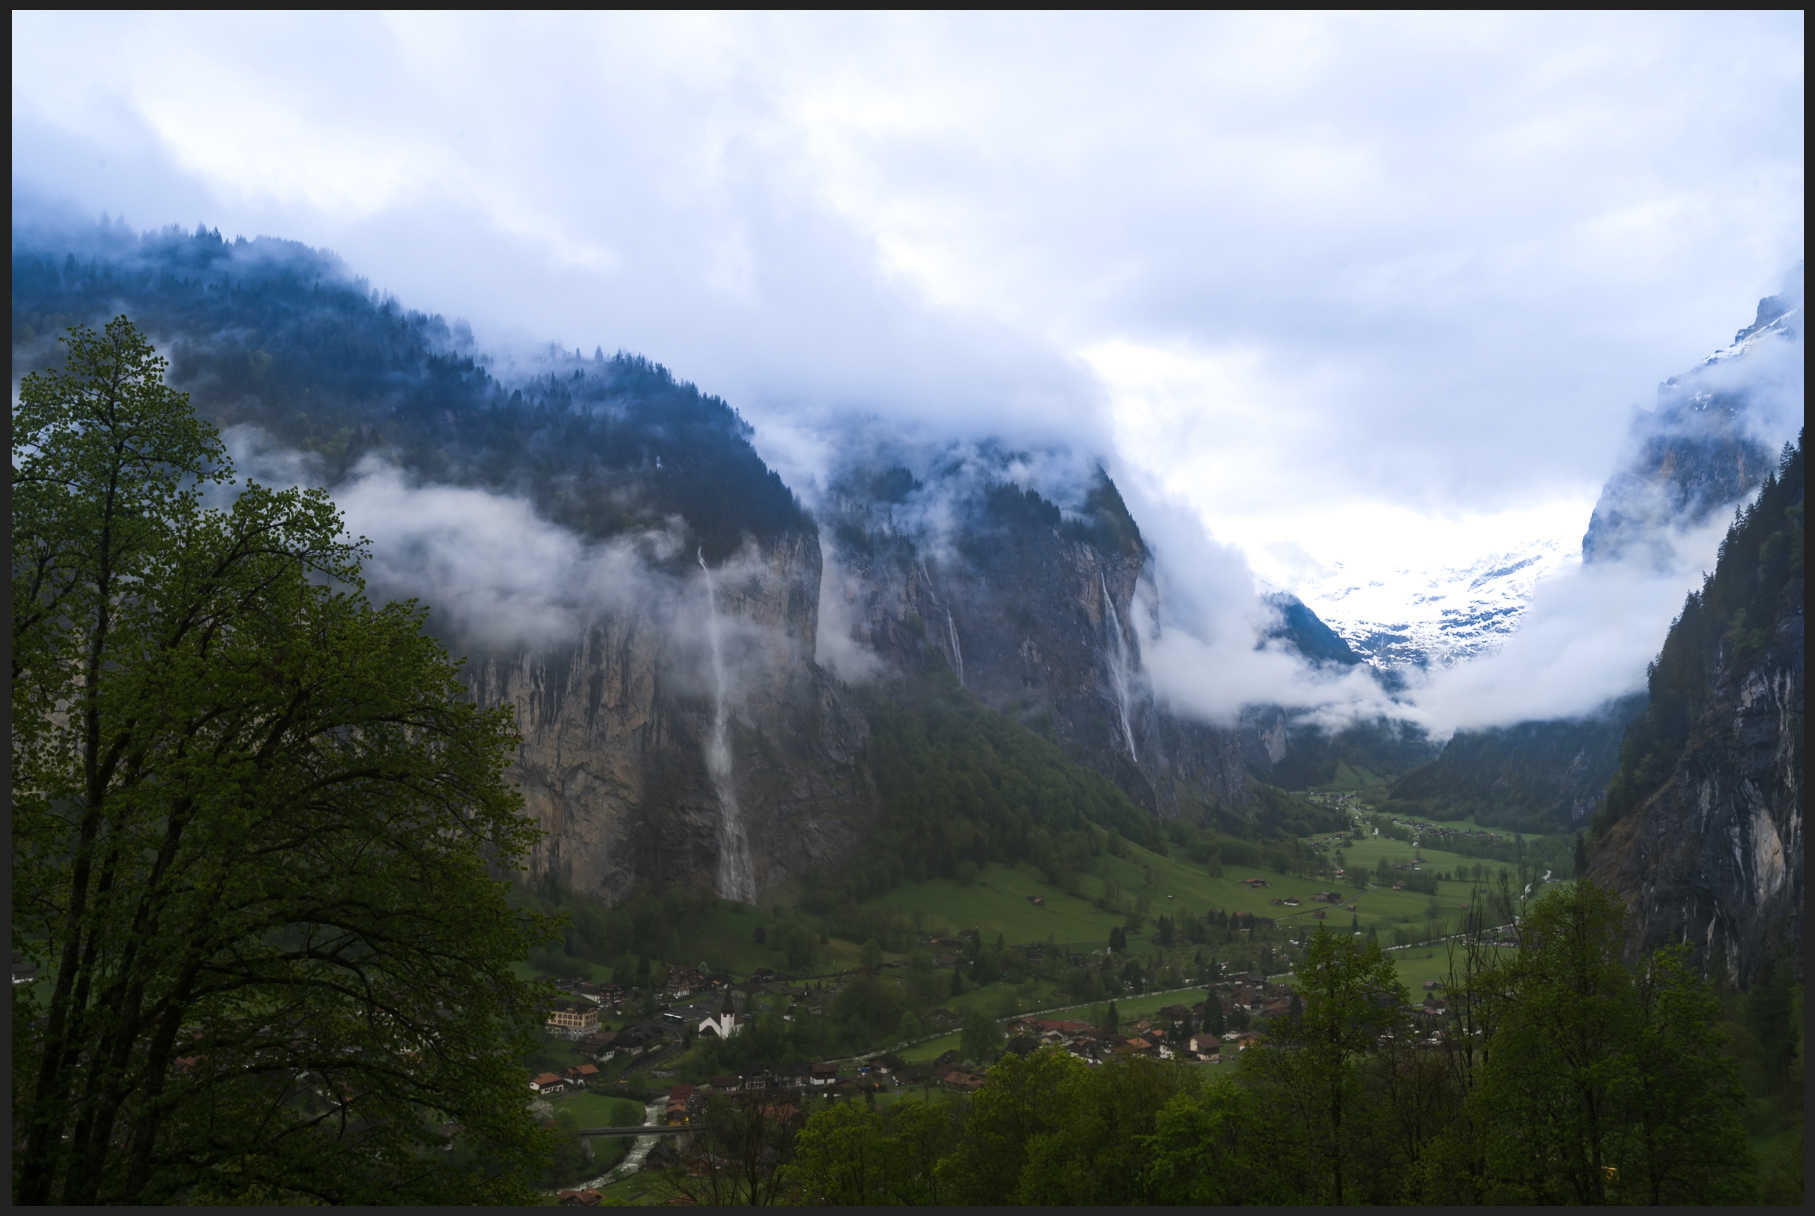
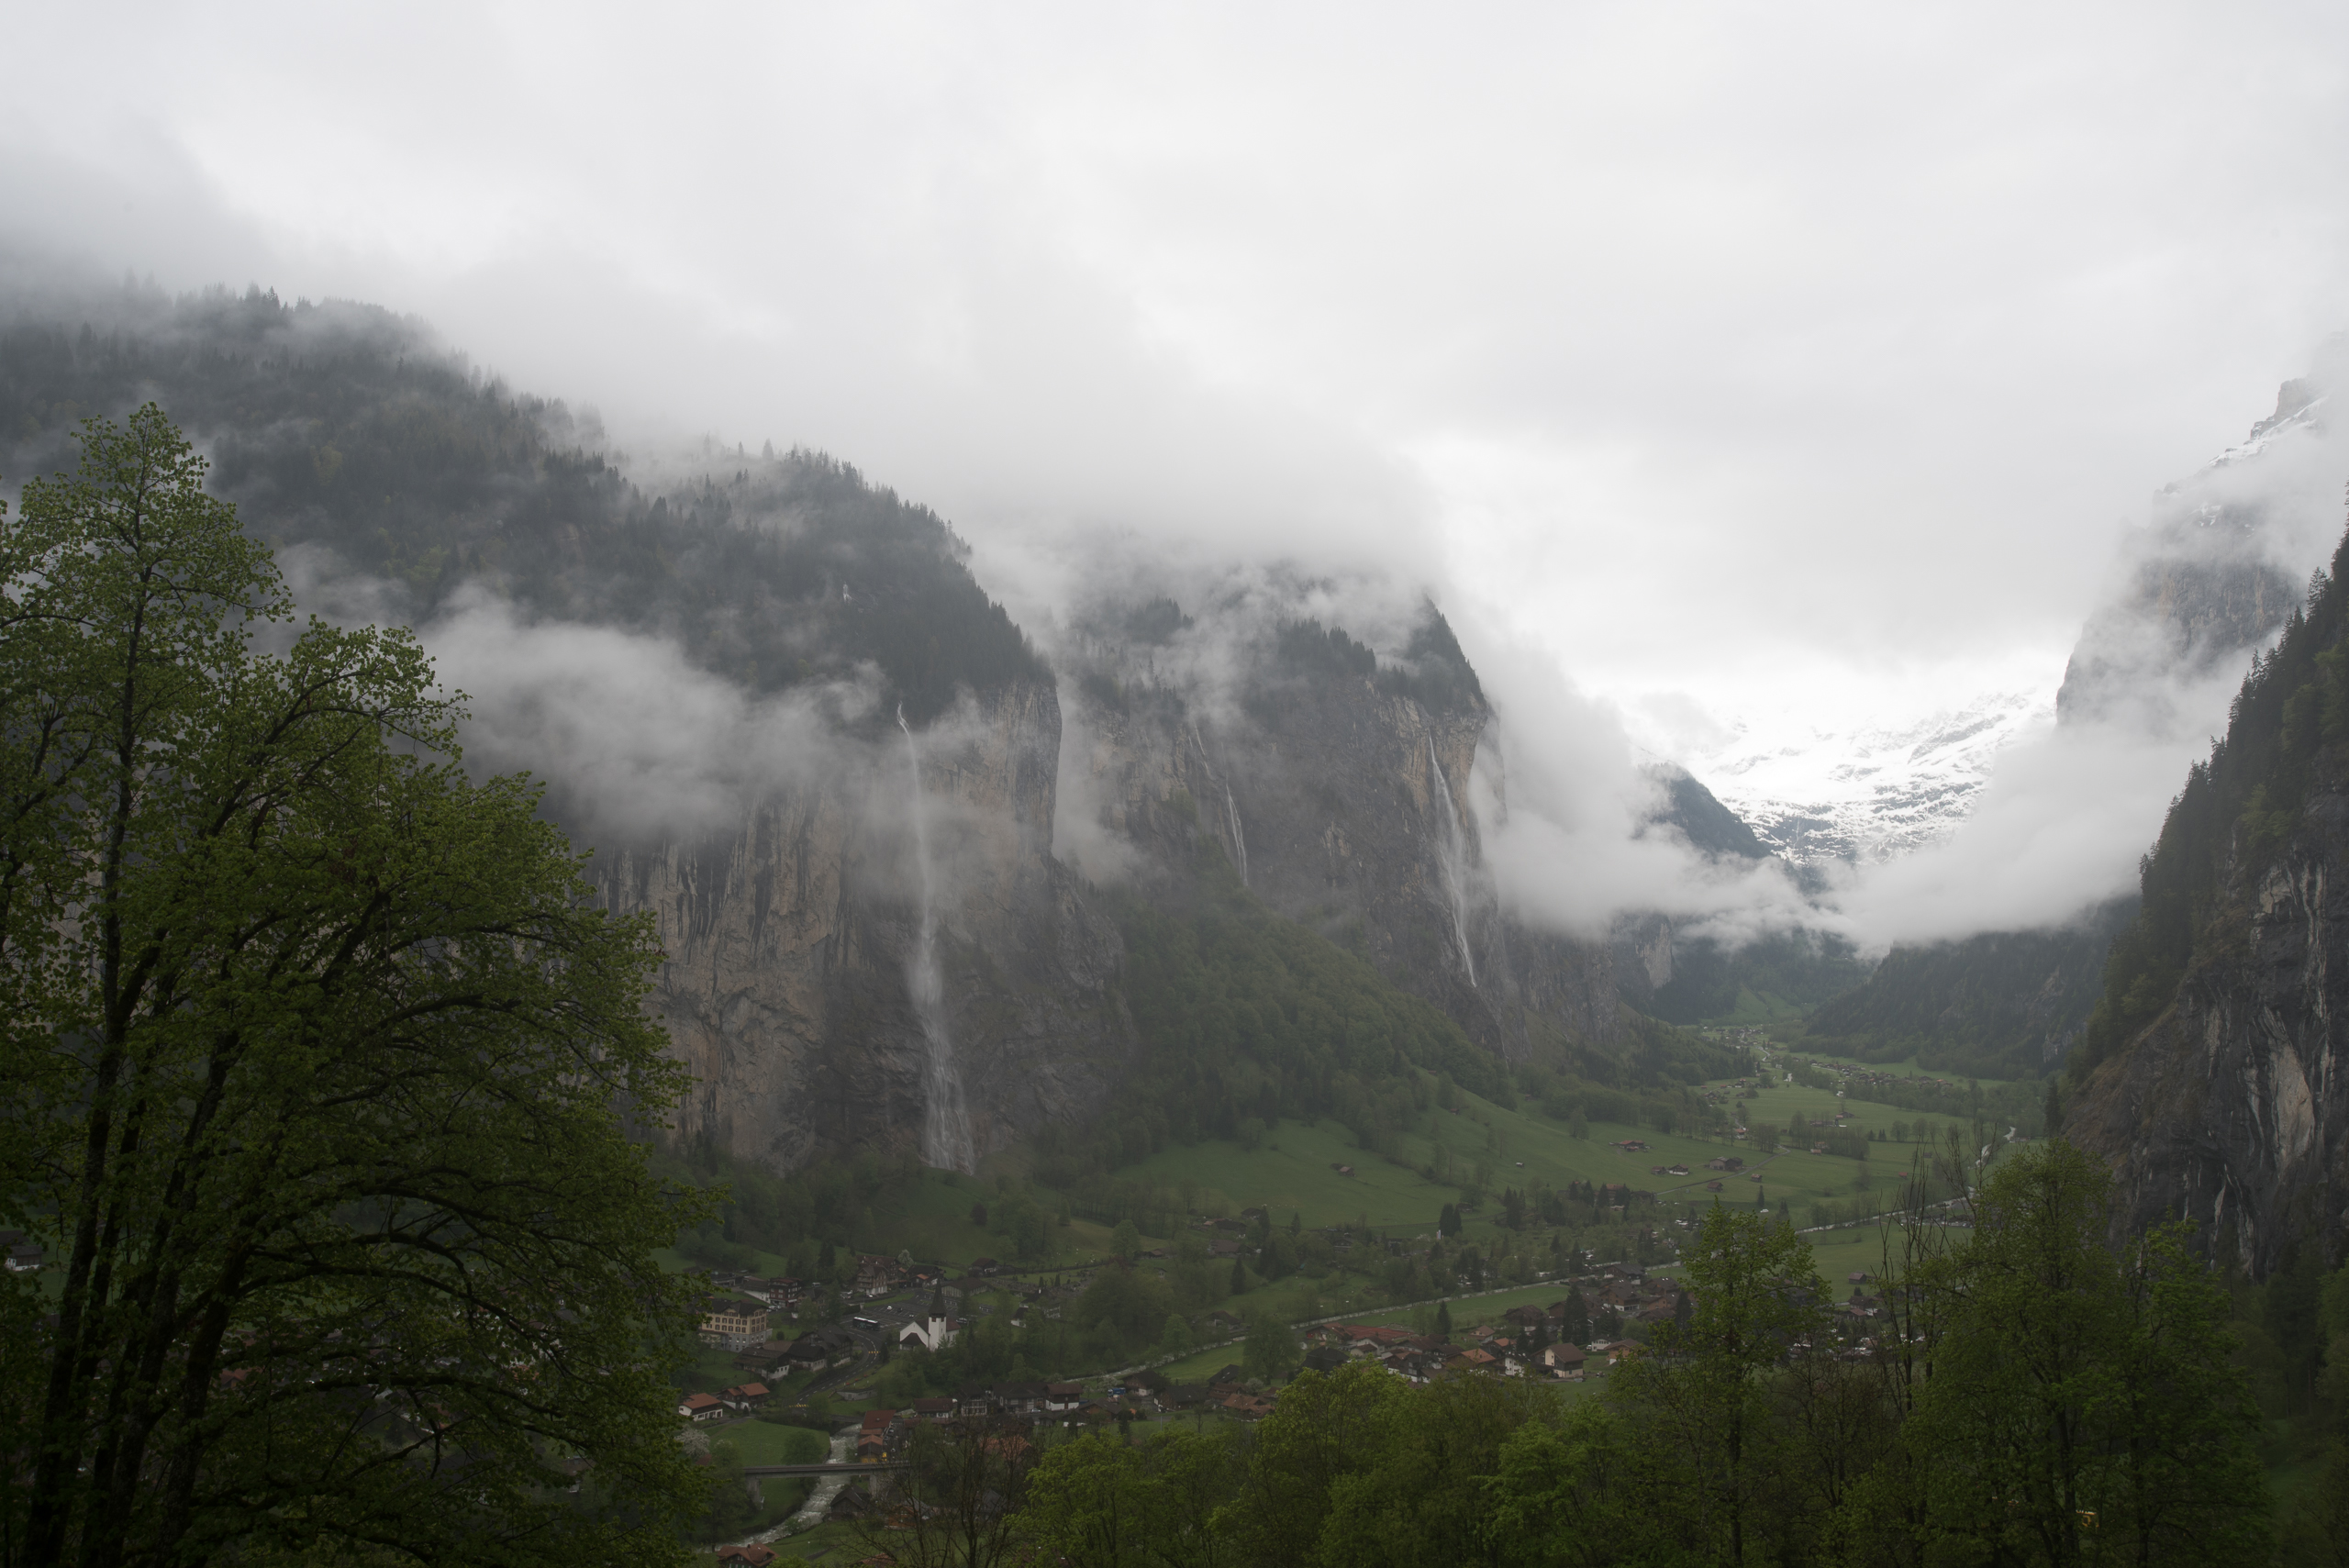
The day began completely cloudy, dreary and misty. Perfect conditions for landscape photography; especially without the harsh, midday sun I would aim straight into. But since I had no solid idea of scale or any precise composition in mind, I decided it was best to take a zoom lens with me, in favor of the much sharper prime. I attached the Nikon 18-35mm f/3.5-4.5D ED-IF AF on my D750 and we ventured into the small wood of Wengwald that leads down the north face of Rivendell Lauterbrunnen Valley.
Then we came across this opening in the forest canopy. We waited for about half an hour, and as the mist started to dissipate, I precariously set up my camera on the tripod near the edge of a rock (that seems to be a theme). I personally loved the glint off the snowcapped mountains in the distance, but capturing this as well as properly exposed foreground trees, meant a huge dynamic range. Sure enough, the 14mm prime would be far too wide to show any detail in the distant mountains, so I set the zoom to 32mm and focused on the bright church while checking the exposure in the sky. The moment those clouds drifted in towards the end of the valley, I fired away 5-shot auto-exposure bracket. But just look at how grey the middle one looked (SOOC) when I got back home:
Mood, Color, and Feel
That grey image did not feel like one of those scenes from the movies. So I started the process of editing by browsing the web for screenshots from both Rivendell and some mountains to look at how the late cinematographer Andrew Lesnie did it for the The Lord of the Rings:
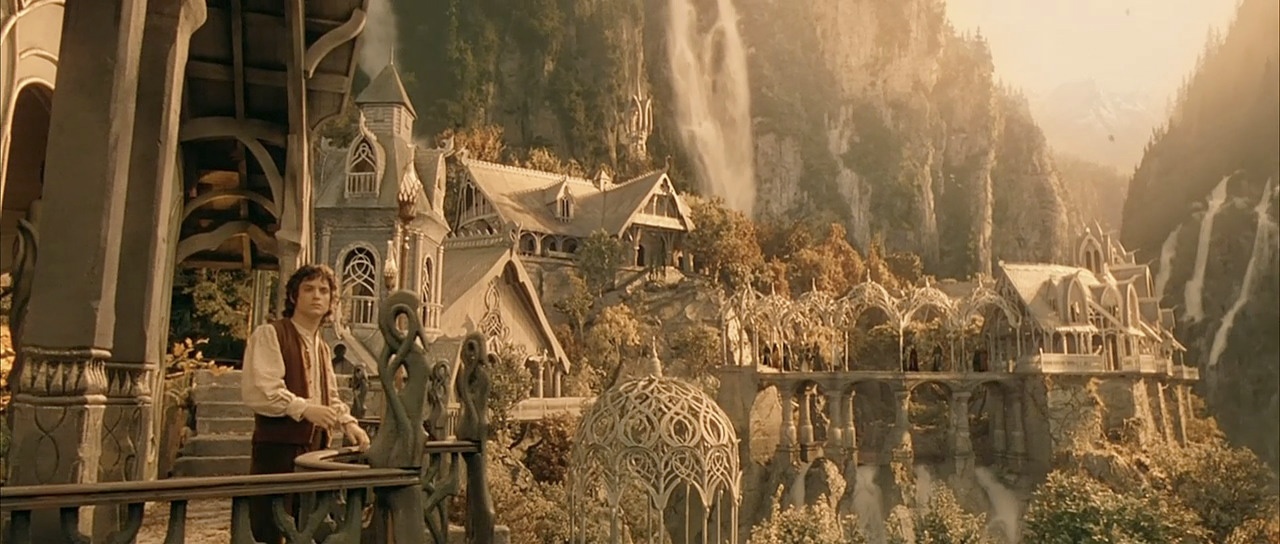
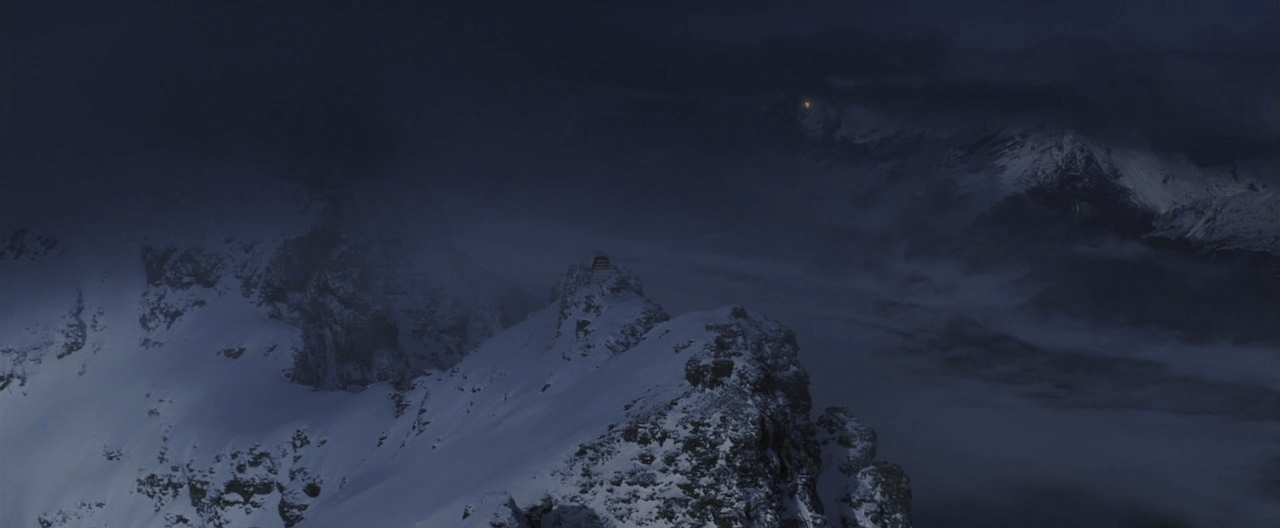
The autumnal mood of Rivendell and the dark blue mountains portrayed in The Return of the King combined into a complementary color pallet. I would base any further decisions in post on these two screenshots to emphasize that LOTR look and feel.
The Flip; a Change of Seasons
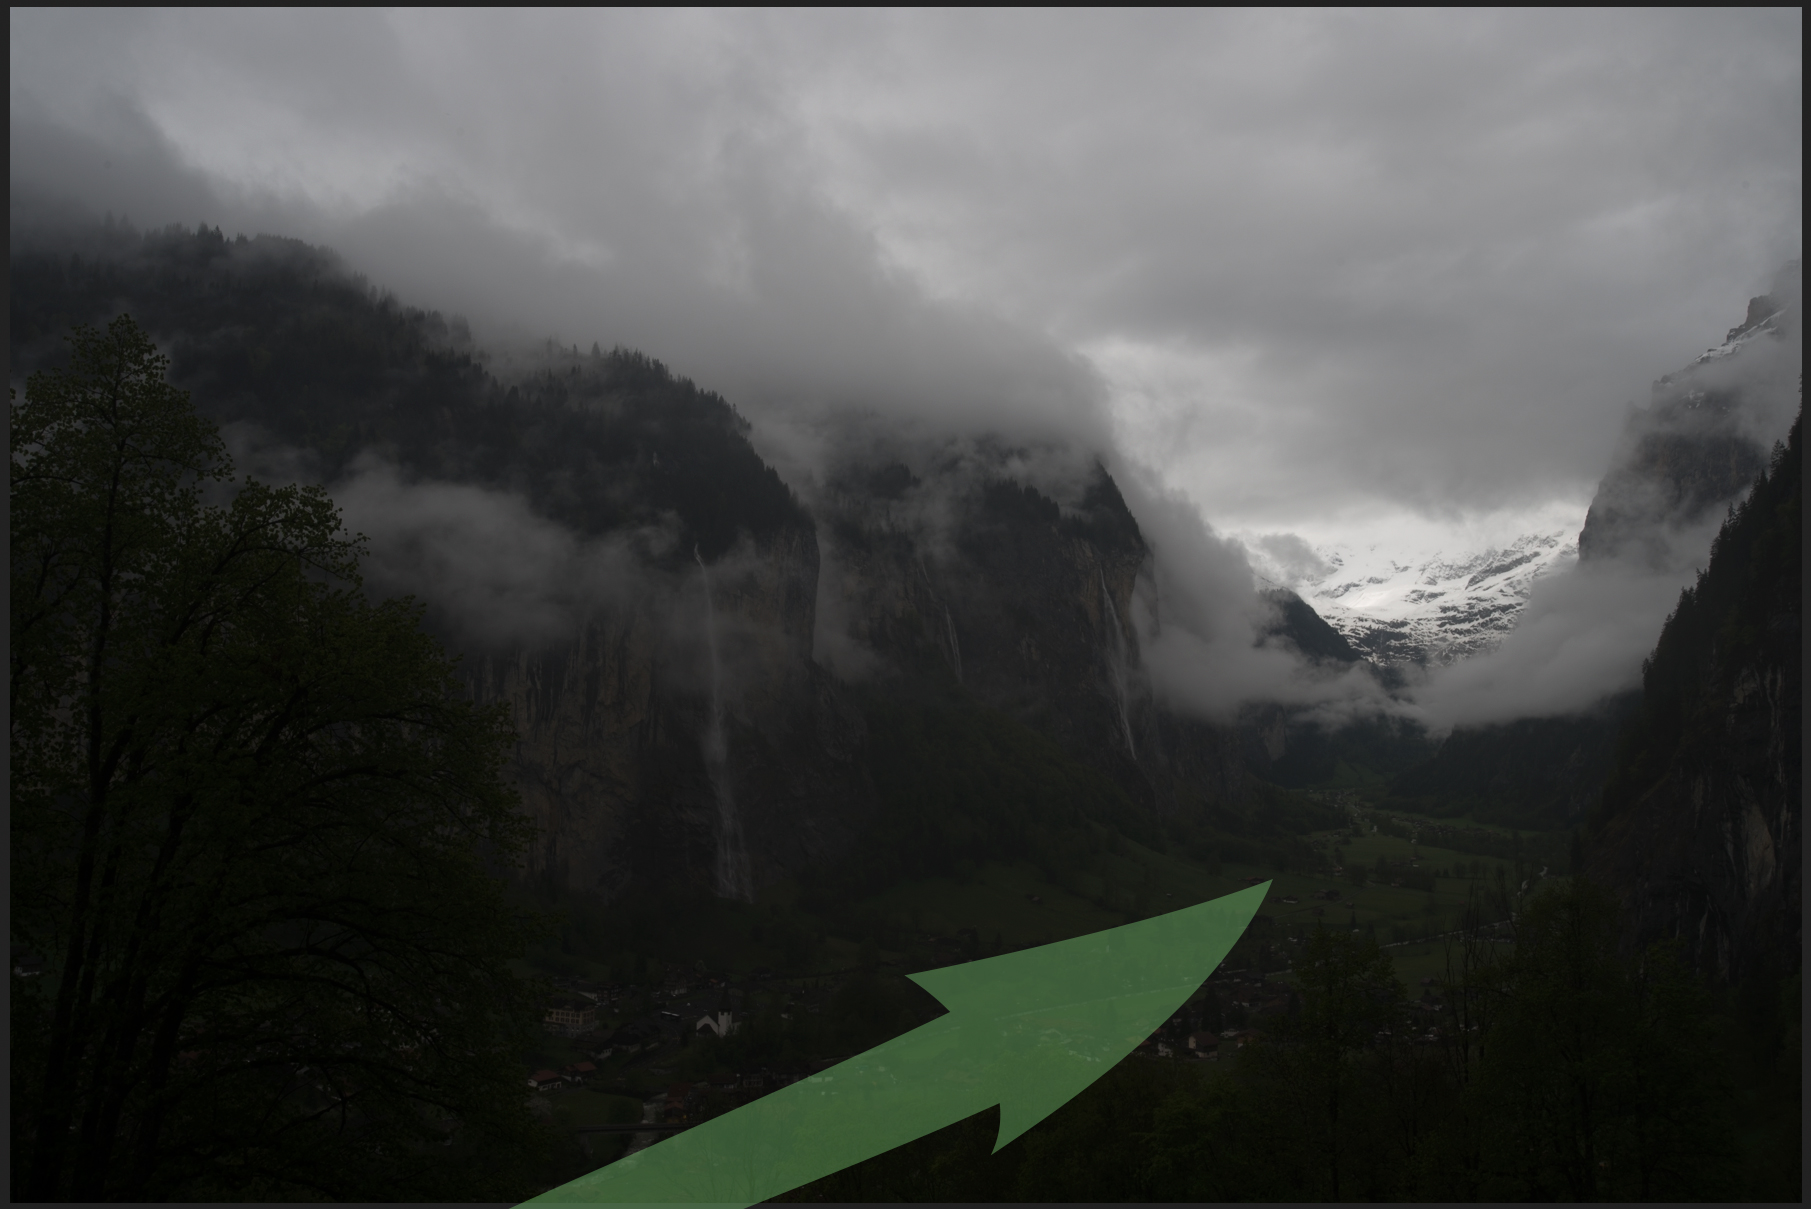
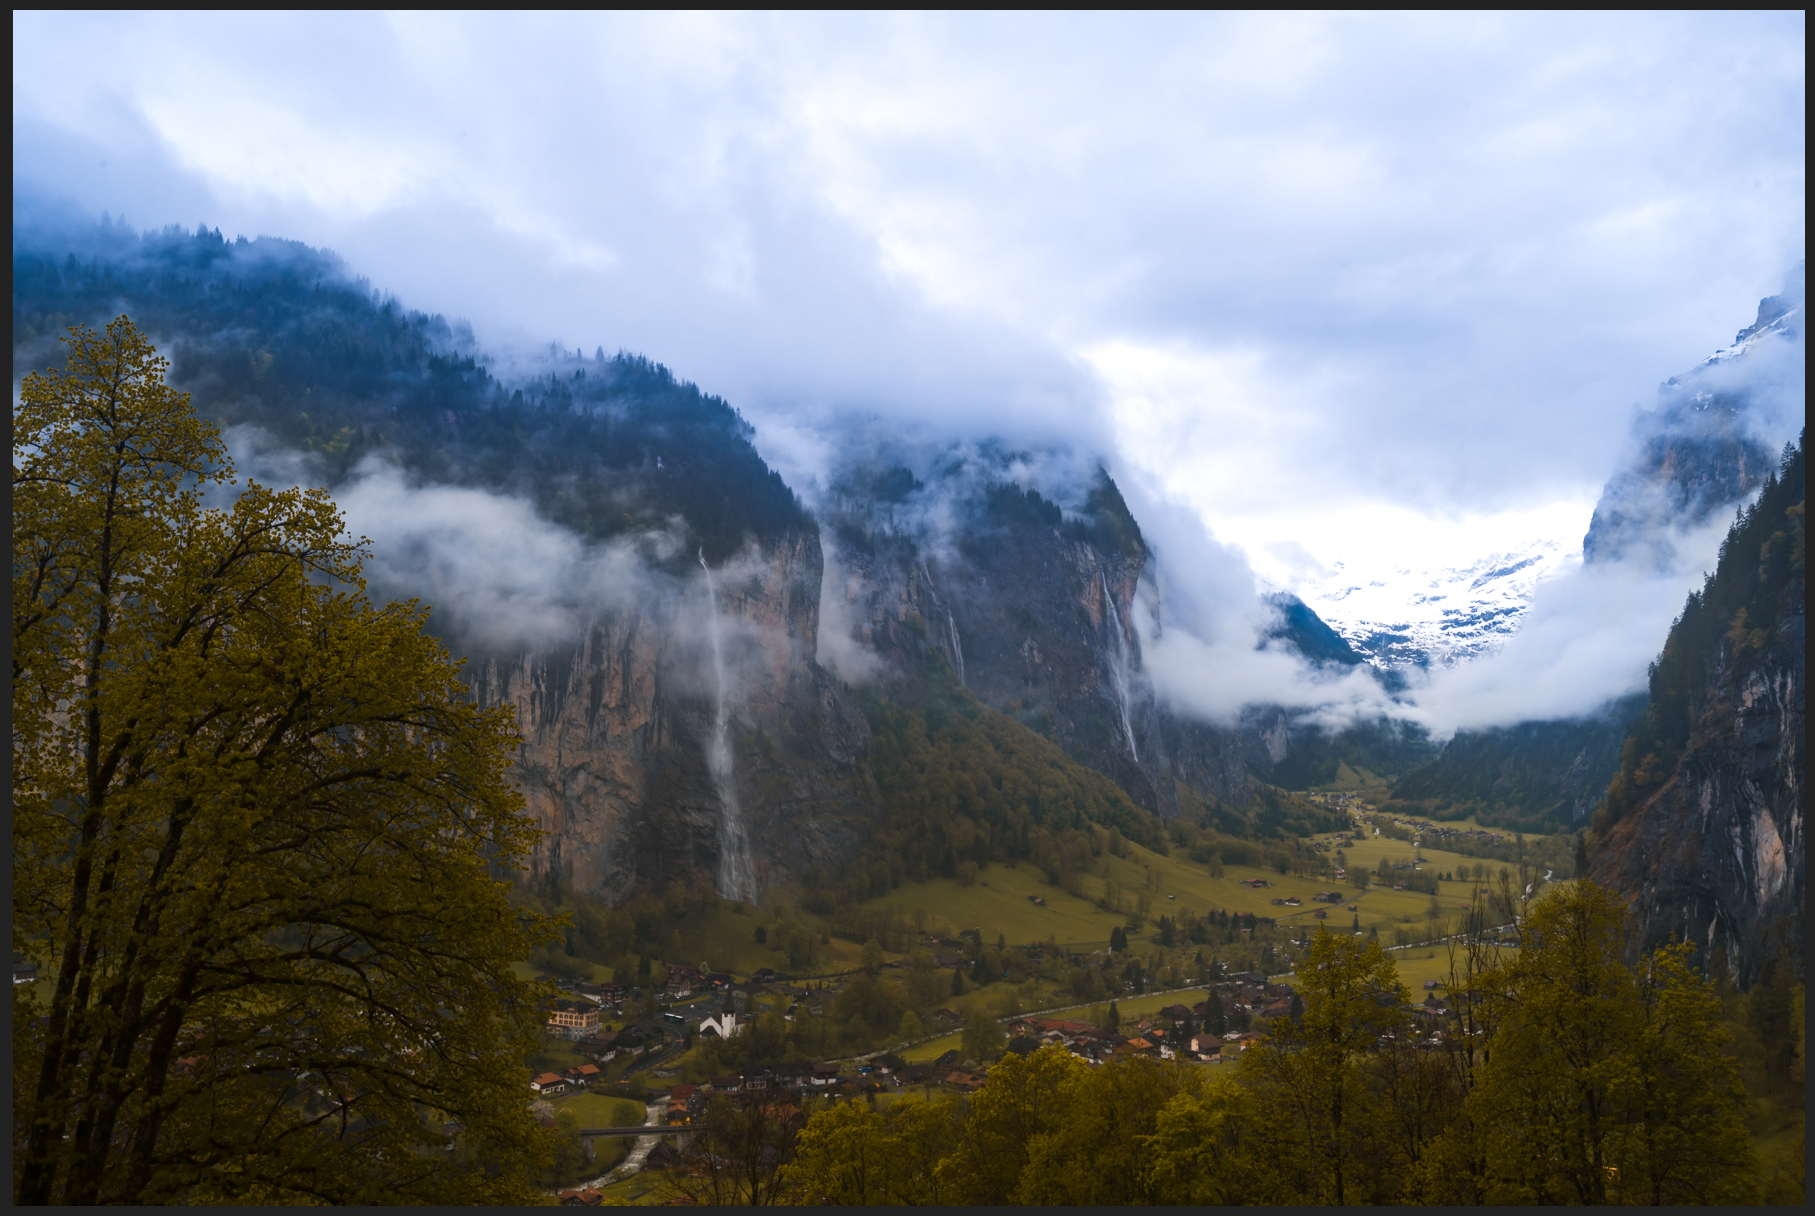
Before we get into the nitty gritty, I want two things out of the way. Firstly, when processing bracketed shots in Adobe Lightroom, it’s a good idea to select all of them in the series and make your adjustments with “Auto-sync” turned on. Second, I’m sure you’ve looked at this resulting image and wondered if anything is real anymore. I’m not here to tell you about real photography and all that, but rather the thought process behind the image. I’m showing you a part of myself rather than a location. It’s what puts these sort of images in the fine-art category. Let’s continue with processing. Since I would think of Rivendell rather than Lauterbrunnen while editing this, I decided that the composition would look stronger if I flipped the image; since it would lead the viewer’s eye from left to right.
I loved the cold and stormy feel of that screenshot from the Return of the King. With all five images selected, I dragged down a grad filter and made the following adjustments:

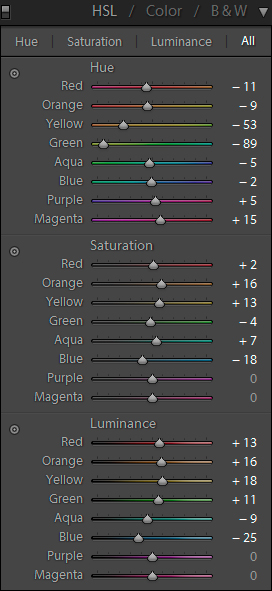
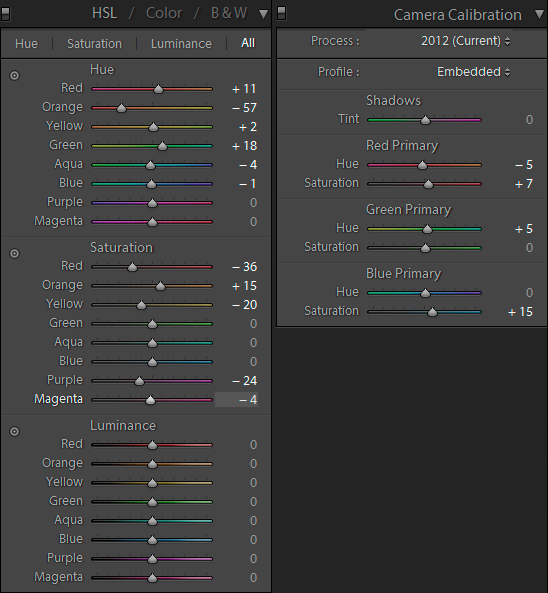
Since we parted with reality this early on, it was then that I decided that this wouldn’t be a postcard image that helped people reminisce of this picturesque Swiss valley. So the third thing I would do, is change the hue to accommodate my vision. I used a combination of HSL adjustments and camera calibration to obtain this. I also bumped the Dehaze filter to increase the drama in the clouds at this stage. Here are the settings and the before and after images of the bright image:

On to the mandatory settings. For detail adjustments and of course lens corrections, I’m quick to dial these settings in for nearly every image I work with:
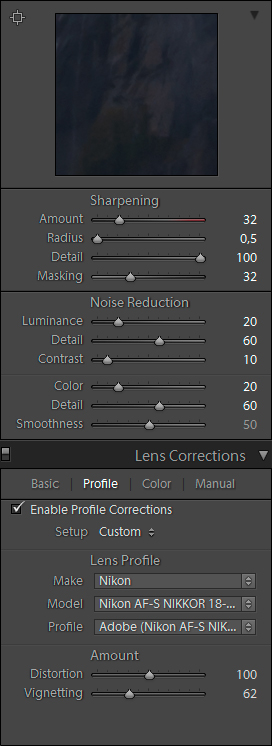
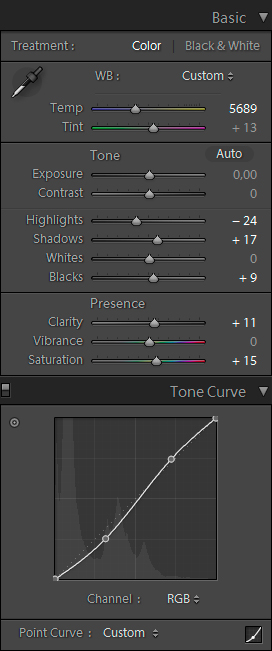
Concerning basic settings (considering these are five bracketed images I’m working on simultaneously), I wanted to bring the exposures a little closer together to make it easier to blend them in Photoshop. A good way to do this is by lowering the highlights and bumping the shadows, since those areas are usually the ones in which you blend the images. But in doing so, you would also lose some contrast in the areas of medium luminosity and consequently, saturation. To compensate, I dragged an s-curve in the tone curve. Here are the settings:
After all this is done, I opened each image in Photoshop without leaving Lightroom by right clicking on one of the selected images and going to Edit in > Edit in Adobe Photoshop CC. When all five images are loaded up in PS, hit File > Scripts > Load Files into Stack and then clicking Add Open Files. Do not check the box to also align the images if they were captured from a tripod, as this can ruin the alignment.
HDR
With some intricate luminosity masking, I then mixed the five exposures in such a way, that everything was properly exposed, but also with enough contrast to make the resulting image look convincing. There’s just no way to do this properly in dedicated HDR software alone, but it can serve as a good base. Also, the fusion function in Photomatix can set you off to a good starting point.

Drama
I do think the image above looks rather flat. So I’ve also create a darker version with the aid of luminosity masks. Especially the clouds look more dramatic in this version and the glint off the snowcapped mountains in the distance looks fantastic. I want to keep those.

Turning on the Lights
Great. Now the image looks like it was captured at night. To overcome this, I’ve mixed the two previous images and added some creative dodging and burning shown in the image below:
Gandalf’s Touch
I’m an avid fan of the Nik Collection. I would sometimes use Silver Efex to really pay attention to luminosity values in a color image, before returning to Photoshop and setting that layer to the luminosity blending mode. I’ve used this method too in this image, with higher structure values in the clouds and in the foreground, and lower contrast in the part that recedes into the distance to re-introduce a sense of depth. This HDR workflow diminishes the atmospheric feel of the fog hanging in the valley, so it’s important to approach your tweaking locally to images like these. That’s why I like to make local adjustments in both Silver Efex and in Color Efex also. These are the effects I nearly always use in my images, especially in this one:
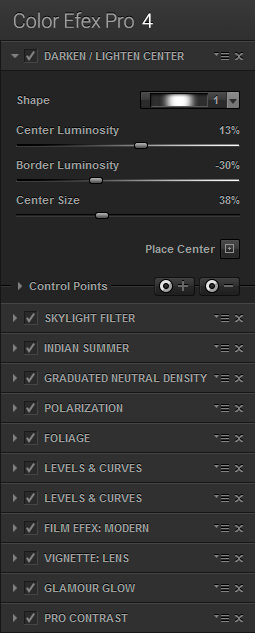
I have utilized the foliage and indian summer filters to enhance the foreground even more, while placing the center of the darken / lighten center filter in the distance, below the snowcapped mountains. This lowered the brightness of the snow, showing the sunlight reflecting off it again. All these settings have their specific use, but used together and with local adjustments to each, these filters truly add a magic touch to this scene:

Finishing up
I like to add an Orton Effect to distant objects in the scene, but it does need to suit the image. By duplicating the image as a new layer and setting that layer’s opacity to about 20%, I then apply a Gaussian Blur of around 40px – but the radius varies with how large the entire image is. A 300 megapixel panorama needs a larger radius in order to obtain the same effect and a certain consistency throughout your portfolio. With the Orton applied, I then save the image and return to Lightroom one more time to add a title, caption and the location, but also to make any final adjustments for either web publication or printing. For 500px and Facebook, I specifically increased the highlights and whites to make it pop more. Next, I applied a tone curve that lifts the black point 3-4 points and reduced the overall brightness a bit (just drag the middle part down slightly). To increase the color contrast between the foreground trees and the yellow of the valley, I applied one more HSL and camera calibration adjustment, shown below:
Here it is one last time, from original (mirrored) shot to final piece:
Closing words
Well, I really wanted to interpret myself what J.R.R. Tolkien would have imagined when he visited this place back in 1911. And for that, I put my worries away of what others would think of altering a photograph this way. I rather like the result, but I didn’t think this would become one of my highest ranking images on 500px because of this. I hope that you find this article insightful and that it may inspire you to visit the mountains too. I would appreciate any constructive feedback on this article or any of my work, as I constantly strive to get better at what I do.
Oh and before I forget, I’m not done processing all of my images from Switzerland yet. Stay up to date by following me here on 500px or on Facebook to be the first to see my new releases!
I’ll leave you for now with some of my latest work in the mountains as well as on the flat Dutch countryside. Thank you for your time!


Leave a reply