Max Foster lives in Minneapolis, MN and specializes in travel photography from around the world. He focuses on landscape and cityscape images, and you can see more of his work at his 500px profile, Website, and Facebook Page.
When I began my journey into the photography world, I read as many instructional books as possible. These dealt with everything from exposure and composition to the minute technical details often overlooked. These books helped me learn quickly, but after being exposed to the latest work of many advanced photographers I realized that the books were also dated in some respects.
One of the most appealing attributes of landscape photographs is sharpness from front to back. Everything is in sharp focus in the foreground, middle and background, allowing the viewer to be pulled into the image as if they were standing right there.
The majority of the instructional books I read stated that this could be accomplished rather easily by stopping down to a very small aperture, such as f/22. Once stopped down, you then had a couple of options; you could either focus at a spot about 1/3 of the way into the scene, or you could determine your hyperfocal distance and focus at that spot. However, using a small aperture can decrease image quality due to diffraction while concurrently limiting depth of field. Even so, at the peak of film camera usage, these techniques were often the best options for maximizing sharpness throughout the frame. With today’s digital advances, we have additional and better options.
In this tutorial, I will show you how to use a technique called “Focus Stacking.” Although focus stacking can be utilized in several genres of photography, this tutorial will outline its usage in landscape/cityscape photography.
Recommended equipment
1. DSLR or MILC with Live-View
2. Lens that can be used in manual focus mode
3. Tripod
4. Remote shutter release
5. Circular Polarizer
6. Adobe Photoshop
7. Pen tablet
When to Use
You will want to consider using a focus stack for any scene that may require more depth of field than your lens is capable of. I say “may require” because this is largely dependent on your interpretation of sharpness, and the lens aperture used in each situation may vary.
Some photographers require a higher level of sharpness to effectively print their images on a large scale. Additionally, lens aperture selection directly impacts the number of images in a focus stack. If you want to shoot at your lens’ sweet spot (typically about 3 stops down from wide open, such as f/8-f/11 for a f/4 maximum aperture lens), then you will need to closely examine your focus stacked images to ensure your depth of field is large enough and overlaps with each subsequent frame. A best practice here is to take a couple extra frames with additional focus points to ensure you will cover the entire depth of field.
A couple scenes that would benefit from this include a foreground that is close to the camera and a background a considerable length away or a telephoto shot with many elements in the frame, each at different distances from the camera.
Scene Characteristics
As noted above, focus stacking can be used in your typical near-far compositions to extend depth of field. However, I also like to break things down into the following categories to help determine the number of frames required and the specific settings used for capture:
1. Subject matter that remains in a constant position
2. Subject matter that moves slightly
3. Closeness to first subject
As you might guess, subject matter that does not move (1) is much easier to capture and assemble into a focus stack. However, it is still possible to stack an image that has moving objects (2). Additionally, the closeness to the first foreground subject will influence the number of shots required to maintain full depth of field (3). I will address these more in the next section.
Shooting
Please observe your selected composition and mentally note the scene characteristics. We will start with the more difficult shooting scenario: subject matter that moves.
If your scene contains moving elements that you want to render sharply in focus (flowers and other foliage are most typical), your first consideration should be shutter speed. Depending on varying wind conditions, you may be able to render these objects sharply with a relatively slow shutter speed, but this will require trial and error.
Since many landscapes are shot in low light, it may also be difficult to properly expose the photo without bumping up ISO significantly and/or opening up your aperture. The downside to increasing ISO is that it introduces noise into the image. It is quite common to be able to use ISO 2000+ and still reduce the noise enough in post to have a useable image, but this depends on your camera. If you are unsure, take some test shots in low-light at varying ISO settings and determine what your comfort level is with your camera’s ISO.
If you also have to open up your aperture, you will decrease the depth of field and may have to take additional frames to compensate. Ideally, you would want to shoot around f/8-f/11. These apertures are usually close to the sweet spot for most landscape lenses, and also offer a fairly wide depth of field. Once you have identified a satisfactory shutter speed, ISO and aperture, it is time to begin the focus stack.
After accounting for shutter speed for moving subject matter, shooting the focus stack is now the same for moving and non-moving subjects. The next steps are entirely dependent on how close the foreground subject matter is to your lens. The important thing to remember is the closer the foreground subject is to your lens, the more frames you will need to have adequate depth of field. Next, follow these steps:
1. With your camera firmly mounted on your tripod, switch your camera into Live-View mode (screen on back shows a preview of the scene).
2. Make sure that your camera and lens are set to manual focus, and turn off vibration reduction.
3. Move the focus frame into position directly over the closest subject in the frame.
4. Use your playback zoom button to zoom into the spot you selected. I usually zoom in as far as possible, and then back off once or twice.
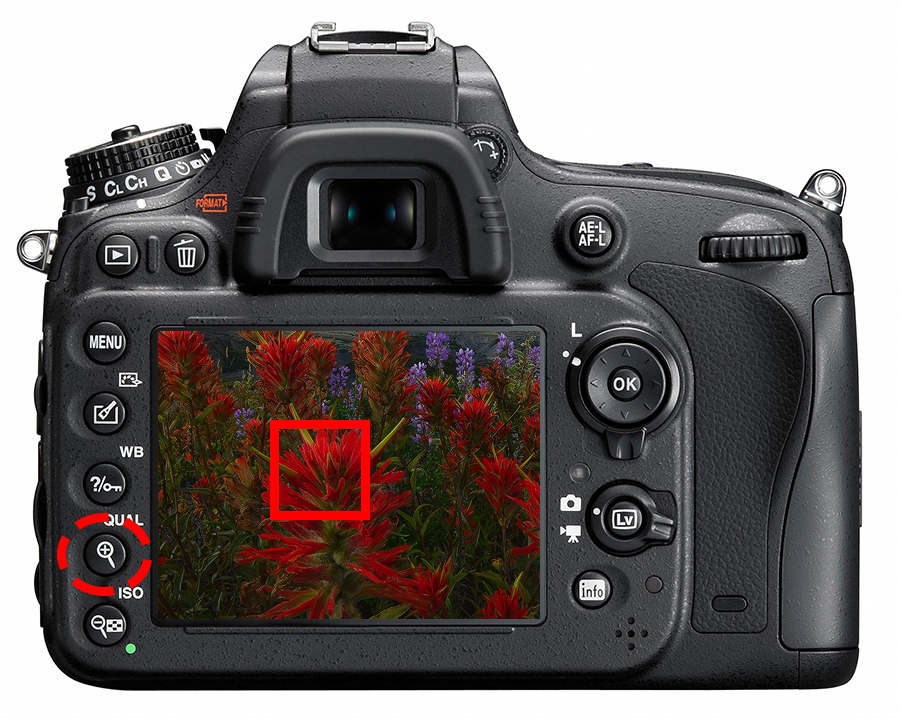
5. Now that you can see the subject closely, use your lens’ manual focus ring to focus on that spot. Live view makes this very easy!
6. Once focused, verify exposure settings and use your remote shutter release to take your first frame.
7. Click your playback button and review the image. Zoom in to closely gauge the depth of field you attained, and pay special attention to where you lose sharpness further into the frame. You will want to focus slightly behind this spot next.
8. Back in Live-View, move the focus frame into the spot you noted in #7. Repeat #4-7 for as many frames as needed to cover the entire depth of field in the scene. This may be 2 images or 12; it all depends on the scene. (Once you get this sequence mastered, you will be able to do this much faster than your first time around!)
9. Once you have all the images required for depth of field, ensure that you also have maintained acceptable exposure. You may need to take an additional frame for the sky (or other bright area) if your histogram indicates that you have blown highlights.
10. Congrats, you just shot your first focus stack!
Stacking
Once back at your computer, it is time to process the files.
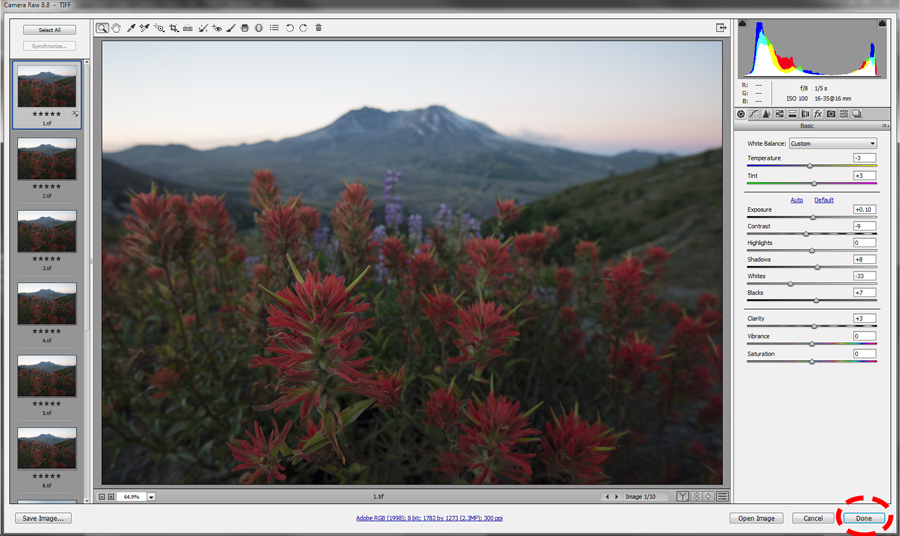
1. In Adobe Bridge, select all the files in the focus stack and open them as a group in Adobe Camera Raw. Correct distortion, reduce noise, adjust white balance, contrast, saturation, etc. as needed. When you have your first edits completed, apply the settings to all images in the stack. (This can also be done in Lightroom.) Click done.
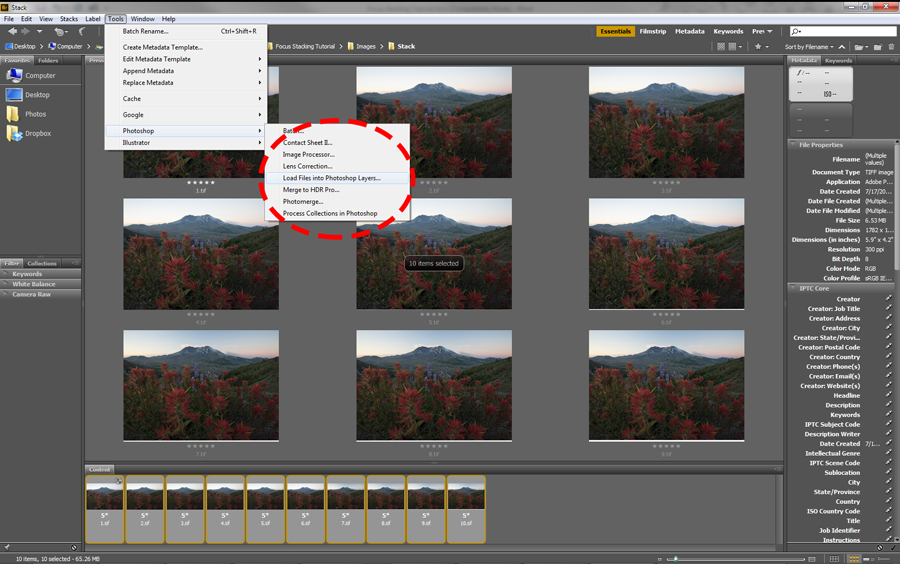
2. Back in Bridge, your files should still be highlighted. Go to the toolbar and select Tools/Photoshop/Load Files Into Photoshop Layers.
3. Photoshop will now open and create a new file with a separate layer for each image. I like to rename the files so I can easily identify them.
4. Highlight all the layers in the stack.
5. Go to Edit/Auto-Align Layers.
6. In the dialogue box that opens, set the projection section to auto, and deselect the lens correction options. Click OK.
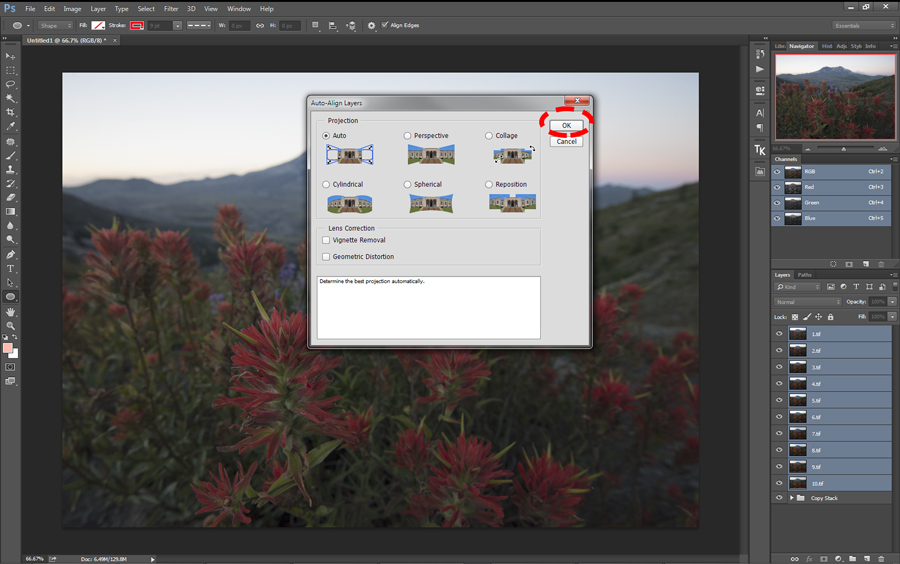
7. Photoshop will align all the layers; verify this before proceeding.
Automated Blending
1. Highlight all your aligned layers again, excluding any different exposures taken for the sky or bright areas.
2. You may need some of these original layers later, so duplicate them and create a group at the bottom of your layer panel. You can turn off the visibility of these, as well as any different exposures for the sky. (You can always import the same layers from Bridge later if you want to skip this step due to file size concerns.)
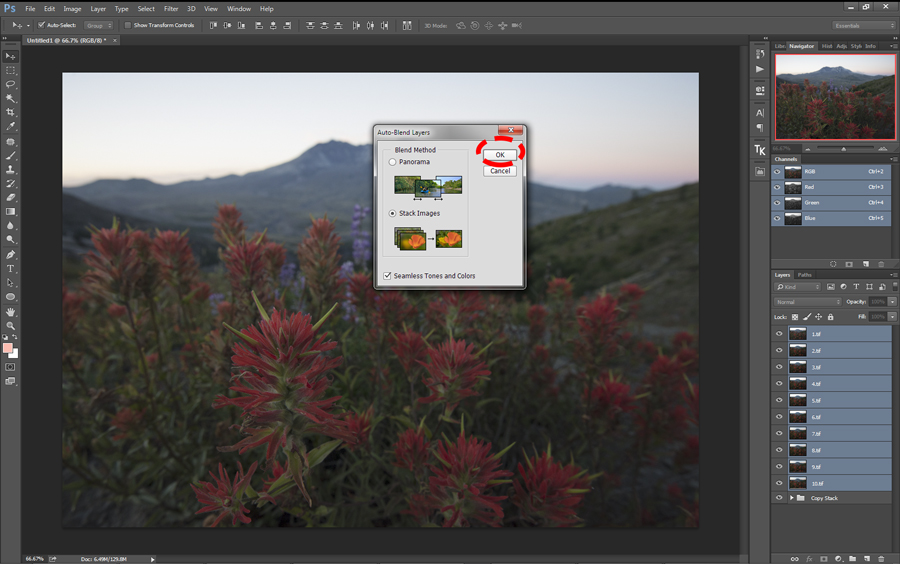
3. With the other layers highlighted, go to Edit/Auto-Blend Layers.
4. Check the Stack Images and Seamless Tones and Colors radio buttons and hit OK.
5. Photoshop will create layer masks for each of the layers. These masks will have white/visible areas for sharp portions of images and black/hidden areas for out-of-focus areas.
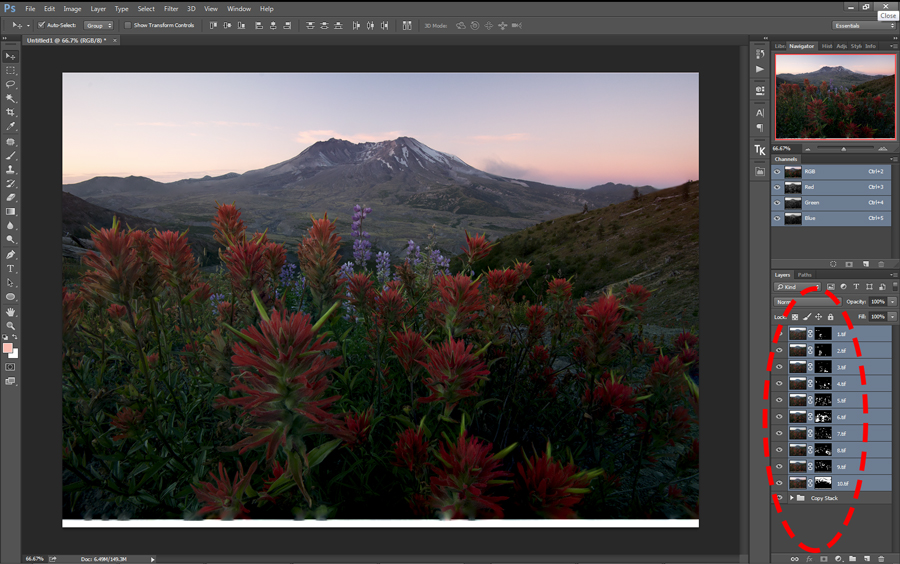
6. At the top of the layers, hit Ctrl-Alt-Shift-E to create a merged layer.
Hand Blending
1. Keep your merged layer visible, and hide all your other layers.
2. Make a new blank layer above your merged layer.
3. Zoom into 66-100% and slowly scroll around the image. If you see any out of focus areas, discolorations or other wacky spots, paint a white “X” over the spots with your brush tool (on the blank layer).
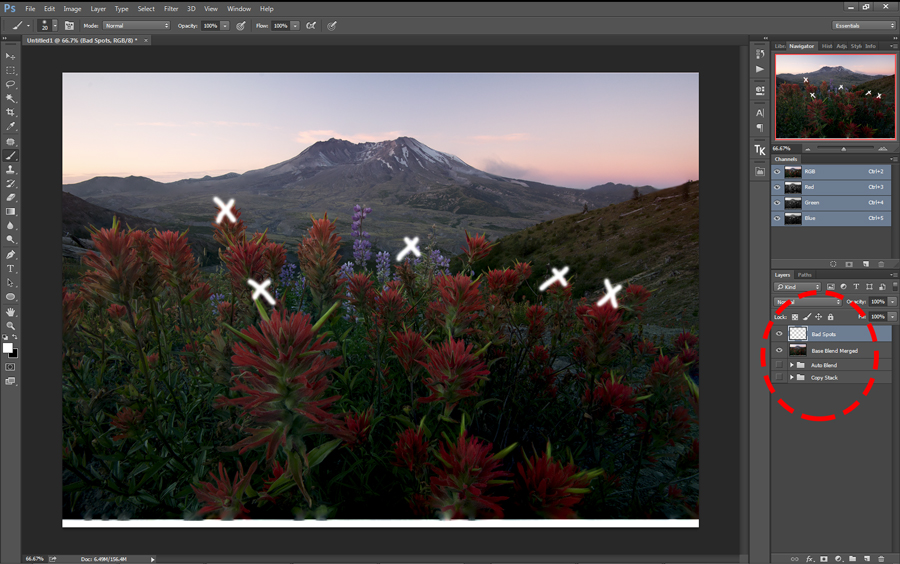
4. Once all the spots are marked, pick one to start working on.
5. Make the group of previously aligned (non-blended) layers visible and click through them to identify which layer has the marked spot in #4 completely in focus.
6. Duplicate this layer and put it at the top of the layer stack.
7. Add a layer mask to this layer and click Ctrl-I to invert it (it will turn black).
8. Select the brush tool and put your opacity and flow to 100%. Hardness should be at about 50-70%. Make sure white is your foreground color.
9. Use your brush tool to paint white on the layer mask to reveal the in-focus areas of the top layer. Paint as much as necessary to remove the out of focus spot. This is much easier using a pen tablet rather than a mouse.
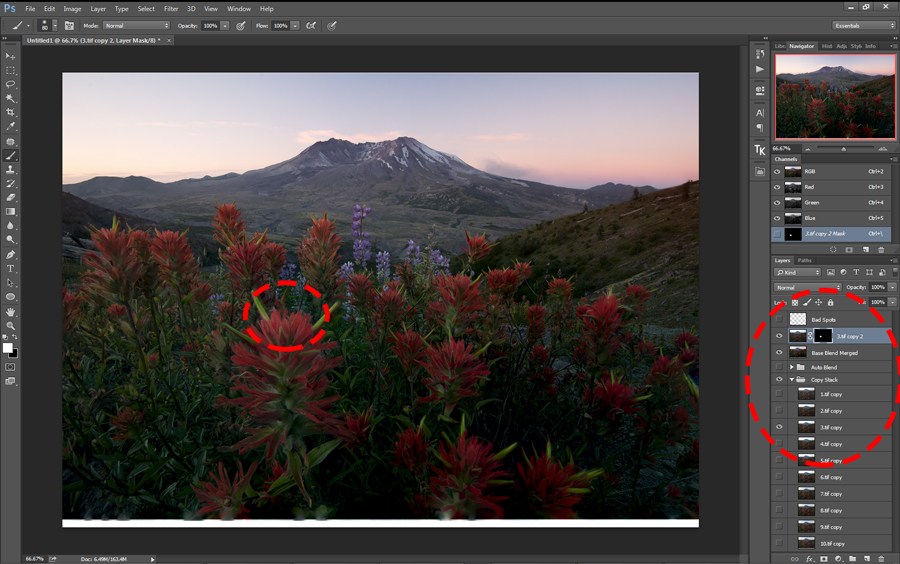
10. Highlight the top layer and the layer below and merge them.
11. Repeat #4-10 for all the spots you marked in #3.
12. Hit Ctrl-Alt-Shift-E again once you have all your initial touch ups completed.
Cloning
1. For images with moving subject matter, you may have to clone in spots that were blurred due to movement, etc.
2. On the new merged layer, use the clone stamp tool to clone areas that are difficult. I recommend doing this while zoomed in to 200-300%.
3. Once you have completed all of the touch ups, make another layer copy. I like to rename all of these at different stages, e.g.: Base Blend, Touch Ups, Cloned, Final Focus Stack.
Exposure Blend
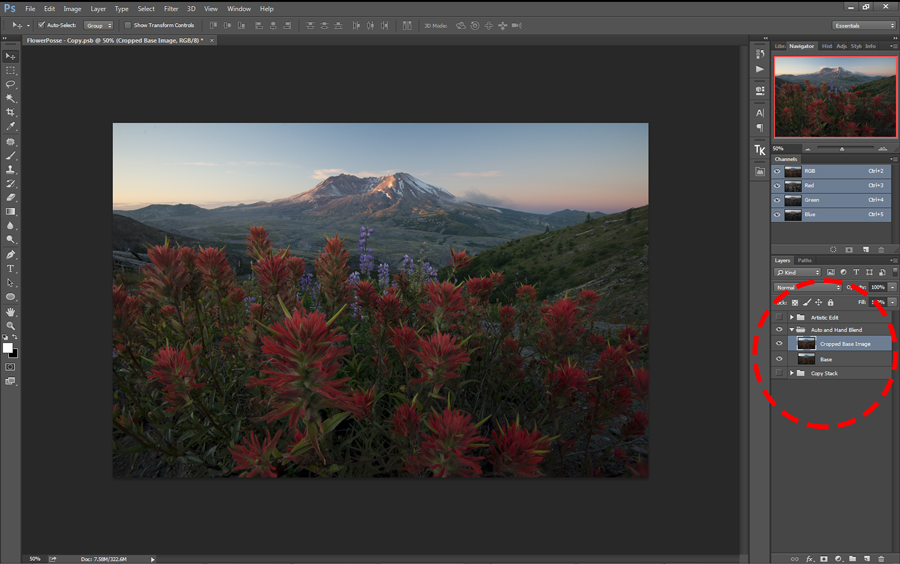
1. If you had an additional layer for your sky or other bright area, put this at the top of your layer stack.
2. Add a layer mask and invert it.
3. With a white brush, paint in the areas of the sky that you want to blend in.
4. There are many other tutorials that cover exposure blending, but this will get you started.
5. Hit Ctrl-Alt-Shift-E to create a final merged layer.
6. After aligning and blending all these layers, you may notice that the outside perimeter of your photo has artifacts or blurred edges. This is normal and can be eliminated by cropping away these areas.
7. This final layer is the base image that is focus stacked and ready to be edited further in Photoshop, if desired (color, enhancements, dodging/burning, etc.).
Conclusion
Although this tutorial is fairly lengthy, the process is straightforward and you can speed things up as you gain experience.
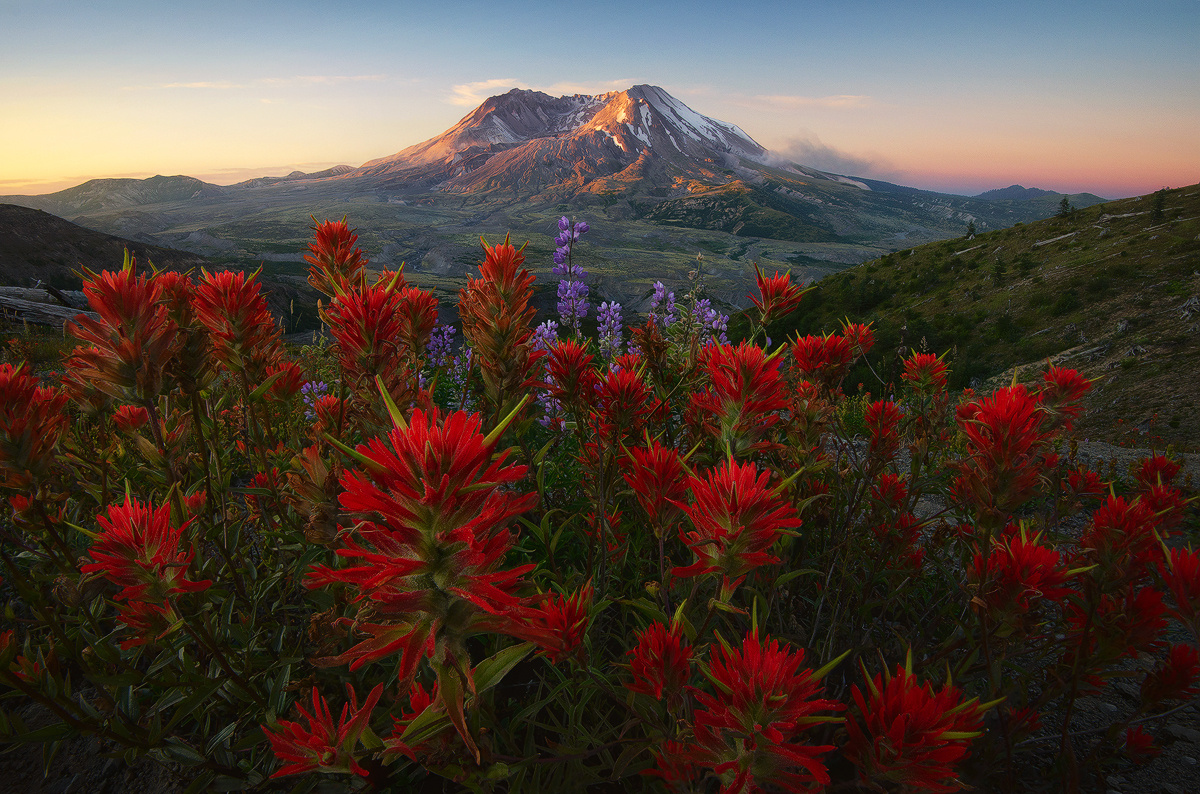
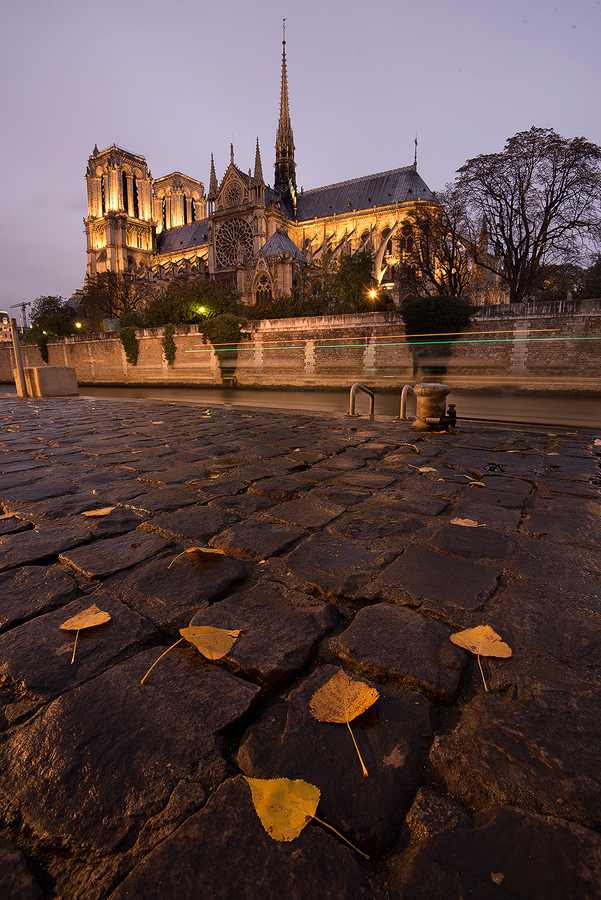
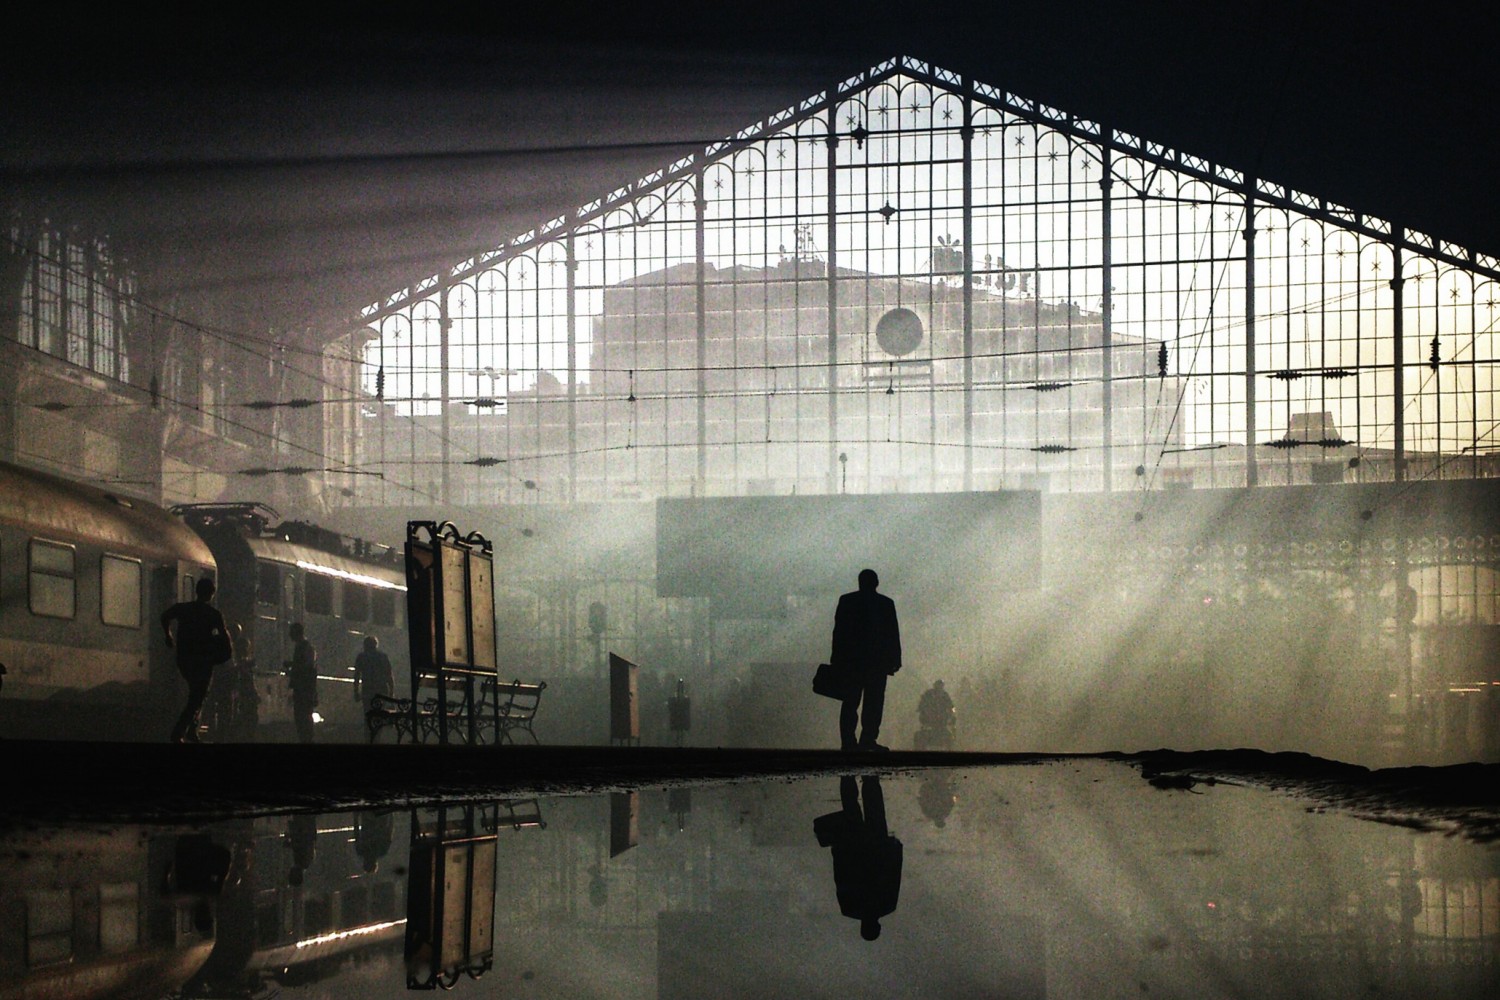
Not all scenes require focus stacking, but it is great to have the ability to do so when needed. Most focus stacks are not difficult; some are just two frames and can be blended in minutes. With patience and practice, you will be shooting focus stacks in no time!





Leave a reply