
Night sky photography shots are impressive. Let’s go on a trip together and take stunning night sky photos. In this tutorial, you will learn how to hunt for a dark sky, choose the right equipment, discover the 500 rule, and take awesome photos.
Hi, I’m Dave Morrow, and I will be your guide in this journey. I’m a fellow 500px-er, adventure junkie, and I love teaching photography. In this tutorial, you will learn how to hunt for a dark sky, choose the right equipment, discover the 500 rule, and take awesome photos.

Introduction to night sky photography
Night star photography seems like a daunting task, but trust me it’s much easier than you think. When I first picked up a camera and decided to capture some shots of the night sky I could barely see a light at the end of the tunnel. Now, a few months and a few hundred shots later, that light is shining bright and I’m here to share with you the information and experiences I gained along the way.
But wait, there is one problem, from your vantage point there may be a million and one factors keeping you from seeing the mesmerizing beauty of space or the Milky Way. Most of us live in locations where cloud cover, smog and light pollution are the number one enemy of the night sky photographer. That’s where I come in, armed with my tutorials, presets, and simple tricks you will have all the ammunition necessary to defeat the odds and capture the beauty of space and the galaxy that lies beyond. I do have a few small errands for everyone to run prior to departing on our trip, so grab a sturdy tripod, wide angle lens, a camera with manual mode functionality and your imagination, let’s head for the stars.
What you need to know
#1 The number one key element to capturing the night sky, Milky Way, or stars in general is having a dark sky, and I mean the darkest sky possible. Please note, if you can’t see the Milky Way with the naked eye, it will be very hard to capture it any better on camera. Here are a few solutions to ensure the best shots possible, first of all check a Light Pollution Map.
#2 The next equally important step is checking the moon phase. If there is a moon in the sky, by no means will the stars appear to shine as bright. Our moon is much closer than any of the stars seen in the night sky, therefore it appears to shine much brighter. Shooting on nights of the New Moon ensures that the moon is not visible in the sky and that the Milky Way appears as bright as possible. A great resource for tracking down this information is the The Photographers Ephemeris.
#3 The third crucial item is a very sturdy tripod, this is one of the steps that many people miss out on and therefore sacrifice the quality of their star shots. I currently use a Really Right Stuff TVC-34L Versa Series 3 Tripod with BH-55 Ballhead and Nikon D800 L-Bracket and find it to be hands down the best set up out there.
#4 The 4th and last necessary Item is a camera with manual mode functionality that shoots in RAW format. This allows the user to have ultimate control when capturing the stars and in the post processing environment.. My preferred night star photography camera is the Nikon D800, which handles the high ISO and noise induced from night sky shooting flawlessly. Although it is not necessary, having a camera remote/timer and very fast (wide aperture) wide angle lens will greatly improve the results of your star shots. I shoot with and highly recommend the Nikkor14-24mm f/2.8G and/or Nikkor 16mm f/2.8 Fisheye lens for all my star shots. At f/2.8 they are both VERY fast lenses.
Lens & Camera advice
If you are looking to get into night star photography and are not sure what kind of camera or lens to select there are a few pointers to keep in mind. First off, if your wallet is deep enough a full frame camera with a 35mm sensor is the best way to capture the night sky, a medium format camera will also work wonders but comes with an even higher price point. When talking full frame sensors a few good ones come to mind. In the world of Canon the 5D Mark II or Mark III will work fine along with the 6D models. There are a few other options such as the Nikon D700 or the D600 on the Nikon side of things. Looking at cameras that do not include a full frame sensor the Canon 7D or the Nikon D5100 will somewhat do the trick, but a full frame camera is really necessary to capture the Milky Way and all it’s stars.
Moving along to lenses there are a few major points that need to be touched on. Having a lens with an aperture of f/3.5 or faster is absolutely necessary for capturing the Milky Way, for star trails it is not at all necessary. Here are a few great lenses that will work wonders on your full or crop sensor camera. I consider the NIkkor 14-24 F/2.8G wide angle lens to be the best star photography lens on the planet, I use it for 95% of my star shots and it never fails. Another yet cheaper option would be the Rokinon 14mm f/2.8 or the Rokinon 24mm f/1.4. I have also been experimenting with my Nikkor 16mm f/2.8 Fisheye which seems to do a fine job less the insane amount of distortion, which at times can look very cool and out of this world.
Step by step to taking night sky photos
Head on over to my Free Star Photography Tutorial and download a free copy of my 500 Rule Chart if you like, we will use it in the following section.
First off let’s get one thing straight, and then we will move on to some interesting math homework, sounds like fun right? To get successful shots of the Milky Way you will have to have a very visible and clear view of it with your naked eye. If you can’t clearly see it, physics won’t allow you to capture it with your camera without inducing a massive amount of ambient light which will destroy the picture. That takes all the trouble of finding the Milky Way out of the equation, so now your job is to find a really dark spot where you can see it and start shooting using the following steps.
500 Rule. Let’s let the math homework begin. OK OK, I’m just kidding the math part has already been taken care of in the form of this chart (provided). And now I introduce to you the 500 Rule. Even though it appears to be quite complicated the concept is simple in theory and crucial to capturing clear star shots.
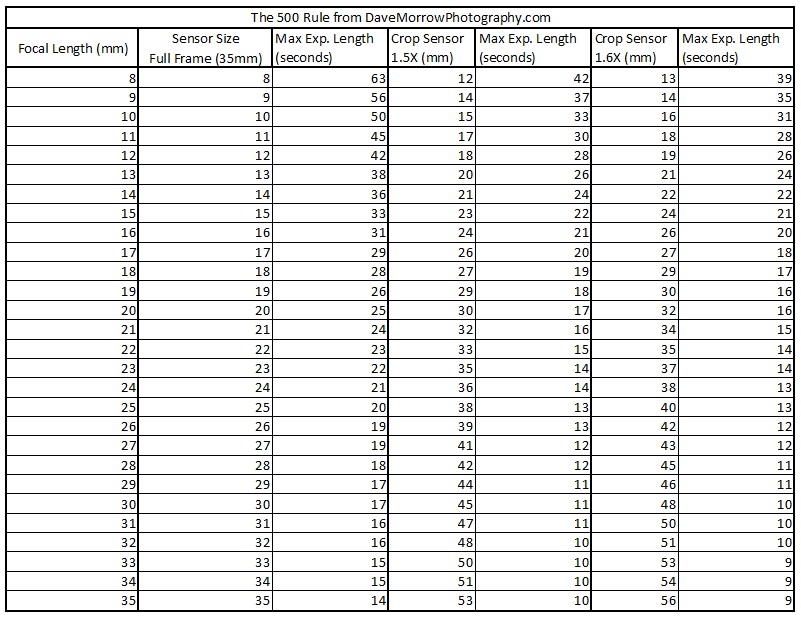
No Star Trails. To prevent star trails, also known as the visible change of the star’s location with respect to our earth’s location over the selected shutter speed, divide the number 500 by the focal length you are planning to shoot at, say 14mm for example, the result is the maximum exposure time for your shot in seconds.

Yes Star Trails. The great part about the 500 Rule is that it can also work in reverse for the shooter that is looking to capture star trails. For those of you that don’t shoot with full frame cameras it is necessary to take this “Crop Factor” into account when performing the calculation. I have provided standard crop factors for different camera models below. For example a full frame 35mm camera shooting at 16mm can capture the night sky for a maximum of 31 seconds prior to showing any results of “Star Trails” in the picture. Once the exposure time exceeds 31 seconds, trails or star movement will start to show up in the shot. The best way to clearly exhibit this relationship is to go outside and experiment, there are a million different acceptable combinations it’s just a matter of finding what works for you and your camera. My Free Star Photography Tutorial also provides info on this topic.

Capturing The Right Night Sky Photography Shot
Now that a lens and exposure length has been reviewed it’s time to get down to the technical aspects which I will refer to as the Big Three: aperture, ISO and shutter speed.
I currently shoot my night sky photography shots with a focal length of 14-24mm, ISO ranging from 3000-5000 (depending on your camera these high settings may increase the noise exponentially) and shutter speed of 30 seconds. Keep in mind, a longer exposure picks up more light, which in turn means you will see stars that are farther and farther away from our planet. On the other hand light sources closer to our planet will appear brighter at longer exposure times. It is key to play around with the Big Three: aperture, ISO, and exposure time until the correct setting is achieved. Each of these settings directly reflects on one another, this being said there are many different combinations that will yield great results. The trick is to find out what works best for you and your camera, there is no right or wrong way to do it, just good and bad results.
Focusing at night can also become difficult. I find it easy to focus at infinity, take a practice shot to see how it looks then adjust focus from there. Usually infinity works just fine. See something you like in the foreground? Take one shot focusing on the stars, then another focusing on the foreground; these can in turn be blended together in Photoshop using layer masks for a sharp & interesting overall image. It is also worth noting that unless I am taking two shots to blend in the stars with my foreground using Photoshop, I only use 1 RAW exposure or file to capture the night sky. Since there is a very minimal range of light, the dynamic range of the image is low and a single exposure will work just fine.
Post Processing
Lightroom edits. When it comes to post processing star shots I use a few tools, the first being Lightroom 4. Lightroom can be used for basic RAW file conversion, color correction, basic luminosity control, contrast, sharpening and noise reduction. These can all be performed using the simple slider interface that is provided with the program.
Experimentation is once again the best way to find the best settings that work for you. To make life a bit easier I also made some Under the Stars Lightroom 4 presets that I use to process each one of my star photos. These presets will make the stars come to life and the colors pop with the click of a button.
Photoshop edits. Upon completing the noted steps, Photoshop and luminosity masks can be used to achieve ultimate control in bringing out the most in your star shots. Luminosity masking is the technique used in Photoshop to select only certain ranges of light in the picture. This being said its most powerful feature selects the bright stars and allows the user to brighten them, while the remaining darker portions of the photo remain untouched. On the other hand luminosity masks can also be used to allow a noise reduction layer to be applied to only the dark and noisy areas of the photo. Detailed selection and luminosity masking are both intermediate level Photoshop skills that take hours of practice but are well worth the reward!
After using luminosity masks in Photoshop my post processing is complete and I can save the file for later viewing or sharing on the web. I provide an Under the Star Post Processing Video Tutorial that covers all these steps denoted above in full detail.

Thanks for reading! To see more of my work, follow me on 500px.
For more info on night sky photography, visit my website, Facebook page, and check out my Free Star Photography Tutorial.
We hope you enjoyed this night sky photography tutorial! Did you have images taken using my technique? Upload them to 500px and share links in the comments below—we’d love to see your results.
After reading the following tutorial, go grab a free copy of my 39-page “Star & Night Sky Photography” eBook included at the top of the Free Night Start Photography Tutorial on my website.
You Might Also Like These Articles:
- Why I Switched from 50mm to 35mmm for Street Photography
- 50 Surreal Night Sky Images Of Every State In The USA
- 35 Mobile Photography Tips For Taking Better Smartphone Shots
- This Photographer Captures Moody Street Photos Of London After Dark

Leave a reply