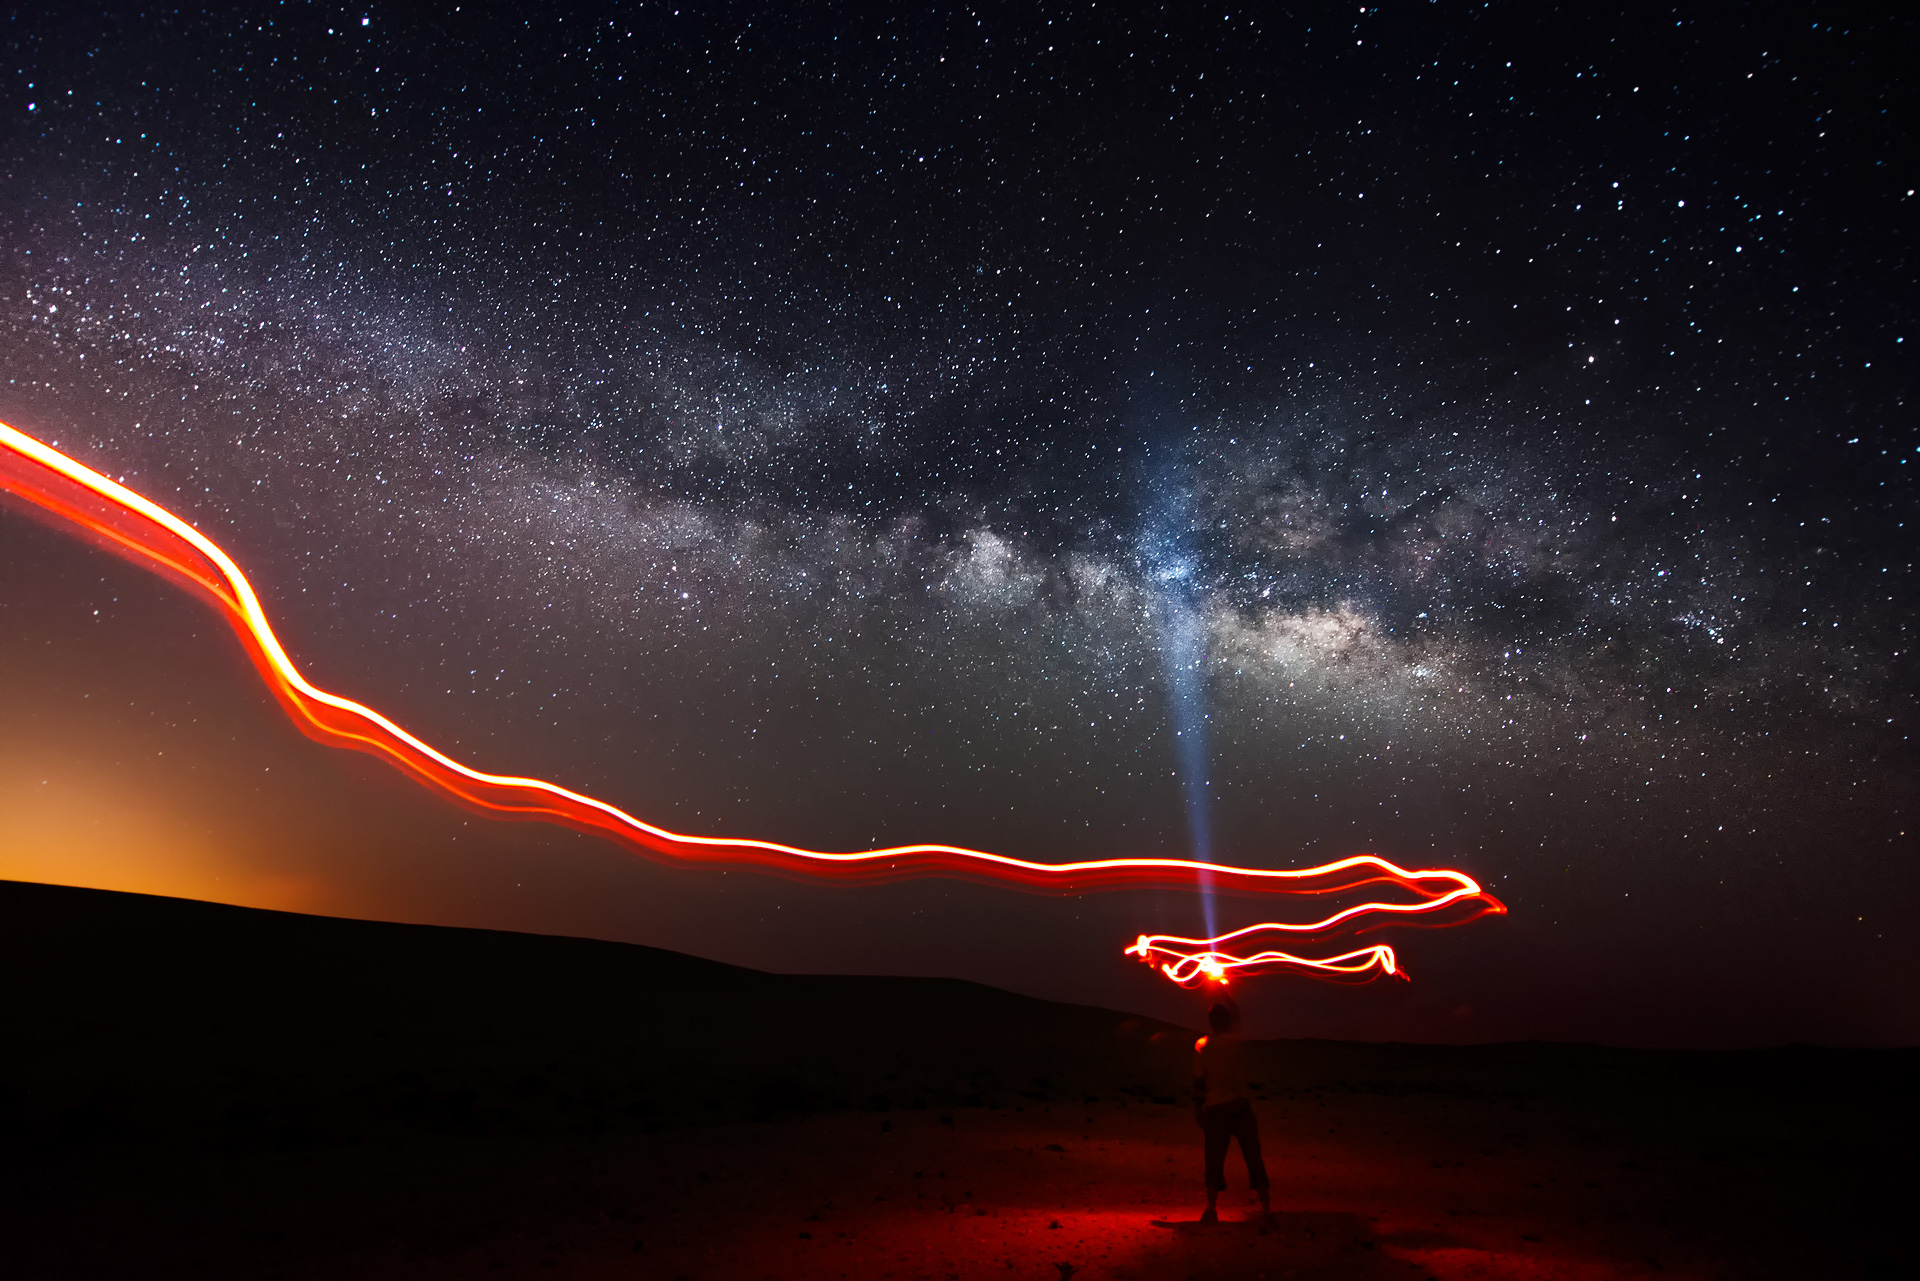
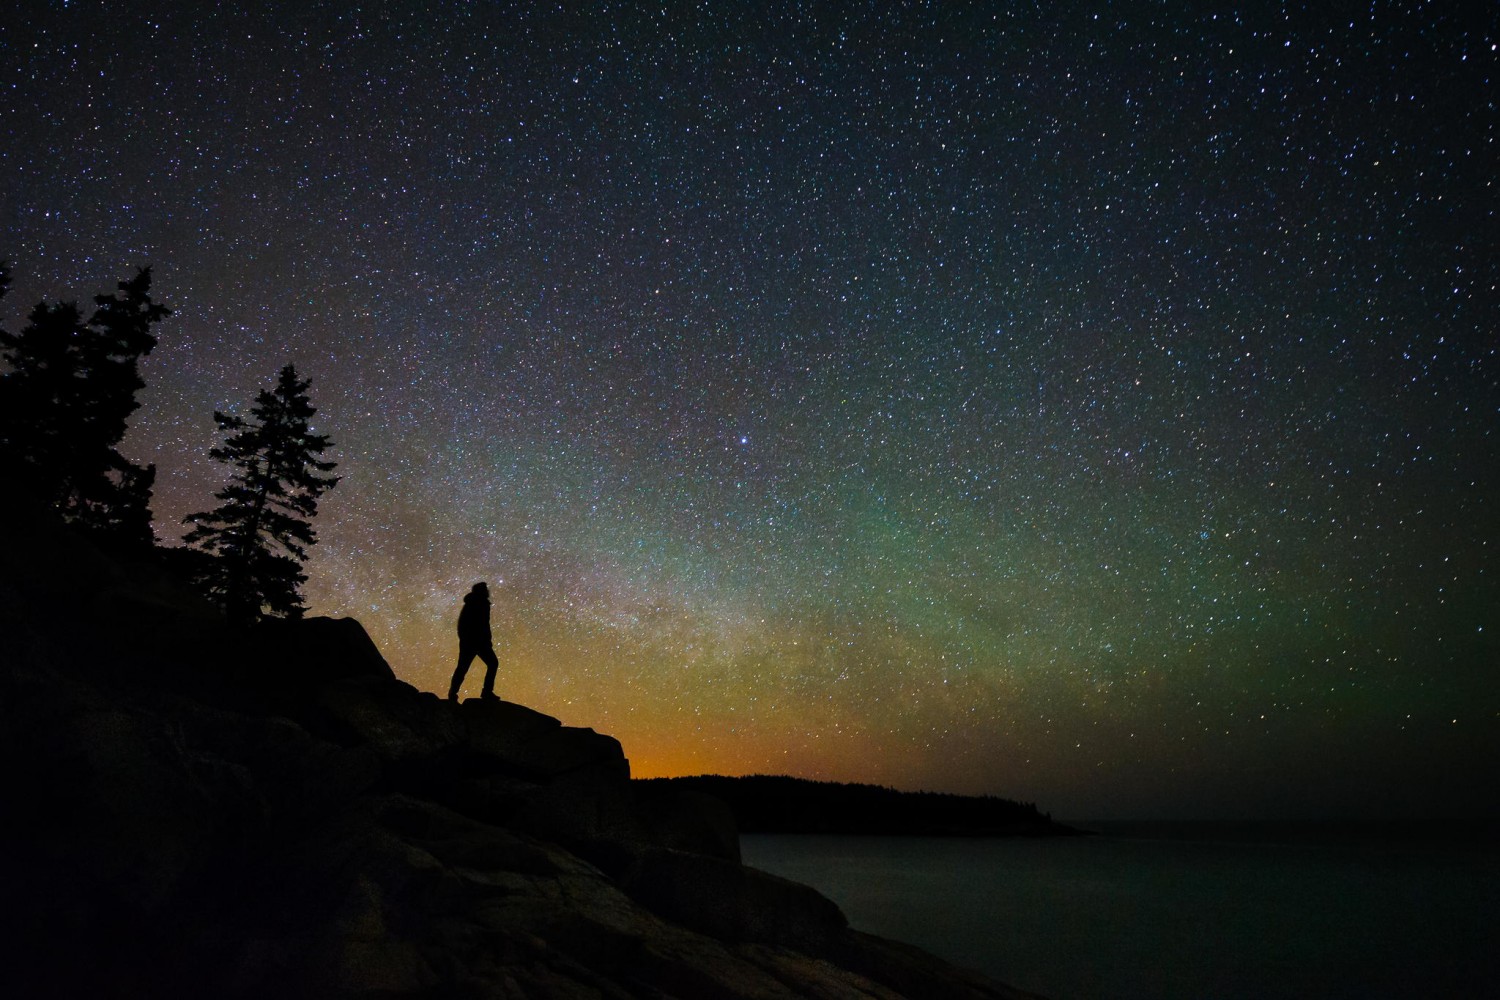
Whether you call it a self-portrait or “selfie”, there’s nothing like an awe-inspiring photo of a person under a vast, star-studded Milky Way to really capture an audience’s attention. Throw in the extra personal nature of a self-portrait, and you have instant drama in your picture. In this stellar tutorial, Qatar-based photographer, designer, and educator Hammad Iqbal shares his tips and techniques on mastering the Milky Way self-portrait, a popular shot among 500px photographers. Scroll down, and get inspired to go out and shoot under the night sky!

Photography has seen its great days, taken many bold steps and has enjoyed a steady progression. From the yesteryear of good old film to the first dawn of digital photography, we have all witnessed this change, mostly positive, in the realm of photography. But it’s the past few years which could be considered a turning point for photography as an art. Blockbuster phenomenon such as Instagram has given millions of people to get into photography, although it’s mostly for fun. And another recent phenomenon that deserves a mention is the ‘Selfie’ or self-portrait. I have no idea what’s with all the buzz surrounding it, but as a photographer who appreciates a great image and the effort that is involved, I have to say that there are many extraordinary self-portraits on 500px which have set the bar very high. And there are more people who would love to learn to do something similar, so I’m here today to show you how to make an electrifying self-portrait under a trillion stars.
GADGETS
A great shot doesn’t always need the absolute best and most expensive tools. In fact, great artists are also good at working within the limits of their equipment but are still able to produce stunning results. They know how to improvise and use any situation to their advantage. I am happy that I can do a thing or two as well when it comes to working with whatever I have. All shots in this article were made using the following equipment, most important of which is an inexpensive LED flashlight by Nebo.
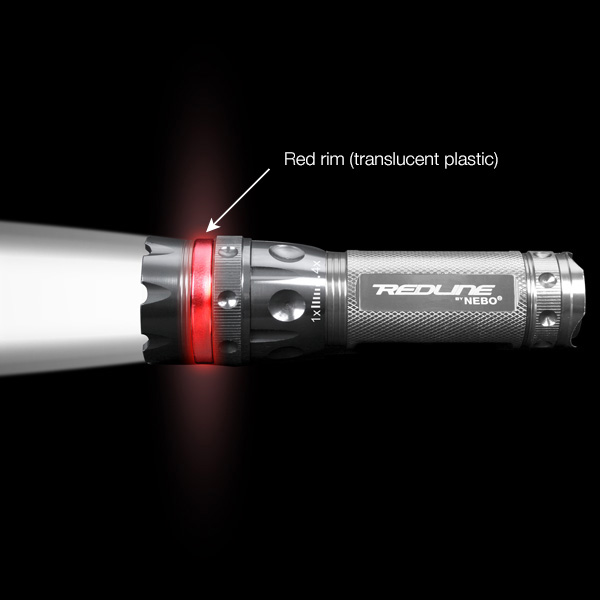
1. LED flashlight – Nebo 5581 Redline is a tactical LED flashlight that costs about $15. It has a rotating ring on the front which allows the user to change the spread of the beam. The red ring around it is a plastic and can be cleverly used to do some interesting lightning effect in red without much effort.
2. A decent DSLR – Thanks to the recent advancements in DLSR technology, you can now get great long exposure shots from a mid-range DSLR such as the Nikon D5300 or Canon 650D. Don’t worry if you have an entry-level DSLR. You can still take such shots with it but don’t expect the high ISO performance to match a more expensive camera. By the way, it’s not a requirement to have a DSLR. You could do absolutely fine with a mirror-less body such as Fujifilm X-series, Sony or any other brands that allow you to control all aspects of your exposure (aperture, shutter speed and ISO) manually. But remember that, to get best results, you must always shoot in RAW format, always.
3. Solid tripod and head – No matter what camera you have, you are at the mercy of a reliable and strong base to hold it firmly in place. We are dealing with long exposure work so make sure that your tripod is up to the task and will not prove to be the weakest link in the chain. It should be able to hold the weight of your camera and lens without you having to worry about wobbling or shaking during long exposures. I use a 4-section carbon fiber tripod from Vanguard (Vanguard Alta Pro 284CT tripod) which is light, sturdy and has great vibration dampening technology and it has proven to be a great companion to my Nikon D800. Equally important is a heavy duty ball head. I use the Manfrotto 498RC2 ball head which is built like a tank and can hold quite a lot of weight without breaking a sweat.
4. Wide-Angle lens – Milky Way is huge. In fact, it spans across a distance of millions of light years. Gladly, we can still see a beautiful portion of it from our little home planet. In order to cover a substantial amount of foreground and the Milky Way, you will require a wide angle lens. On a full-frame camera, you are looking at 14mm to 17mm of focal length as ideal. On crop sensors, it should be 11mm such as the Tokina 11-16mm DX Pro II. I use a Nikon 14-24mm f/2.8G ED with my D800 and almost always shoot at the widest focal length for capturing the Milky Way.
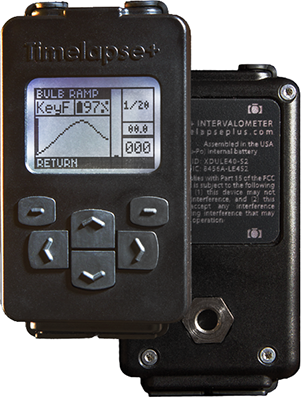
5. Intervalometer (optional) – Shooting long exposures is much more effortless with an intervalometer. They are relatively cheap and you can either buy one from the same manufacturer as your camera or get a universal one with the cable for your particular model. I use the Timelapse+ but you don’t need to go for something as sophisticated as this. If you do not have an intervalometer, you can still shoot up to 30 sec of long exposures easily with your DSLR. Just set your shutter speed to 30 sec mark in Manual mode and you are good to go.
PLANNING
To save yourself any disappointment, it’s best to do some homework before heading out. Below are some of my tips to get you ready.

1. Find the Right Location – We are talking about Milky Way and stars, so a dark location with minimum light pollution is priority one. To find an appropriate location in your city, you can use Blue Marble Navigator website. It’s basically a global satellite map of the city night lights and indeed a valuable reference to get an idea about light pollution in any city of the world. I find it very useful and I’m sure you will too. The darker areas on the map are better suited for Milky Way shots as they suffer much less from light pollution, therefore choose your location carefully. Tip: Use the search field on the website.
2. Find the Milky Way – When I started out in long exposure work, which is not so long ago, it took me some time and quite a lot of reading to learn the basics of shooting the Milky Way. The first thing is to find it. Luckily, nowadays it’s just a matter of few taps on your mobile phone or tablet. There are many useful apps on Android and iOS to help you find the Milky Way, constellations, lunar phases, meteor showers and even satellite trajectories on any date, time and the location of your choice. I personally use Stellarium Mobile and Star Chart on my Android smartphone. For iOS users, I recommend Stellarium Mobile and Sky Guide. I also recommend that you download the desktop version of Stellarium on your PC or Mac. It’s such a useful reference.
HOW TO ACHIEVE THE ELECTRIFYING EFFECT
So you have done your homework and are out now in the wild. It’s time to capture some great self-portraits under the Milky Way. Believe me, it’s much easier than you might have thought. For your convenience, I have made a schematic diagram with important notes that can prove to be very useful on location.

As you can see in the diagram above, it is easy and a lot of fun to achieve such effects provided that you have an LED flashlight or something similar to create a red trail during long exposures. Now let’s go through the steps mentioned in the diagram.
STEP 1: CAMERA SETUP
Shooting mode – Make sure that the camera is set to ‘M’ that is, on manual mode so you can control all aspects of your long exposure shots.
Focal length – Use the widest focal length on your wide-angle lens to cover as much of the Milky Way as you can. For the shots in this article I set the focal length to 14mm on my Nikon 14-24mm.
Focus – Milky Way shots are captured in the darkest environments so autofocus is not going to work. Even manual focussing will prove to be very challenging because the subject you want to focus at is at an infinite distance and is so faint that you can’t see it with your naked eyes. Nothing to worry about. Just set your camera and lens to manual focus and rotate the focus ring until the focus mark is set to infinity.
Aperture – You want the maximum amount of light to register on the sensor during the long exposure so the fastest aperture on your lens is the way to go. I use f/2.8 on my Nikon 14-24mm. Do the same if you have the Tokina 11-16mm f/2.8. Whatever lens you have, use its widest aperture.
ISO – To get the stars or Milky Way to be properly exposed, a higher ISO setting is a requirement. Depending upon the sky transparency, you will need to use an appropriate ISO for your shots. Generally an ISO of 2400 is a good starting point. I used an ISO of 6400 because in the desert of Doha which is not much higher above sea level, sky is not gorgeously clean and the density of stars is not as striking as you would experience in places that are at a much higher altitude, have a clean atmosphere that is free of dust or humidity, and are much farther away from light pollution. To get to an appropriate ISO setting, the best method is to take test shots starting with an ISO of 2400.
White Balance – I prefer to set the white balance to auto since I am shooting in Raw.
Capture Format – You can never overemphasize the importance of shooting in Raw. That’s the best thing to owning a full-fledge digital darkroom, and quite frankly if you have a DSLR or mirror-less with the ability to shoot in Raw format, you should make an effort to learn to process your images. Afterall, the capability to shoot Raw is one of the most significant features of a camera and it’s pointless to spend money buying a DSLR and not using its most powerful feature.
Tip: Since the shot is a long exposure, the best way to release the shutter in order to avoid micro vibrations is using a cable or remote. But if you have not got one, you can always use the built-in self-timer option on your camera. Just set the self-timer interval to at least 5 seconds.
STEP 2, 3 & 4 – GET SET, GO!
As shown in the diagram, once the camera is ready and setup, all you need to do is turn the LED flash on, keep it above your head aiming at the sky, and press the shutter button. Once the shutter is released, it’s time to get creative. Follow the steps below.
- Start walking away from the camera in any way you like—in straight lines, curves, zig-zag or any other shapes you can think of, but try to stay within the frame. It might take some trial and error but it would be interesting and a lot of fun.
- Just remember that you only have a max of 20 second to do your performance. It’s because the last 10 seconds of the 30-sec exposure should be to register you and the beam of light on the Milky Way on the sensor.
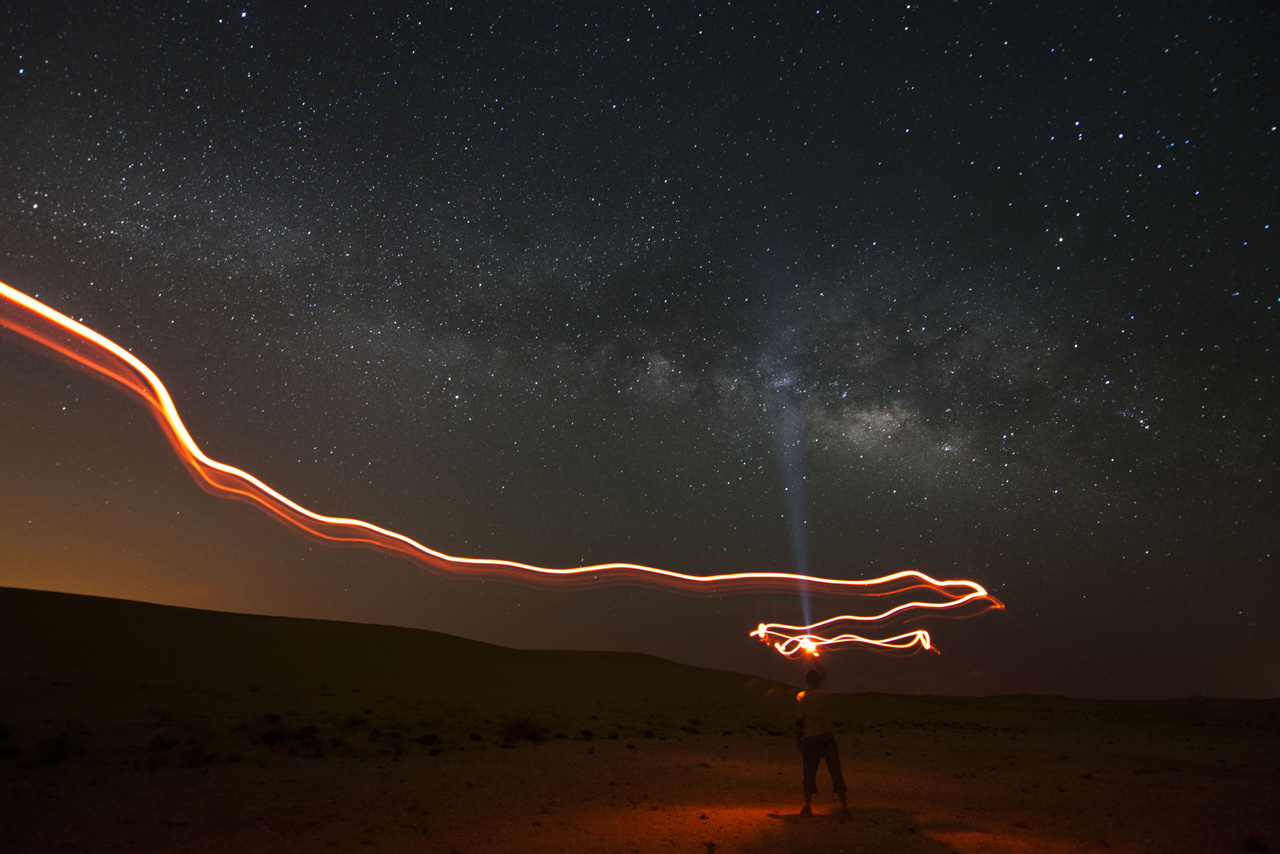
- If you keep walking throughout the 30-sec exposure, the camera will not be able to register you and the beam of light and you will only get the red trails in the shot. There are many ways to do this, for instance, you can capture a few 30-sec trails at first and then one final shot with the 20-sec trail and 10-sec stand still. Later you can merge all the shots in Photoshop to create one shot that looks something like the one below.
POST-PROCESSING
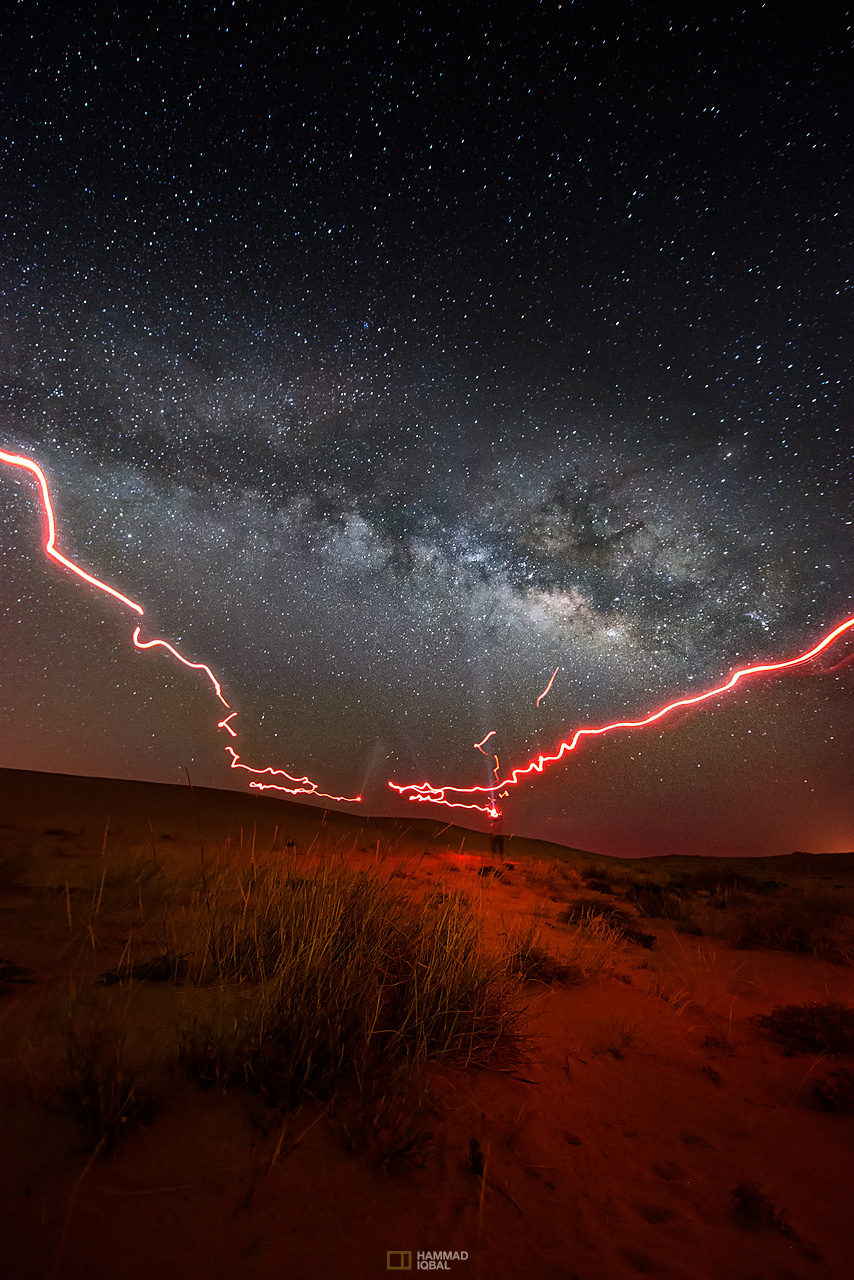
Alright, so you have taken some shots in RAW. Let’s head straight to processing those files now. Here is how the cover shot in this tutorial looked like straight-out-of-camera.
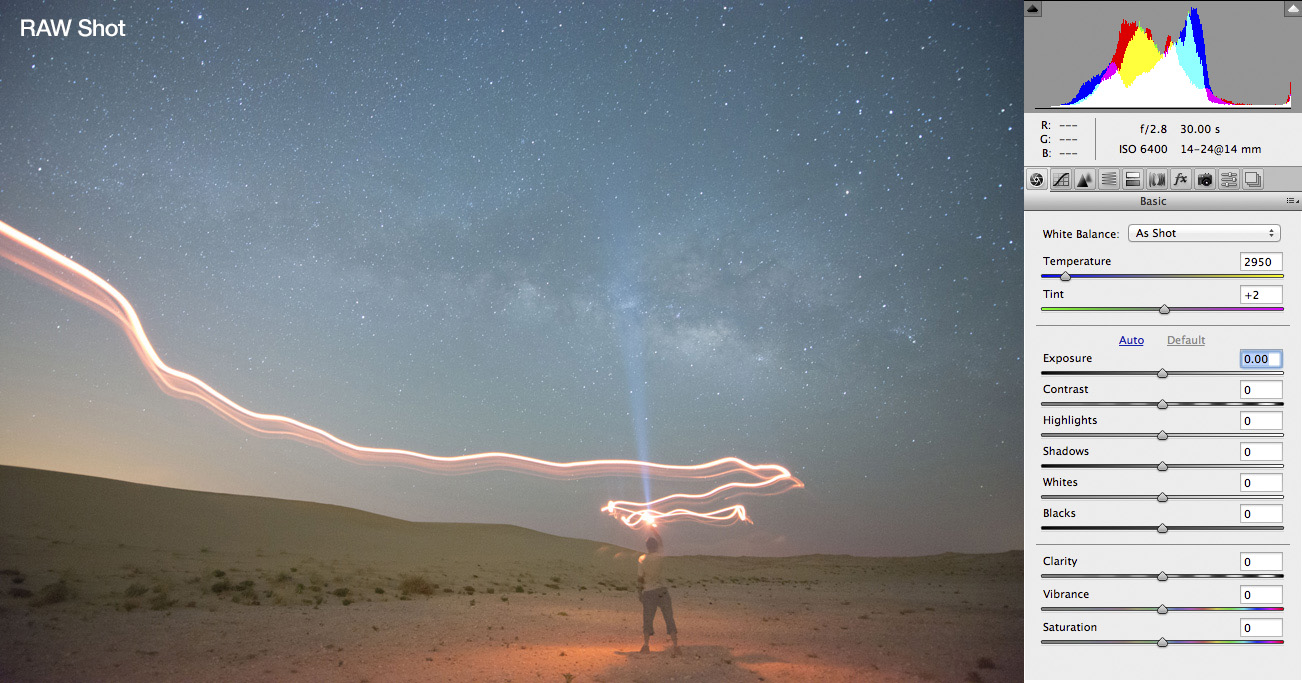
1. White Balance and Exposure – The camera has automatically set the white balance to a rather cool temperature which is making the Milky Way look too blue. Also the image looks too flat so I added a lot of contrast. I also decreased the exposure by two full stops to get the sky black.
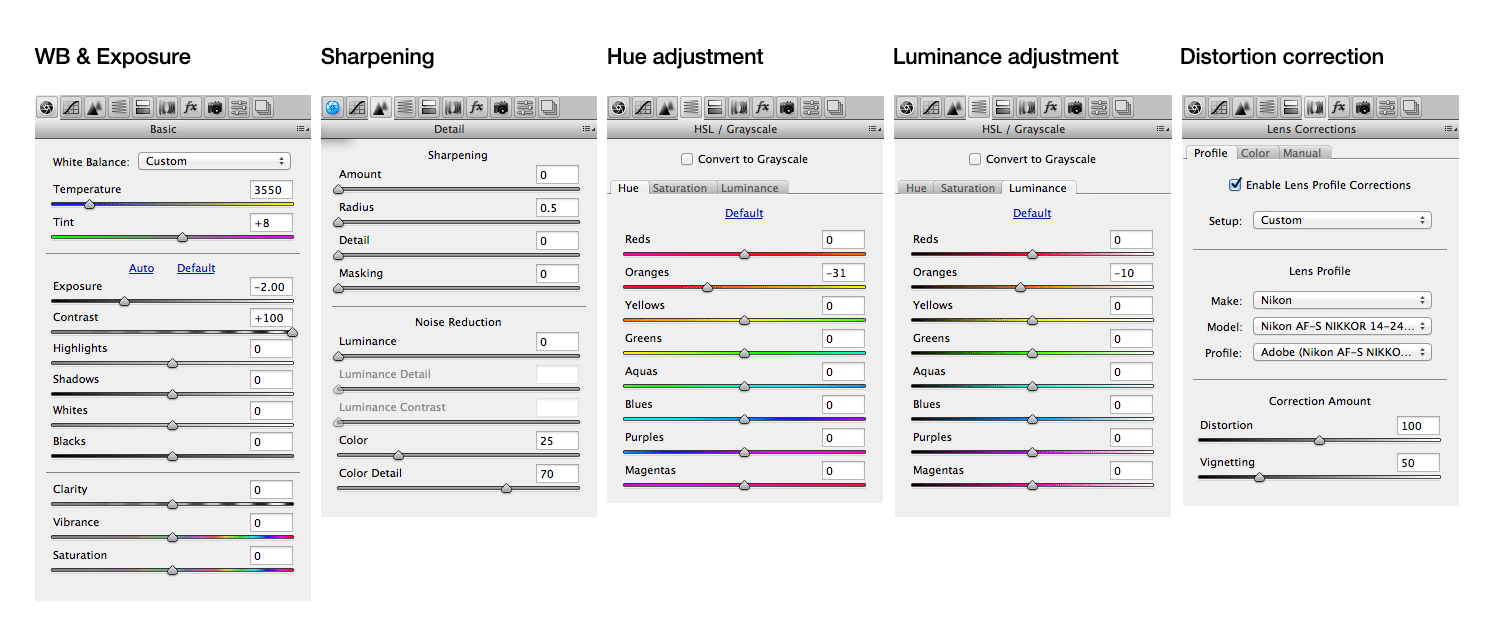
2. Sharpening (see above image) – People prefer to add sharpening in Adobe Camera Raw or Lightroom but I prefer to add it in the end before saving the final processed file as a JPG after resizing it down for web. The reason why I like to do it as a last step is because sharpening is relative to the size of the output image and also because I prefer to keep my raw images free of sharpening to give myself more freedom to retouch my images in Photoshop and play around.
Most people share photos on the Internet. I also share my images on my Facebook page and 500px profile at a resolution of either 1280 pixel or 1600 pixel wide, and the sharpening amount and radius settings will always be drastically different from the settings applied on a full size raw file, so that’s one more reason for me to keep my raws without any pre-sharpening.
3. Hue and Luminance Adjustments (see above image) – As you can see in the SOOC (straight-out-of-camera) version above, the glow created around me by the LED flash was orangey and pale so I shifted its hue to red and turned the luminance down to make it more deeper.
4. Lens Correction (see above image) – Vignette was quite obvious as you can notice on the SOOC. In Milky Way shots, I prefer to be able to see the stars nice and bright and therefore vignette reduction is important. Chromatic aberration was not removed because it makes the stars look pure white but in reality each star emits a different color so I prefer to retain that extra information in my star shots. Distortion correction was not required here because this is not an architectural shot.
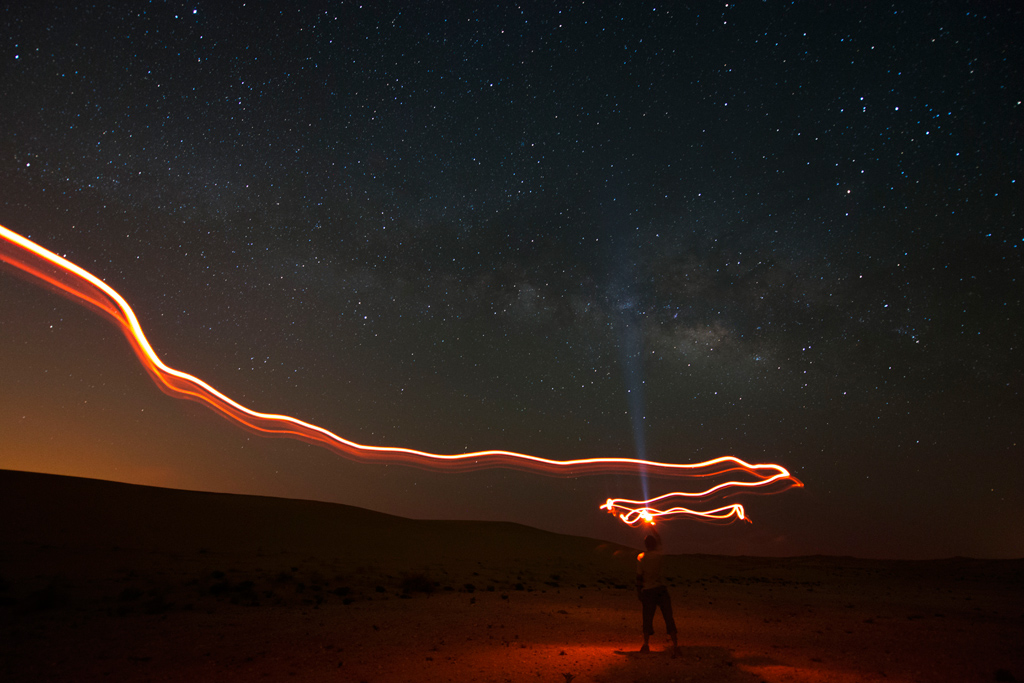
Here is how the shot looks like after applying the corrections.
I liked the contrast and dark mood of the shot but the Milky Way was too faint in comparison to the trail so I added some clarity to it selectively using the adjustment brush in Adobe Camera Raw, as shown below.

The greyed out area shows the mask of the adjustment brush. You can see that the clarity is set to 100 and here is what the shot looks like after the adjustment.
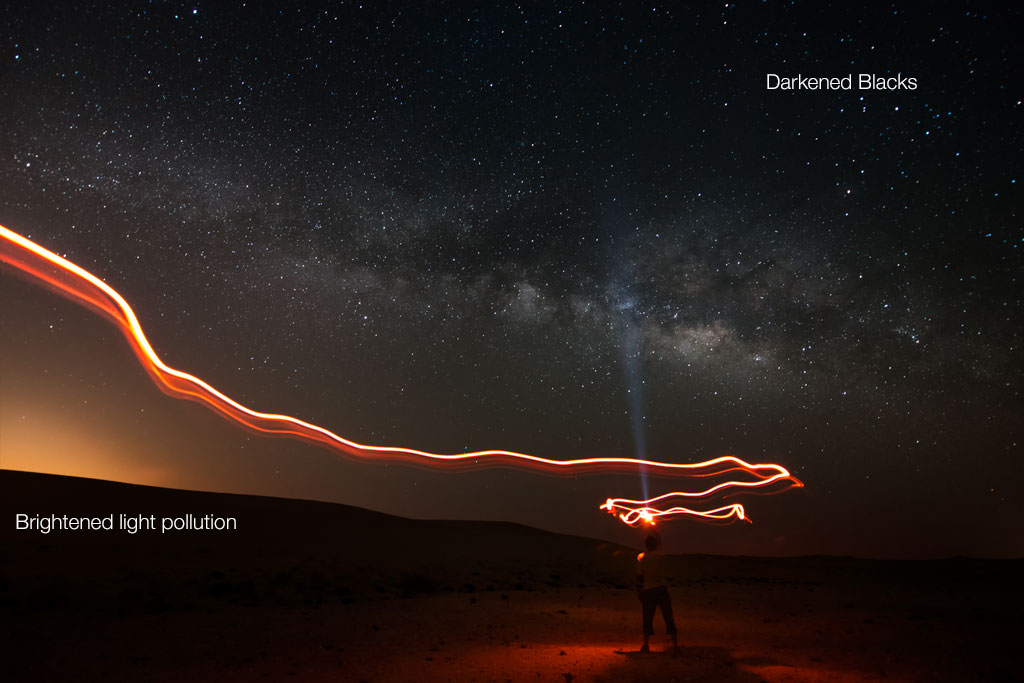
The image has started to look interesting and Milky Way is more clear but further adjustments will make it pop. So I made the blacks deeper in Nik Viveza, added some global contrast and brightened the light pollution area as shown below:
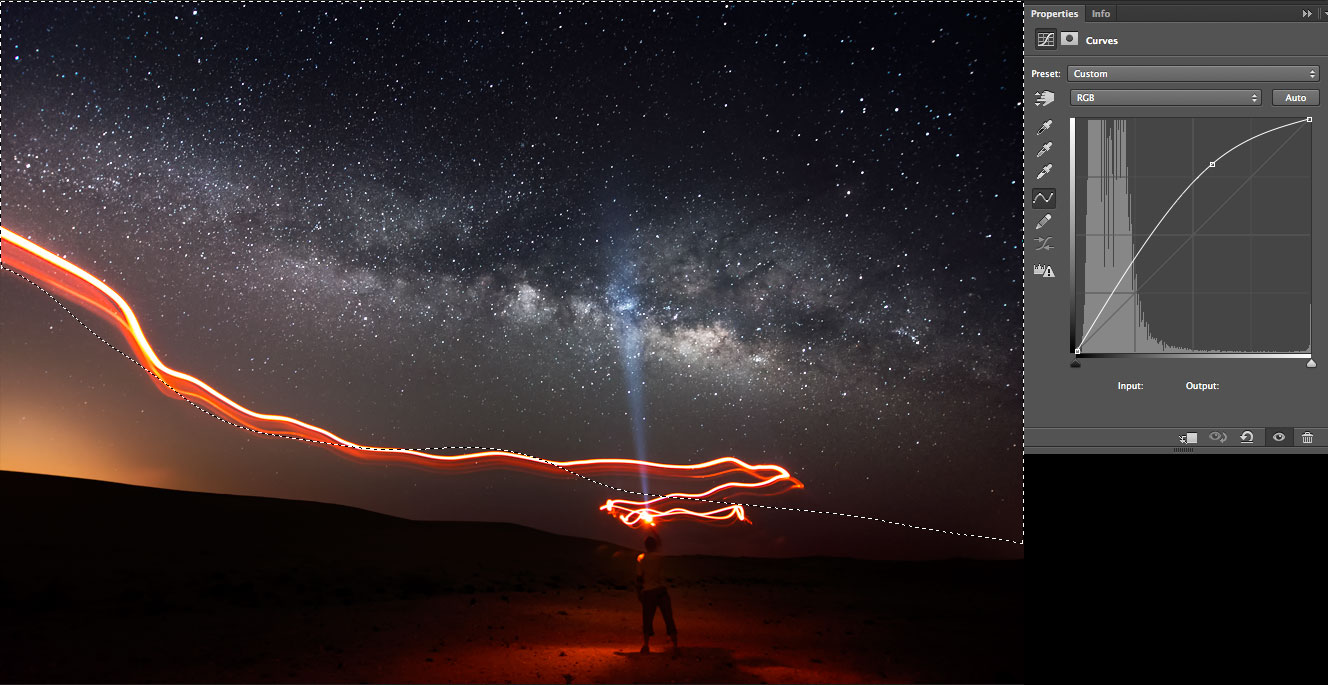
The Milky Way still needed the attention I wanted so I applied a Curve Adjustment layer in Photoshop to life the brighter midtones. I also lifted the midtones a bit around where I am standing as shown in the image below:
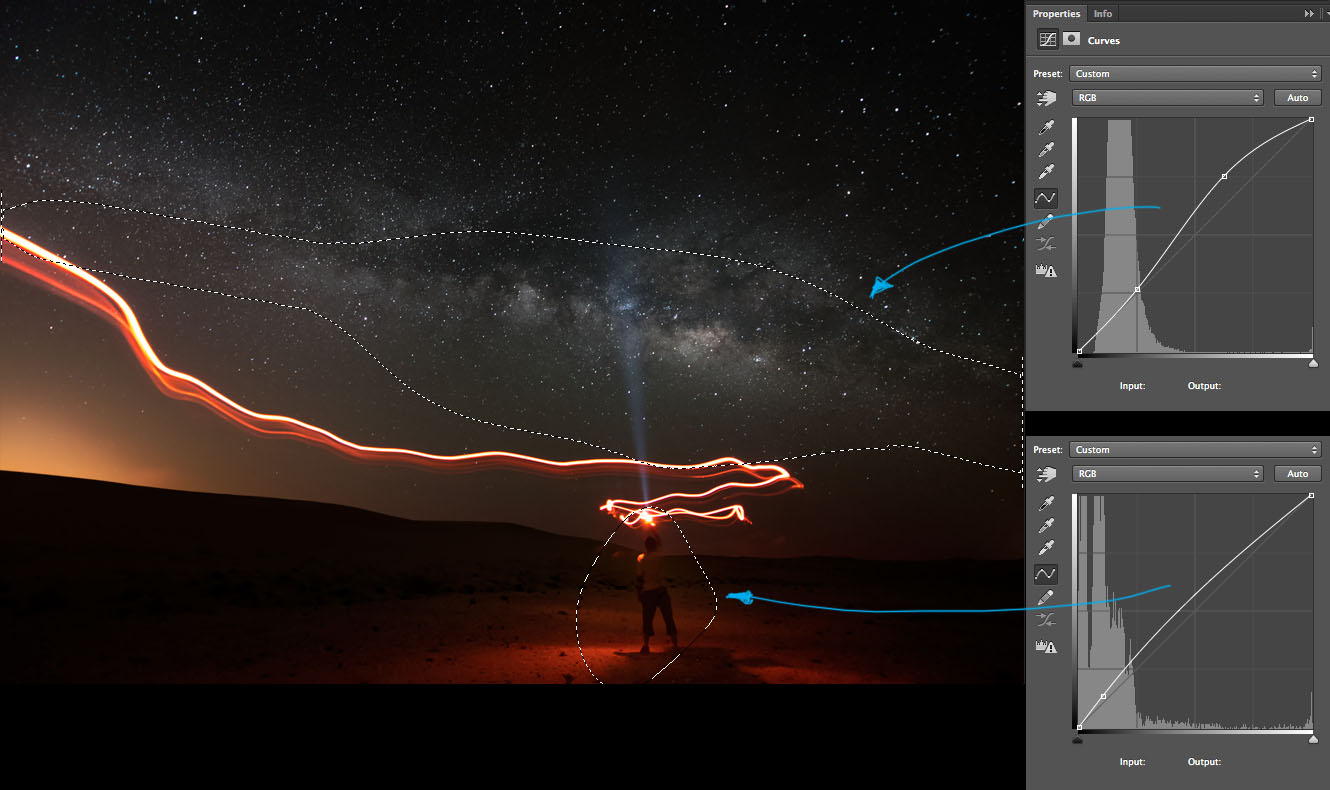
Note: the dotted lines (marching ants) represent the mask applied to the adjustment layer
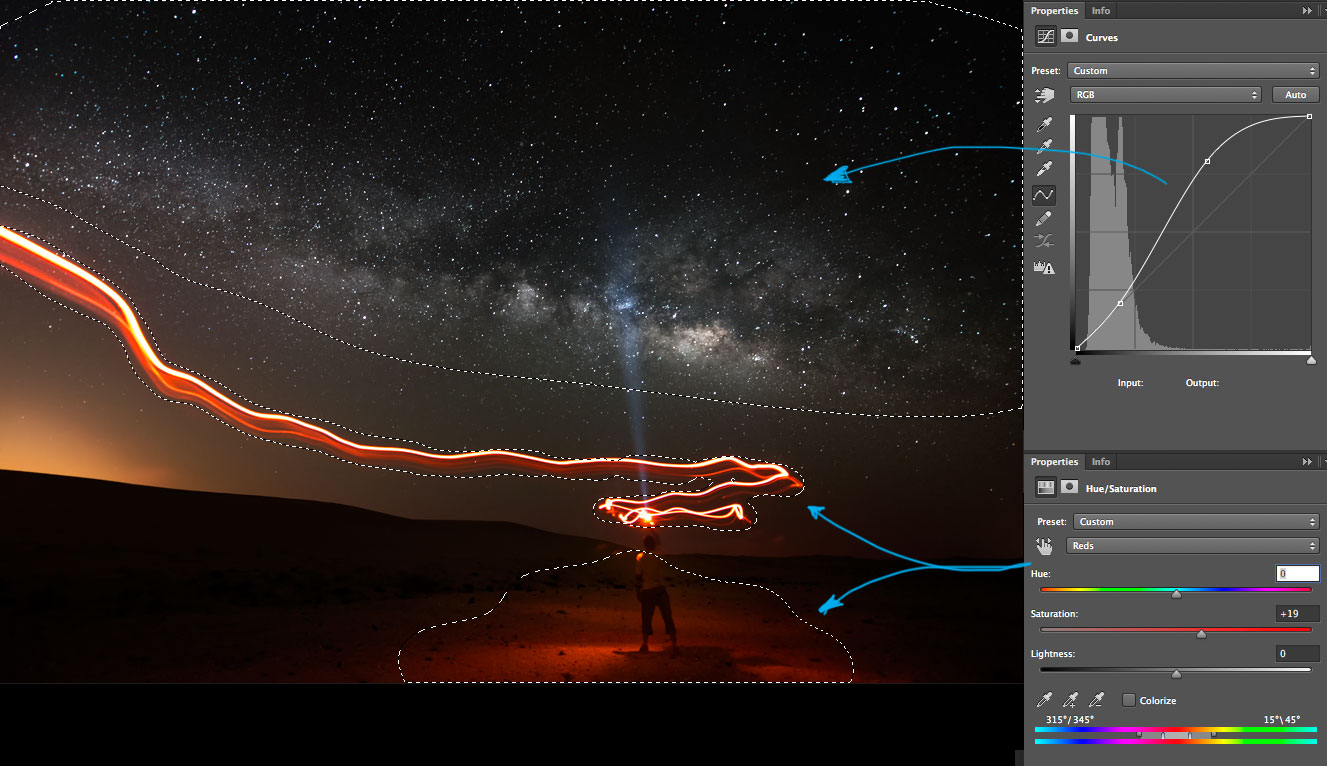
The galactic core looks amazing when it’s bright and contrasty so I added another Curves adjustment layer. To make the trail more vibrant, I boosted the reds using Hue/Saturation adjustment layer as shown below:
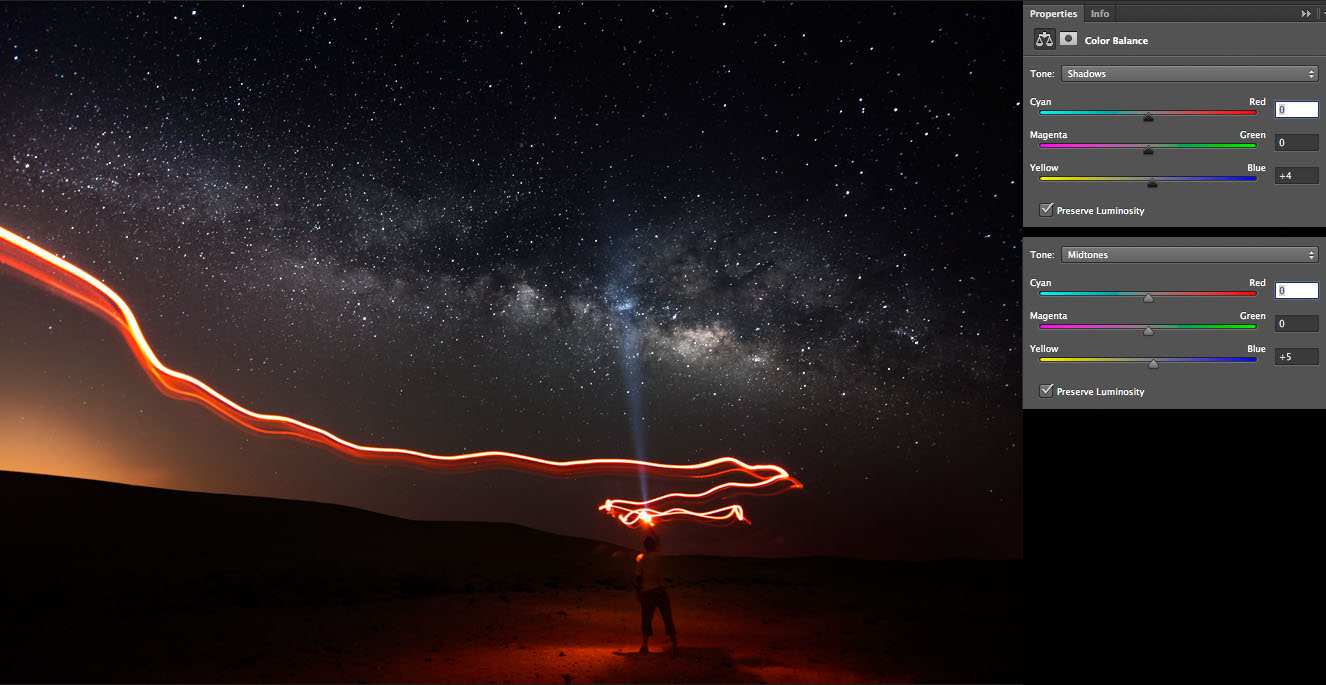
For a striking contrast between the red trails and the sky area, I added some blue to the shadows and midtones using the Color Balance adjustment layer as shown below:
Finally, to bring visual balance to the top and bottom halves of the shot, I lifted the midtones a lot more using another Curves adjustment layer as shown below.
SHARPENING STEPS
Sharpening is a two-step process. First is downsizing and second is the sharpening. Below is the method I have found to be most effective in terms of image quality.
Downsizing – Now that you have all the elements of the shot processed to your liking, you would want to save a downsized version for sharing online. Follow the steps below:
- Make sure that before you sharpen the image, downsize it to the resolution you want for sharing on the web.
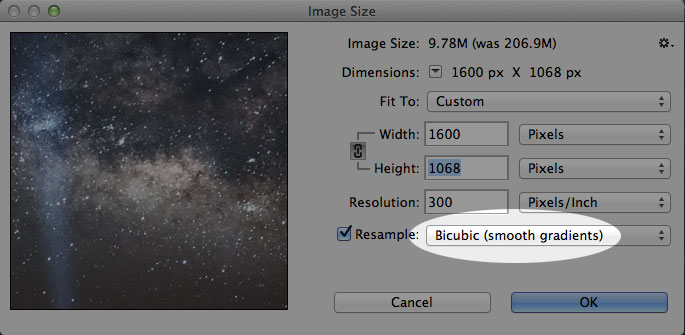
- If you are downscaling the shot in Photoshop, I suggest you to use the “Bicubic (smooth gradients)” resample method (see image below), because it does not artificially adds any sharpening while downsizing the shot and keeps the integrity of the image.Note: Do not use the Automatic setting because if you use it while downsizing your shots, Photoshop will apply the “Bicubic Sharper (reduction)” method, adding sharpening and creating halos around areas of high contrast.
Sharpening (Highpass method) – This is my most preferred method of applying sharpening in Photoshop using High Pass filter under Filter > Other > High Pass. Follow the steps below:
- Make sure to first duplicate your image as a new layer and then apply the filter.
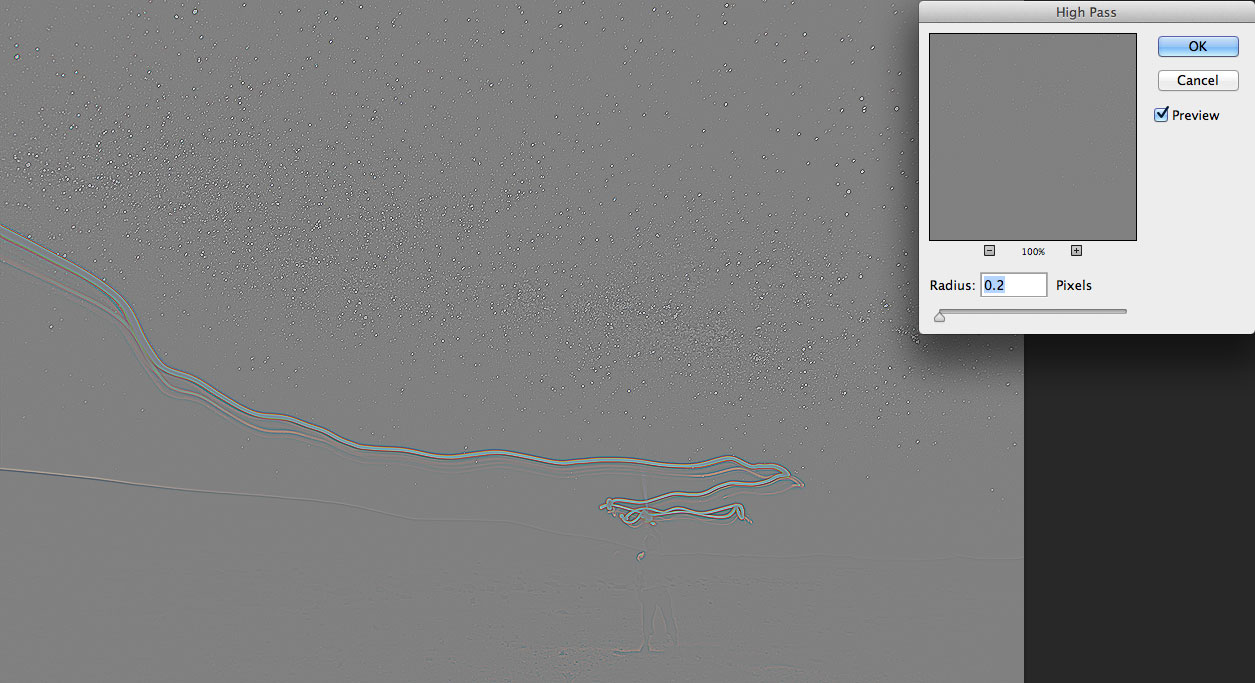
- The secret to getting a clean and crisp result without artifacts is to apply the filter at a very small radius setting. If your web resolution is anywhere between 1600 pixels up to 1920 pixels on the longer side, use a radius of 0.2 pixels as shown below.
- Once applied, change the layer blending mode to Overlay. A single layer applied with a 0.2 radius High Pass filter is not enough to bring out the fine details in an image. So you will need to duplicate the high pass layers a few time until you are happy with the result, as shown below:
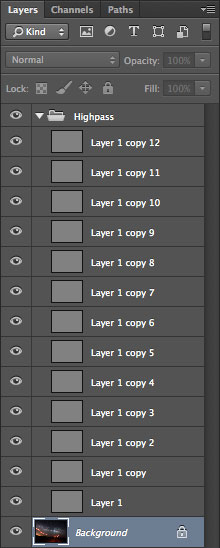
- Depending upon the resolution of your image and the detail therein, you can choose to turn the visibility of some of the high pass layers to finetune sharpening or group all layers together and change the Opacity of the group to control the sharpening effect.
For this tutorial, I have made my sharpening and web sharing Photoshop actions available. Download them here.
Sharpening (Nik Output Sharpener) – Nik Sharpener Pro is amazing and makes the job so much easier. If you use Nik Output Sharpener, make sure to
- Apply Adaptive Sharpening between 30% – 35%. I have found this setting to work 95% of the time on landscape and cityscape shots.
- To control the sharpening effect after applying the filter, add a layer mask and paint with black or white (see image below). Tip: In a layer mask black color conceals and white color reveals.
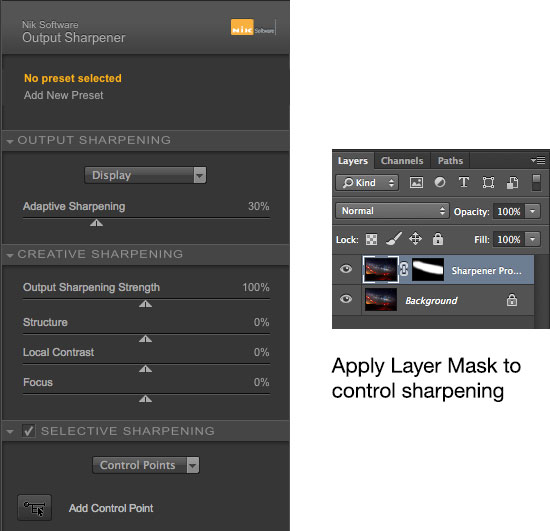
- You can further fine tune the sharpening effect by varying the opactiy of the sharpening layer as well as shown in the image above.
Well, that’s all there is to it. Now you have everything you need to know to go out there and capture your own great self-portraits under the Milky Way. The possibilities are limitless, so go crazy. You can try using colored gels or colored translucent plastic sheets on any flashlight (even a mobile phone flashlight) to create interesting color trails of different shapes. Then, you can combine them with a final shot of yourself standing in the middle of the frame with the flashlight above your head aimed at the Milky Way. The results will be nothing short of surprising.
Have fun shooting! To see more of my work, follow me on 500px. Want to learn more photography tips and post-processing techniques? Please join my Facebook page, and subscribe to my YouTube channel.
Feel free to drop me a line, share your images, or post your questions in the comments below.

Leave a reply