
There is a progression that takes place in the journey that is our lighting knowledge. At first it is learning the ways of ambient light (read: I don’t want to buy a flash). As our career progresses we decide to buy our first flash and throw that sucker straight on the camera, only to question why the shadows on faces are gone… along with the artistic merit. Soon after that we discover a site like Strobist and point the flash at the ceiling and realize our first “Eureka” moment as a photographer. From there we buy our first off camera strobes and it is all downhill…
Off-camera strobes are something that I think should be classified as a different genre in the medium of photography. I say this because they are a part of the knowledge base that some photographers will never need to understand to be successful (like photojournalists and landscape photographers). However, for advertising photographers like myself, they are crucial to my workflow and often make or break an image. We often talk about how bringing lights to an image creates mood, but rarely discuss how it can destroy it, but I digress.

At a certain point in your career, you will reach a level of knowledge that must expand outside of its F-Stop constraints and into an on set Kelvin world that is not just a derivative of white balance. I am of course talking about gelling the lights. For the standard still photographer, this is probably a skill set that will not be critical to his or her success, as it might slow down time on set and impede efficiency. However, if you ever want to work in Hollywood (or at least Los Angeles) you should be driving to the store to pick up a gel set before finishing this blog.
Now the reason I mention Hollywood is that movie and set lighting are more of a product of the color of a light, rather than its brightness. How often do you watch a film or TV show and think, “Is every light that green in a dark alley?” What you are taking in is actually quite special, for it is a color palette painting the on-screen action. If you want a nice example of this, watch Man in the High Castle on Amazon Prime. In it, you will see light coming through windows that appears like it was lit with a neon sign… quite beautiful, really.
But you are probably wondering, “How do I incorporate this into my photography?” It is really quite simple: practice (after buying the gels at the store which you are currently driving to). There are multiple ways and theories behind approaching split lighting with color. One would be to perfect the hell out of your orange and blues (natural balance), while the other would be to master the effects set (your greens, yellows, reds etc.). Going with the natural gels route, you will find your lighting begins to complement the skin of your model. As an added bonus, you will also find that your specular highlights will also gain more depth and form will have more dimension.
The second approach, lighting with the non-natural set (effects colors), will give the image a unique artistic quality not found in the natural tones. Here is where it gets a little dangerous because (as is the case with adding lights) using the non-natural color set can destroy an image, especially a portrait. The reason for this is that we need to have context and balance for the eye of the viewer to not have an aversion. Imagine yourself standing in a room with a single green light bulb. While the light from it is probably fun, the reality doesn’t strike you as normal, because light in our minds is white.
As with all photography tips, the answer of how to do this properly is the hard part, you need to learn both. This way, you will be able to tell the viewer’s eye where the balance is with the knowledge built from the natural color gels, as well as create a narrative with the color set. Sure there are rules to be bent (or broken) when bringing color into lighting, but the fundamentals must be your base upon which you build.

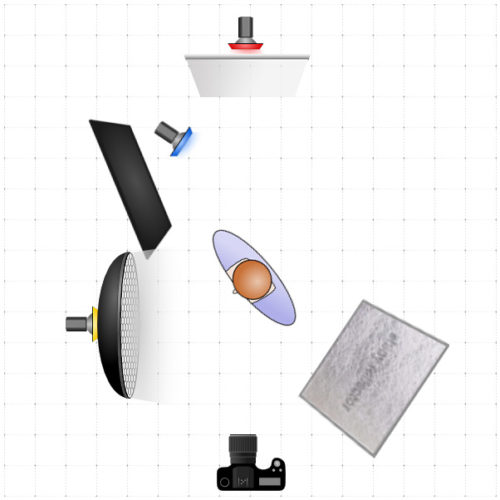
One of the best ways to start learning your color-based light system is just like you did when you started lighting altogether, one at a time. From there, gradually build your repertoire, but be very respectful of the time it will take to do this. If time is not an issue, take a month to work with only one gelled light before adding any complexity to a schema that has added a dimension of depth that should be considered exponential in its most algebraic nature. The reason I say this is that where you can add a gel to a light, you can add two… are things getting confusing yet? Let’s dive further down this rabbit’s hole.
Beyond the factor of color, we can also dial in saturation in a number of ways. To a camera’s sensor, the latitude of dynamic range will also affect the gamut that is taken in of your breadth of color. Think of it this way, throw a red gel on a light and crank it to 11 (figure of speech for blowing the thing out) and you are not really going to see red, heck, you’re lucky if you see pink. Now set that very same light to a measured 18% and you will see a beautiful deep red that caresses the shadows with a feel that is on par with the gain of a sensor at high ISO.

Remember, what we have just done here is reflecting the variables that exist within one light and one gel. The next step along the way is anything you make it, be it counterbalanced color with offset lighting of varying power or the introduction of gobos to create diffused atmosphere, it is up to you.
Now go take the first step and snag two sets of the same gels… why two? Because you will probably melt the first one in a day (don’t worry, as this is par for the course). Practice and patience are your best friends along this journey. Beyond what you have read here, I encourage you to shoot to your eye’s taste, as this is the path to creating your vision.
Now for a couple tips to help you along the way:
- Learn to light with no less than three heads at first. This way you will understand the purpose of a key, fill, and kicker before trying to modify them.
- When practicing, underexpose so you can get an idea of the true color tone before cranking the light up and dialing out the saturation with watts.
- This is the biggie…. KNOW YOUR CAMERA’S SENSOR!!! Not all cameras process color the same way. Some put heavier reception on the green or red channels, and knowing what tones will have more depth will complement your efforts.
Blair Bunting is a commercial photographer based in Los Angeles. This article originally appeared on Blair Bunting‘s Advertising Photographer Blog.


Leave a reply