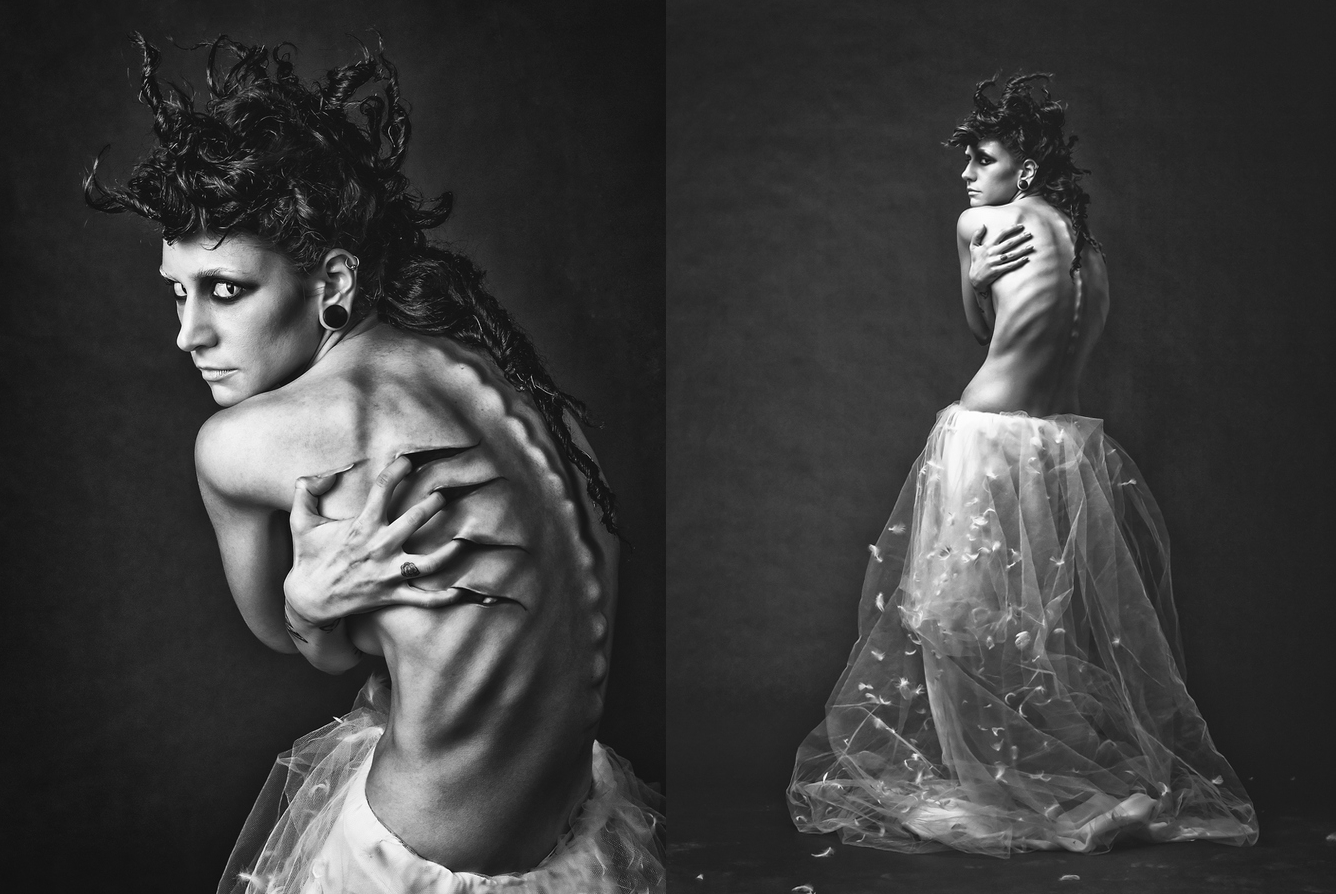
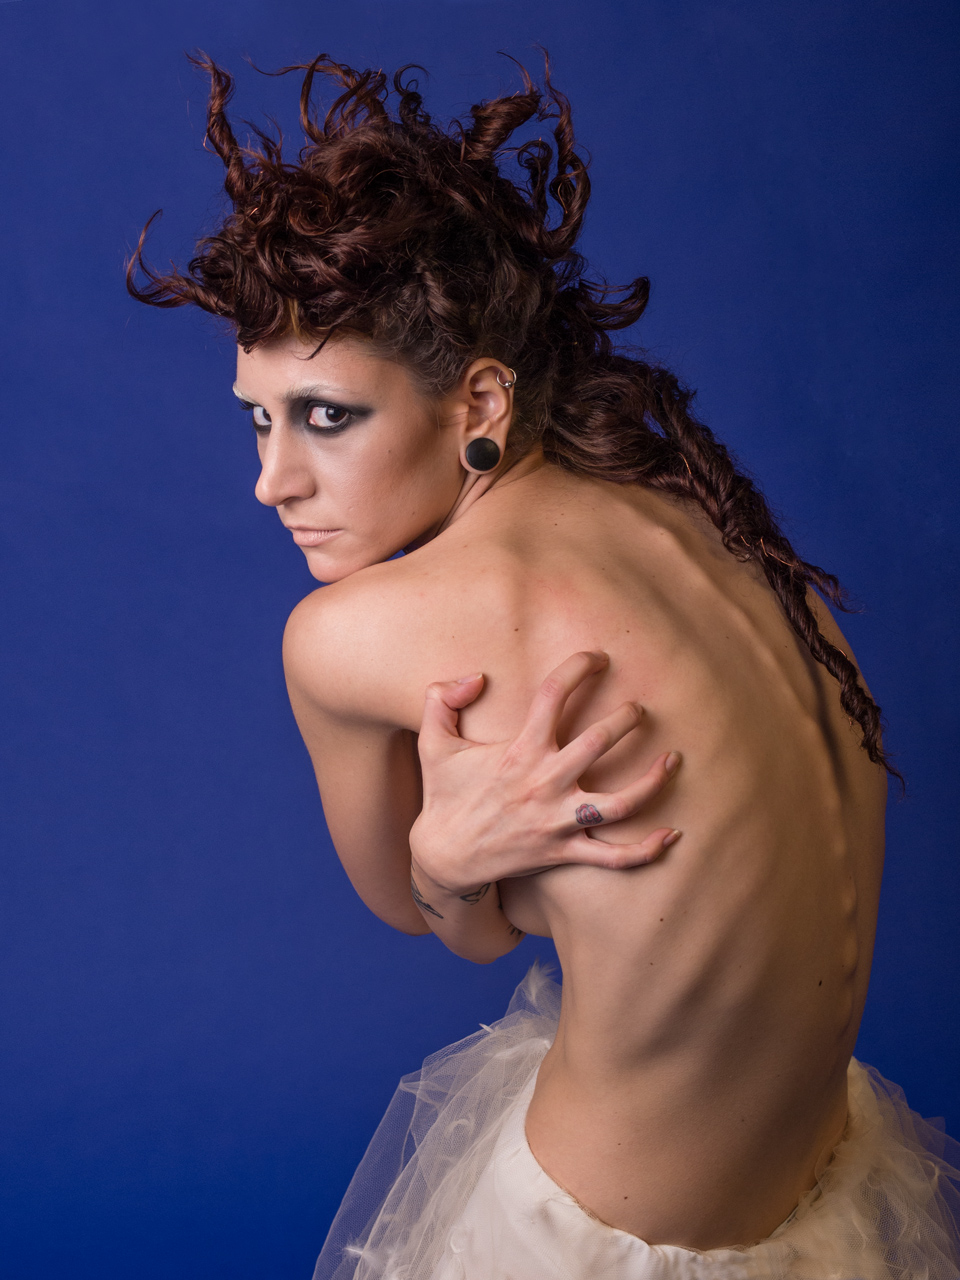
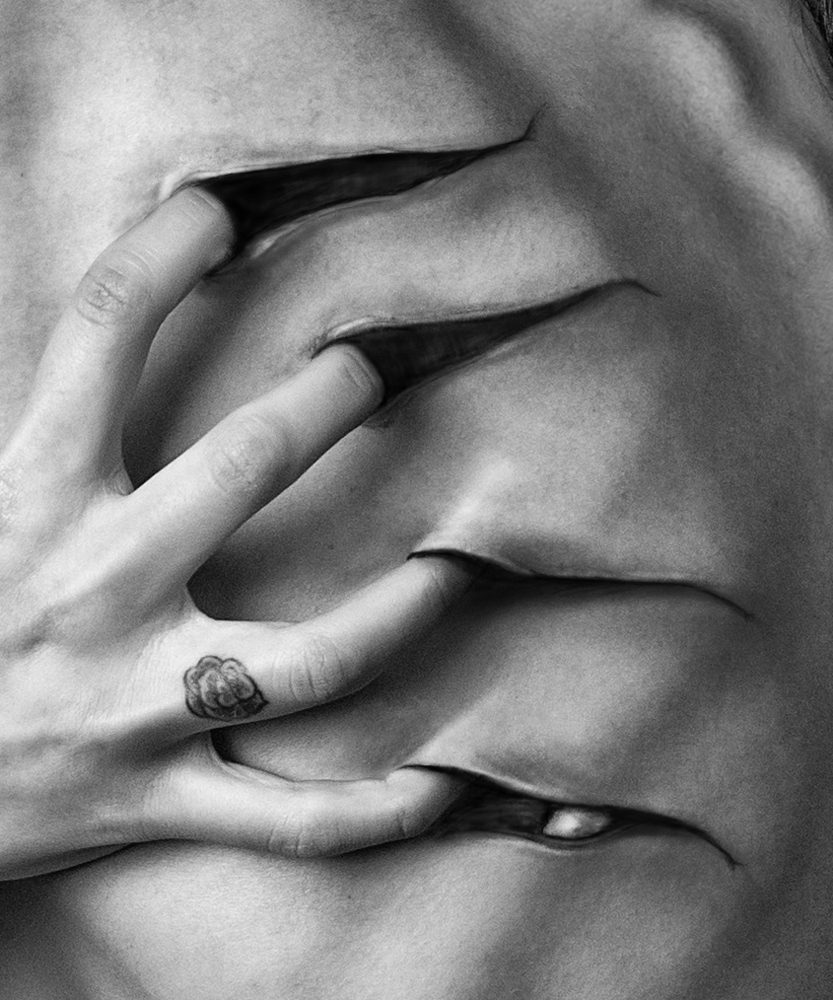
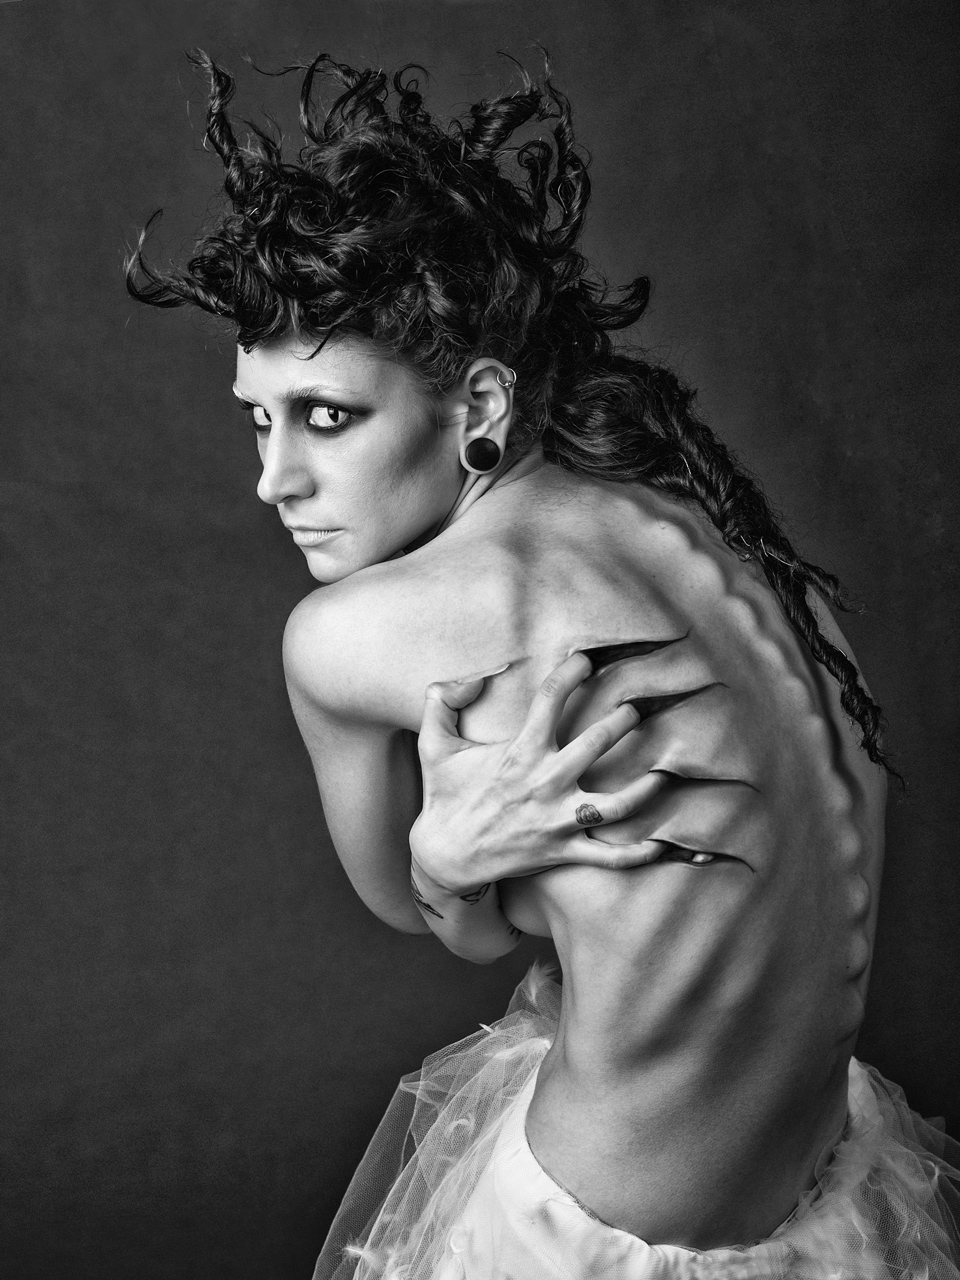
When we stumbled upon this bone-chilling picture of a dark fairy—complete with piercing eyes, sharp fingers, protruding, exaggerated ribs—it sent tingles down our spine. In this tutorial, Croatia-based photographer Filip Grzincic shares the secrets of how he shot and processed this visually-arresting photo. Scroll down and try this out!

by Filip Grzincic
GEAR
Olympus E5
Zuiko 50mm f/2.0 macro, 1/200s, f/5.0
Studio strobe with softbox
Reflector
SETTING UP
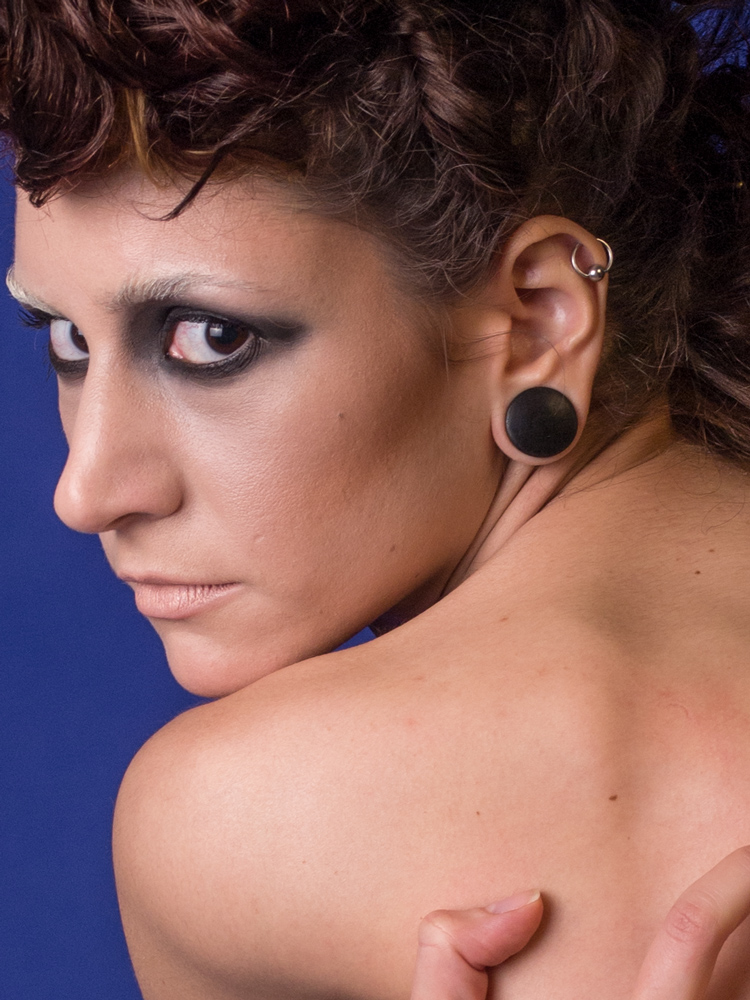
The first thing I did was to gather my friends—a make-up artist, a stylist, and a hairdresser. Together, we went in search of a model. Finally, our model Josipa was in for the shooting. Upon our arrival at the studio, we prepped our model for the shot. The make-up artist did a wonderful job, making Josipa look quite pale and creepy—with dark shadows around her eyes, hiding her brows, and giving her ghostly-white face and lips.
After make-up, it was time to do the model’s hair. We curled her hair around these metal strings, making them stick out into the air. The stylist choose a fabric out of a wedding dress, and we just draped it under her waist. It was a beautiful fabric with feathers that were detaching from the material, and it created a great foreground for some other shots. The final look was really awesome and creepy.

Make-up: Petra Sever
Styling: Ines Košmerl
Hair: Nina Dundur
Model: Josipa Radi?
Assistant: Roberto Pavi?
SHOOTING THE PHOTO
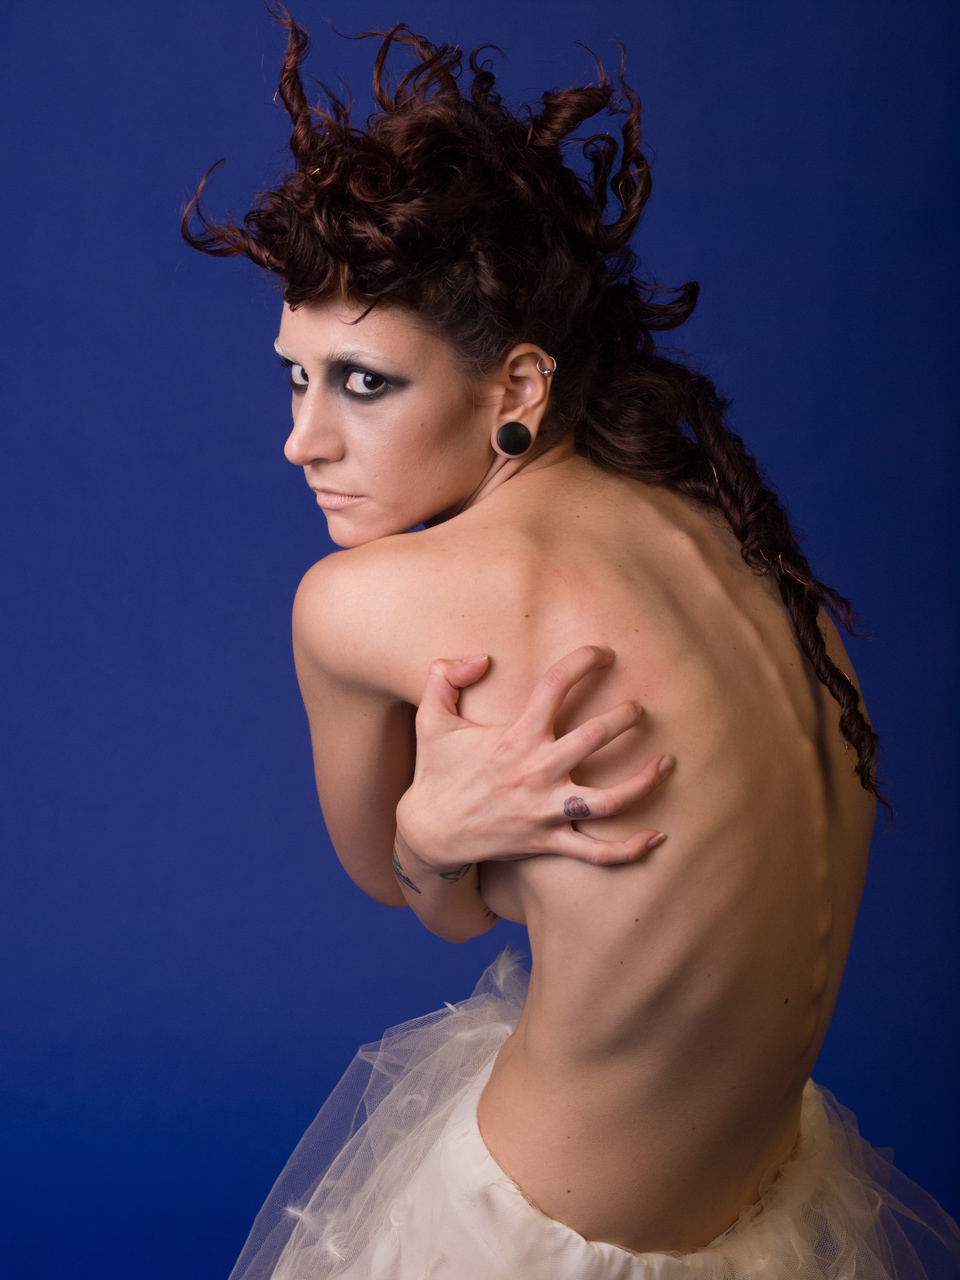
Time to shoot. We started with a couple of poses. We noticed that her ribs were really protruding in certain angles. So we worked on a pose where she embraced herself, scratching her fingernails on her back. The softbox was placed on the right side, directly into her face while an assistant held up a reflector to fill up the shadows on the other side. I do not remember exact power of the strobe, but it was set just below the point where it would burn some highlights on her face. Finally, we got the shot, and our initial image was done:
Now it is time to add some post-processing magic.
POST-PROCESSING
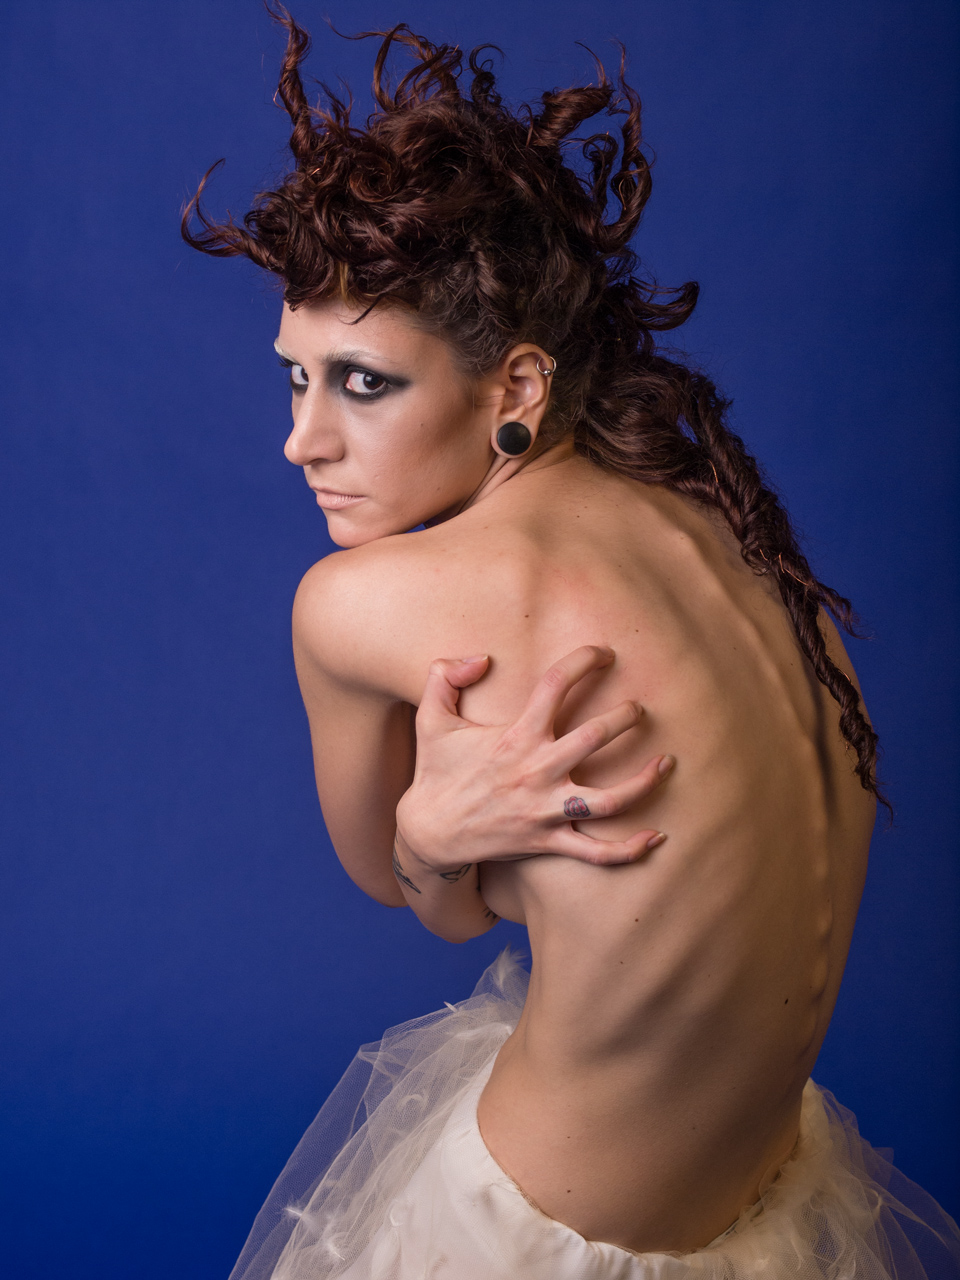
I opened the RAW file in camera raw. As I will do all of the necessary adjustments later in Photoshop, here, I just lifted up the shadows (+67 value) to get more detail in the hair. Then, I lifted up the clarity (+30) to gain some local contrasting.
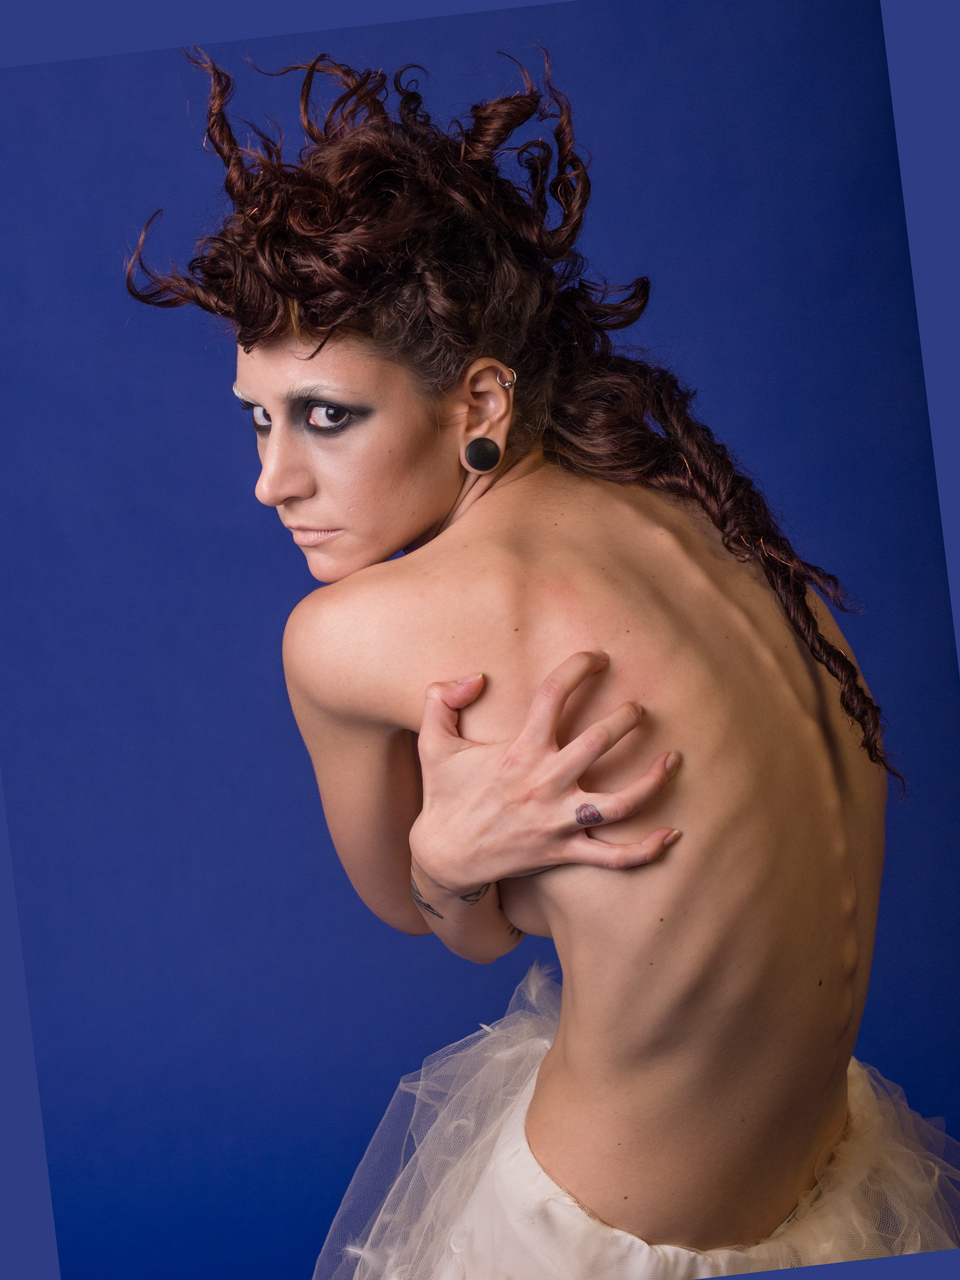
1. Get the right crop. In Photoshop, I rotated the image slightly counterclockwise, because it looked better because her back was more humped and curved this way. However, I did not have much space around her. (Though I always try not to frame too tight when taking the shot, as you never know if you will need some empty space later in post-processing.) So I had to use clone stamp tool to clone parts of the background to fill up the empty space, and a part of her dress.
2. Fix irregularities on her skin. Usually, I soften the skin with the Imagenomic Portraiture plug-in. But in this case, it was not necessary. So I just cloned out some dark circles under the eyes, birthmarks, and scars. I used the spot healing brush tool the most. I also used the clone tool, healing brush, and patch tool.

3. To set the mood, convert the image to black and white. For this, I used Silver Efex Pro plug-in with high structure (harsh) setting. I did not tweak it. I just love using this setting because it really brings the texture out. Then, I continued to work on a black and white image.

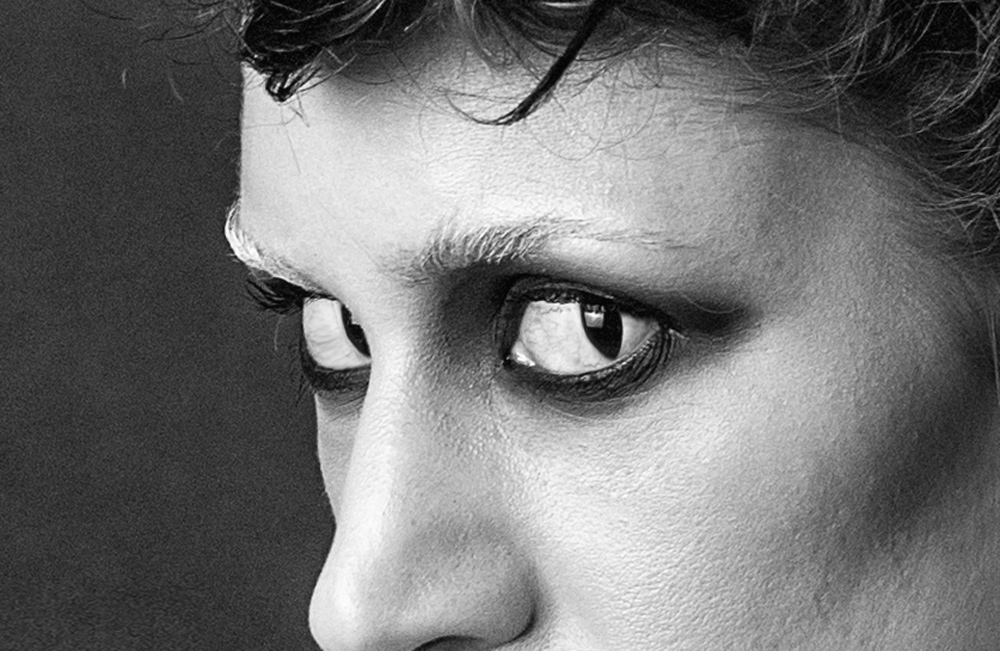
4. Enhance the eyes. I wanted her eyes to be reptile-like. First, I used liquify (filter/liquify). With a forward warp tool (and a really small size to it), I moved the white surface and narrowed the pupils. I finished it up with clone tool. I cloned a bit of the white to the other side of her left eye. The more you zoom in, the more precise you will get!
5. Study the image, and work on enhancing the other details on the model.
The Backbone
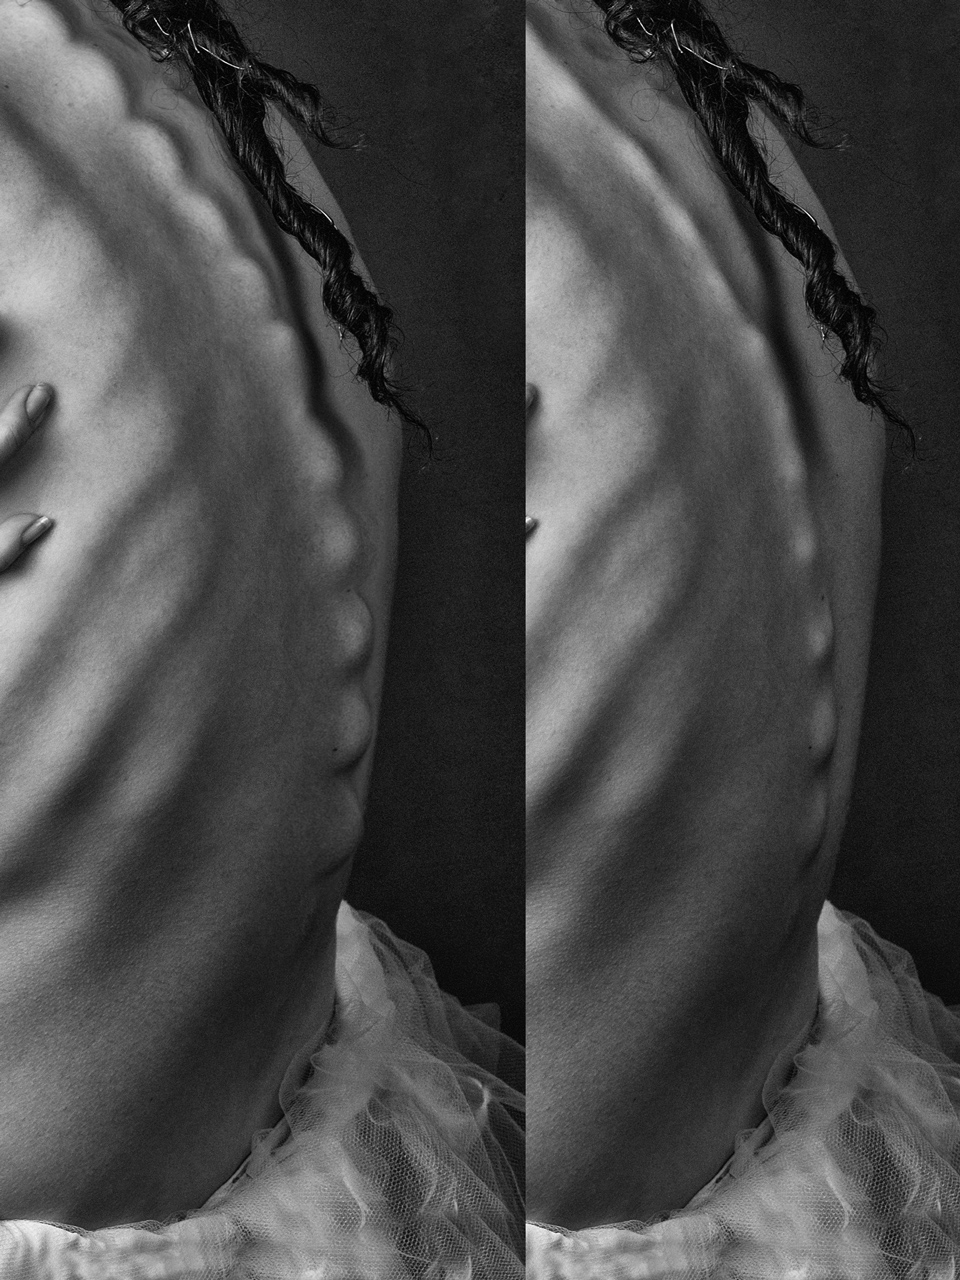
As I’m working on the image, I spotted other details that could be enhanced that I did not originally plan to do. Because her backbone is very interesting, I wanted it to pop out in the image. For this, I used the liquify tool (forward warp tool and bloat tool), and enlarged each of her vertebra. I slowly pushed it to the right with forward warp tool and enlarged it further with bloat tool. The liquify tool made me move the edge of her back. So I masked it out by adding a mask to the layer and brush off the unwanted parts with black brush—100% opacity, 0% hardness.
Whenever I make a significant step and modification, I always duplicate the top layer. I can even merge more layers while pressing the alt key on my keyboard, so that I get a merged layer on top. This way, if something goes wrong and I’m not satisfied, I can just delete the layer and start over. It’s much easier when you are working on slight modifications with many moves. It allows you to fill up your history panel with previous changes while you are continue to edit and work. This is good way to take a step back without destroying the image irreversibly. So I worked on liquify on another layer. And when I masked out the parts that ruined her backbone line, I actually ended up revealing the layer underneath. After the process, select both layers, right-click them, and hit merge while holding the alt key. A new layer will be created on top.
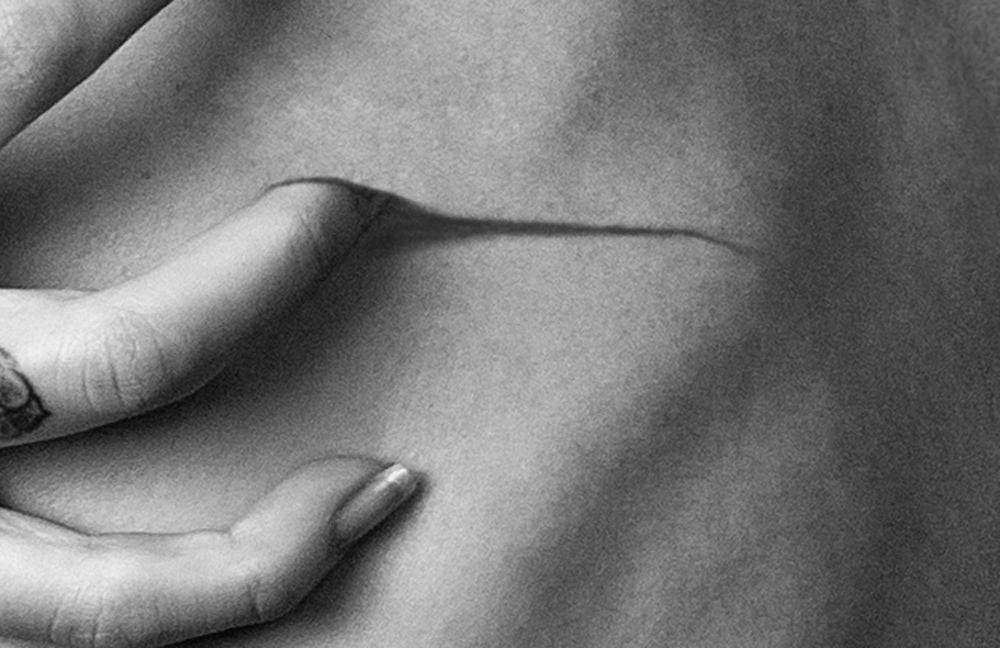
The scratches
Let’s start with the most disturbing part of the image: the actual scratches. At first, I just wanted to put some fingernail marks on her back that would seem like she scratched herself, left some marks, and that’s it. But that was somehow not enough for me. So I tried to clone out a tip of her ring finger, and it immediately looked as the finger dug and pierced into her skin. That was done by choosing the clone tool, set the size somewhere around the size of her finger tip, with hardness set to 80% and opacity set to 100%. Then, Alt-click on a part of a skin near the finger to set a clone sample, and then clone it over her finger tip. I liked it, so decided to work with it. I simply used dodge and burn tools to create the scratches. Each finger works into different layers, so if I mess up, I can start to re-do last finger only.
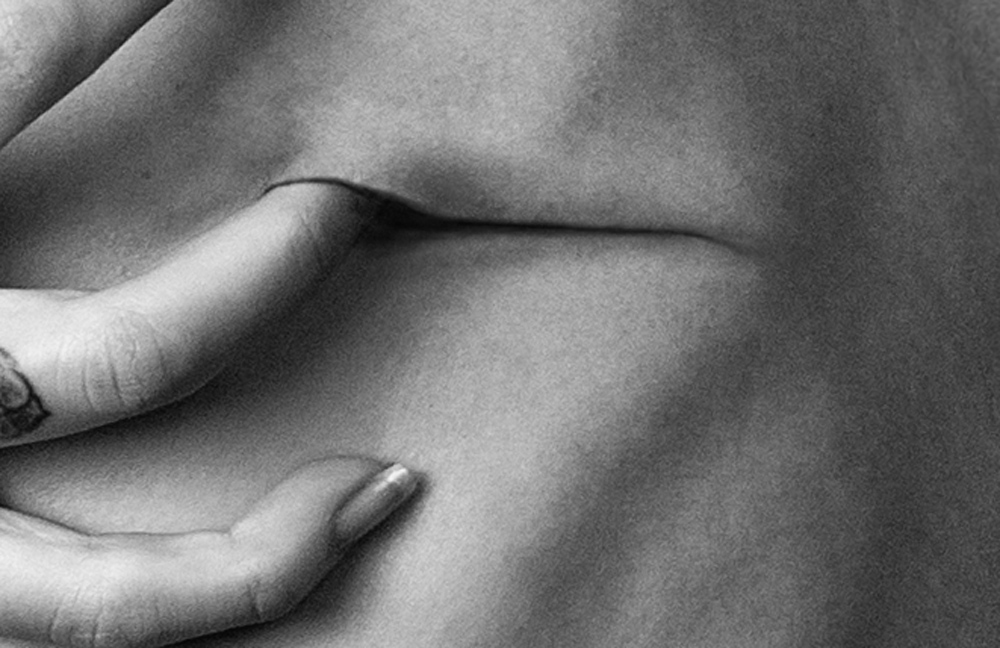
With the burn tool sized at 2px, I set the midtones and I made a first incision:
I enlarged the size of the brush and lowered the opacity to make shadows around it and to make it feel more dimensional:

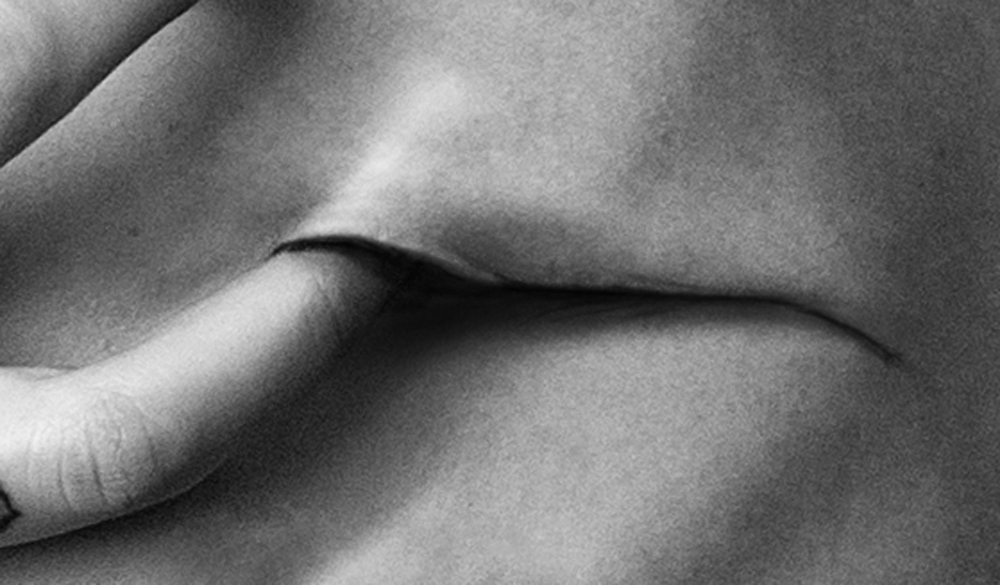
With the dodge tool, I added the highlights (dodge set to midtones). By drawing with burn and dodge, the first scar was done.
The ribs
I began to repeat this with the other fingers. This is simply done using a gut feeling, and some drawing skills. Her protruding, exaggerated ribs were also created this way. I simply burned out the scar around the rib, and then dodged the part of the skin that used to be the rib.
The scar
To give the scar some dimension, I used the burn tool, set to midtones with very small size, around 2 or 3px. Then, I burned the skin outside of the scar, around 3 px from the “hole” (for the index finger). Then I used dodge tool to highlight the place in between. The result is the illusion of peeling skin raised up, where it is dodged.
Creating the thumb
For the thumb, I selected the nail with the polygonal lasso tool. Then, I set the feather to 1px (select/modify/feather), ctrl+c and ctrl+v to copy it to another layer, and ctrl+t to resize it so it was longer.
Creating the shadow
To make a shadow, I copied it again into a new layer and placed it beneath the original copy. I used levels to make it black (image/adjustments/levels—and put the output white slider all the way to the left). I used Gaussian Blur to make it softer (filter/blur/gaussian blur—amount around 4px). Then, I moved it to the right, lowered the opacity to around 80%, and got the fingernail shadow.

Shadows are very important when creating any kind of photo manipulation. You can often see montages that look very unrealistic at first. This is because the shadows are not corresponding to each other. Remember to always study and look at where the light falls, and create a natural shadow, either by manually drawing it on another layer with a black brush, or by copying the object and placing it beneath. Then, you can work on doing levels, blurring, and resizing. Shadows are very important for that final, realistic feel to the image. When the scars are finally done, I used the burn tool to enhance some shadows. I also used burn to create contrast on the ribs and backbone by slightly burning the dark parts and dodging the light parts.
Don’t overdo it though. After this, I used shadow-highlights option (under image/adjustments) where I brought up the shadows bit more (shadow slider amount around 20%).
6. Add some final touches. For brightness and contrast, I enhanced the contrast a bit by moving contrast slider up. To do this, click and use a new adjustment layer in the layers panel. This way, you can always change the setting afterwards. Unsharp mask—not too much, but you want the image to be sharper. You’ll want to do this: (filter/sharpen/unsharp mask) Radius around 1.3, threshold at zero and amount around 50 to 60% or at will. ?
I always tend to dodge and burn a bit, so I burned the background at the corners to get a vignette feel. I also slightly dodged her whole head. Always lower the opacity of the tool, all the way to 0-15%. Set hardness to 0% and larger size. Set burn to midtones, and slightly start burning the corners and the background, then set it to shadows and finish it up.
The final toning was done with new levels layer: output black slider at 29 and midpoint slider at 0.72. This way, you get a gray look. You’ll need to bring the blacks back a bit. With new brightness/contrast layer and contrast slider set to +60, I was able to get some black parts black into the image again. Now, this is my own personal touch that I use lately on my black and white images. I just like the tone that I get with levels and brightness/contrast layer.
Finally—we got ourselves a final image!
TIPS
I shared some tips in the post-processing section of this tutorial. But I also want this advice: never complete your artwork fast. Always do it slowly, and take long looks at your image as you will always find more details to be processed. Sleep on it. The next morning, when you open the image, you may get fresh and new ideas. There were many times I published a photo that looked perfect as soon as I finished editing them. But then the next day, I always spot something I forgot to do, or something I wanted to do differently. Never rush your work. It’s okay to leave it overnight.
Another advice: When thinking of ideas for a themed photo shoot, there will be photo sessions full of straight-up ideas and results that follow that will be more or less successful. I like the photo sessions when you have an original idea and end up with something completely different. This is what happened with shooting this image—it was like a stream of thoughts. As I was processing the photo, a totally new concept for a series opened up for me. When I was done with this image, I just made all other photos from this series similar, and they connected and tied in with the haunting story I wanted to tell.


To see more of his work, follow Filip Grzincic on 500px. You can also visit his website, or connect with him on Facebook and Twitter.
Got a question for Filip about his images or his tutorial? Leave a comment for him below!

Leave a reply