
Meet Jay Russell a.k.a. The Photo Fiend, a self-taught creative portrait photographer based in Calgary. Want to improve your portraits with a full, soft light on your model? Jay can teach you how to make your own ring light. So you too can use it to shoot stunning portraits like the images below!


by Jay Russell
This is a tutorial on the ring light I made that I use for most of my portrait work on 500px. I’ve made a few DIY lights since making my first ring light, but I still prefer the original 12 lights on a 24″x 24″ plywood to be the best light for my portraits.
It’s not difficult to build, but just a warning—because you are working with electricity, I recommend getting an electrician to build it for you or at least provide you with some guidance. If you wire something wrong, you can easily end up electrocuting yourself, so please be safe and take all the necessary precautions.
You can do this project for about $50-$100, depending on the specific materials you decide on using. My cost for this project is $70.
It will take about 1-3 hours to complete.

MATERIALS
- 14-gauge household wiring (approximately 10 ft)
- Standard light sockets x 12
- 24″x 24″ plywood. I used 1/4″ fir, 3/8 would be stronger
- A light switch. I decided on a 600-watt dimmer switch
- 12 light bulbs. CFL or incandescent work fine. Keep in mind incandescents run hot. Make sure you don’t go over the wattage that your switch can handle. I used regular 40-watt household bulbs.
- Power cord
- Small bag of wire connectors
- Zip ties
- Bracket and spigot for mounting to a light stand
- Electrical tape
- Electrical box
TOOLS
- Jigsaw
- Drill
- Wire cutters and strippers
- Screwdriver
- Pliers
- Box cutter
- Measuring tape
- Pencil
- String
INSTRUCTIONS

Measure and mark the center of your plywood at 12 inches. Then attach the string to your pencil to draw the inner circle you need to cut out. Use one of the light sockets to gauge the distance you need to make it. Then, do the same for the outer circle.

Use the jigsaw and cut out your inner and outer circles. For the outer circle, leave one corner in tact, so you have a spot for the switch and mounting bracket. Once you are done, you’ll have a teardrop shape with a hole in it. You can measure and mark 12 evenly spaced points for the light sockets. I just spaced my sockets out and marked everything without measuring. Drill the 12 holes out with a 7/16″ bit, or whatever is close enough so that you can feed 4 wires through.
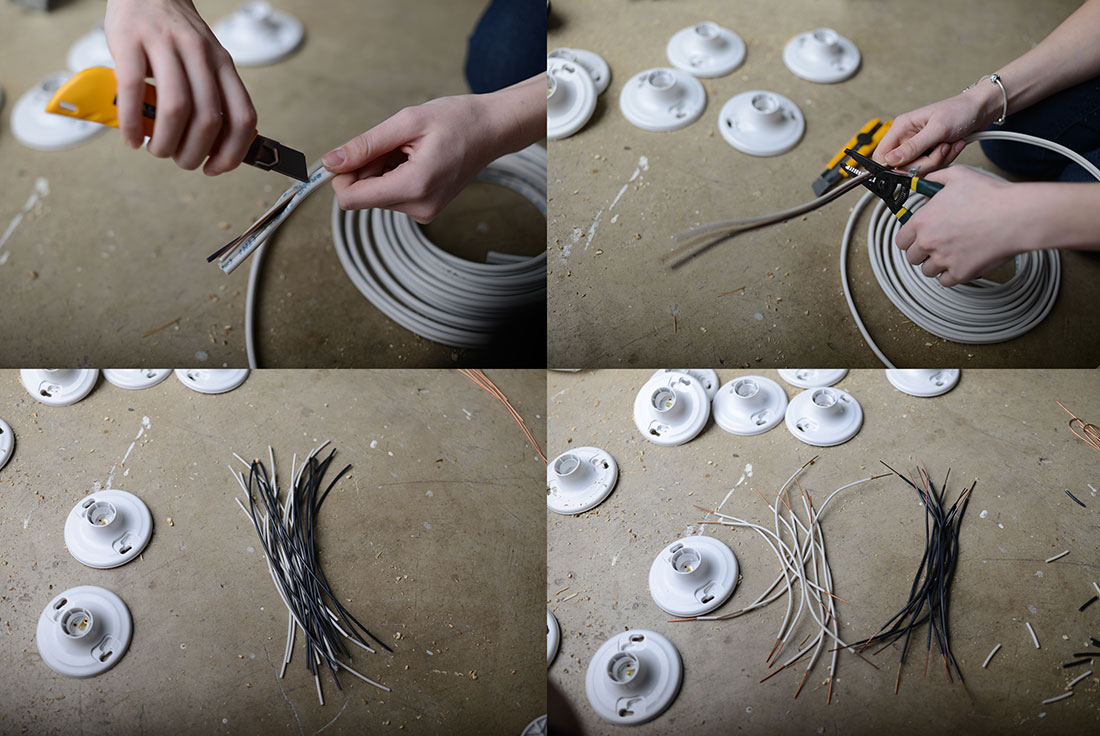
Next you’ll need to strip the wire. Remove the outer shield and cut off 8-10″ strips of the black and white pairs. You’ll need 12 pairs in total. Then you’ll need to strip the ends of every wire, roughly 3/4″ bare wire and use the pliers to make hooks on the bare wire. You’ll feed 4 wires through each of the 12 holes you drilled and wire each light socket.
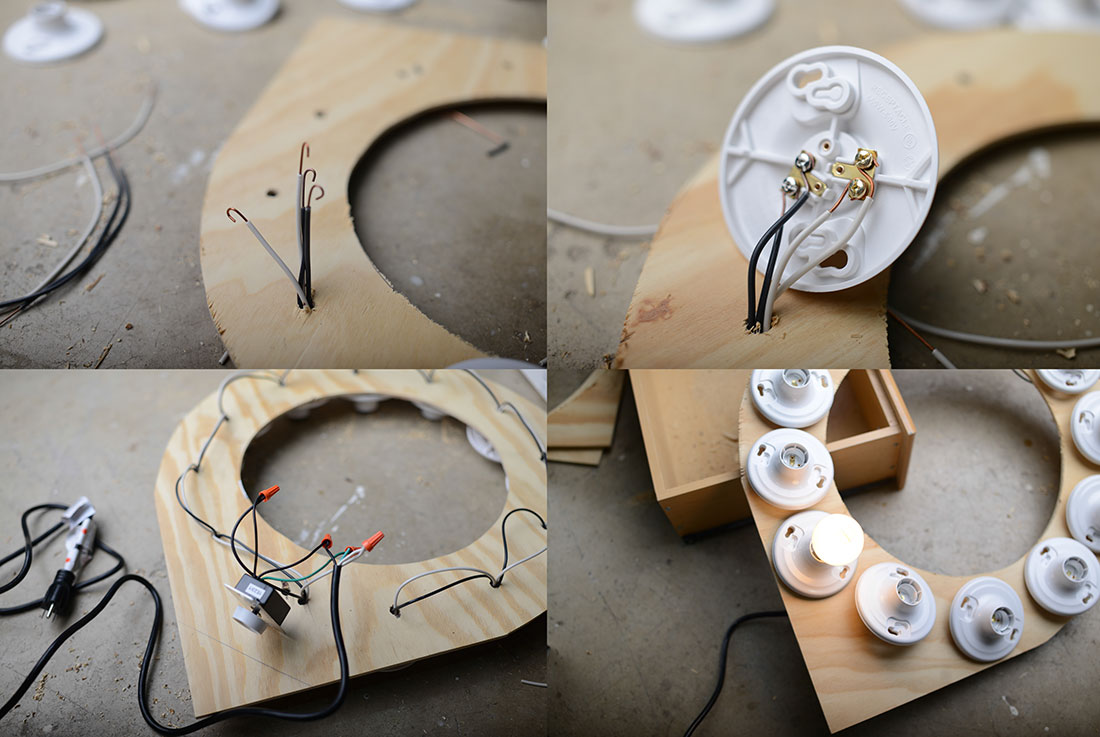
I wired mine in parallel. You’ll want to take your time, and make sure you don’t mix up the polarity. The 2 white wires go to the two gold contacts on the light socket. The 2 black wires go to the silver contacts. Make sure you feed the wire onto the contacts clockwise, so that when you tighten the screws, the wire doesn’t spin off. Double check your work, and do not mess this up. As you wire around the ring, you should have 1 white and 1 black wire left. Do not wire these into the socket you started with—you will wire these into the switch according to the instructions that come with your switch.
For my dimmer switch:
White wire goes directly to the power cord
The black gets wired into the switch
The ground from the switch goes to the ground on the green power cord
Secure your wires with wire connectors and tape them.
Now is a good time to test your handiwork. Screw a light bulb into the last light socket, and test it out. It should work like a regular light switch. If it doesn’t work, then you messed up and you’ll need to unplug your light and double check your wiring.
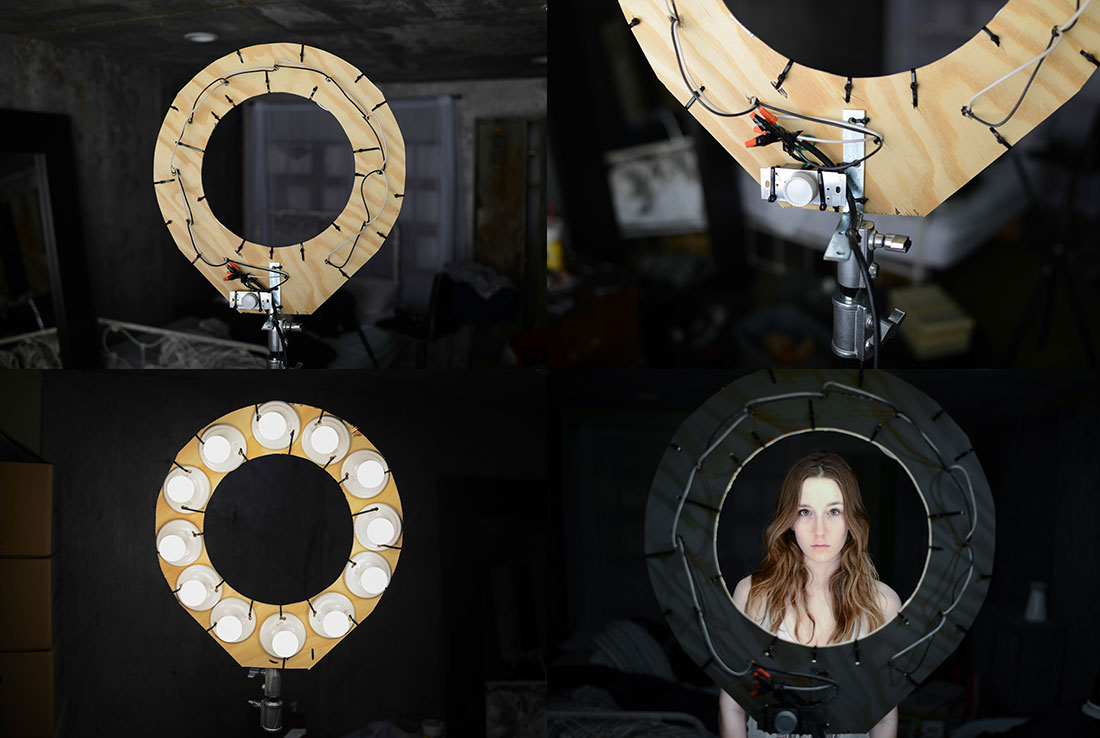
After you know your wiring works and it’s NOT plugged into the outlet, zip tie everything in place. Drill small holes for the zip ties. You can also cut off the tip of the teardrop, so you have a flat edge for your mounting bracket. Important: Make sure you are NOT plugged into the wall when you’re working on your light! I zip tie everything, including the bracket and switch. Make sure there is no bare wire coming out the back of the light sockets or the switch.
Throw your ring light on a light stand, screw in your bulbs and test it out!

We hope you found this tutorial helpful! Follow Jay Russell on 500px to see more of his work.
If you have any questions for Jay, he’s on Facebook and Twitter.


Leave a reply