
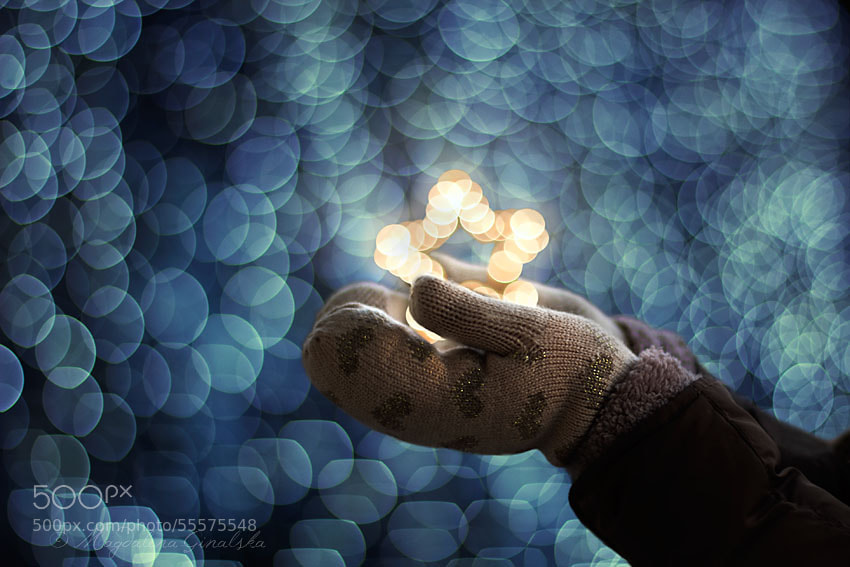
Magdalena Ginalska is a Poland-based photographer who has created some of the most striking and creative macro and bokeh images we’ve seen on 500px. In this tutorial, she shares how she shot and processed her popular “When You Wish Upon a Star” image, so that you too can recreate this spectacular bokeh effect—perfect for any holiday or festive photo shoot!
by Magdalena Ginalska
How I Got into Photography
I got into photography around 20 years ago, when I received my first camera—an old film SLR Zenit 11, with a Helios lens attached to it. I still have it. However, my interest in photography started earlier than that. As far back as I can remember, I’ve always been strangely attracted by beautifully-photographed images, which I was passionately cutting out from magazines. Then I started to buy and collect postcards featuring the works of famous photographers, such as Avedon, Horowitz, Lindbergh—I loved fashion photography at the time. I framed and hung them on the walls of my room. So, my passion was born quite some time before I actually took my first picture.
The Beauty of Bokeh
Bokeh images have some ethereal beauty and magic in them. In our reality, which is often grey and dreary, we all need something that will make us marvel like a kid upon seeing an amazing thing for the first time. Bokeh pictures have that quality. Moreover, this is where a camera lens can surpass the human eye and take us to an enchanted world, which we can’t see otherwise.


The Concept for “When You Wish Upon a Star”
Creating this photo wasn’t just a one-step process. First, the idea grew in my mind, but when I was ready to realize it, I understood I would need the help of some “tricks” to make the picture look exactly the way I imagined. Originally, I was planning to take it at home with the background of Christmas illuminations and without the gloves. I saw those gloves in a store window while doing some Christmas shopping, and I thought, “Eureka!” At this point, I decided to take the picture outdoors. I needed to find a spot with lots of Christmas illuminations, which wasn’t really hard in the pre-festive period. In fact, I found what I was looking for in a beautifully-decorated Old Square of my hometown:
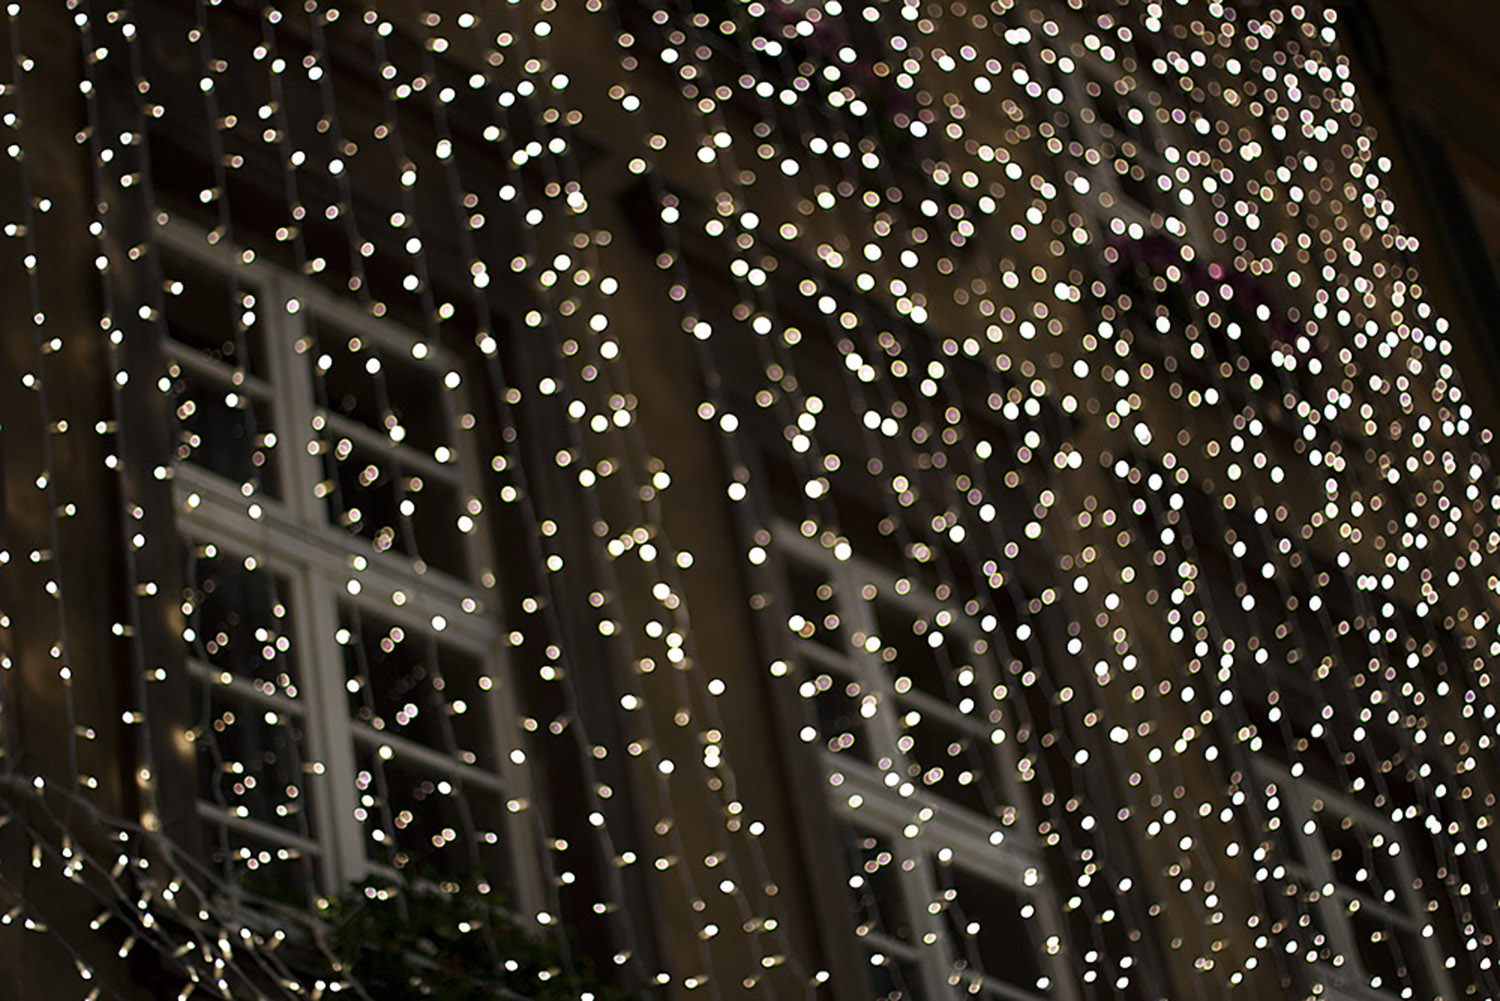
Shooting the Background
Equipped with the Canon 50mm (which renders 80mm on my camera) f1.4 lens, I asked a friend—or rather, her hands—to pose for me so that I could take some sample shots. I wanted see if I could capture what I wanted. I wasn’t altogether satisfied with the effect. The lights were too high for the hands to look natural and well-proportioned. And yet, I understood those very illuminations would create a perfect background for my picture as they were literally forming a wonderful, compact curtain of lights. They met my idea of filling the whole background with a nice dense, uni-color bokeh, so I decided to take some shots of just the illuminations, and see if they could somehow come in handy later.
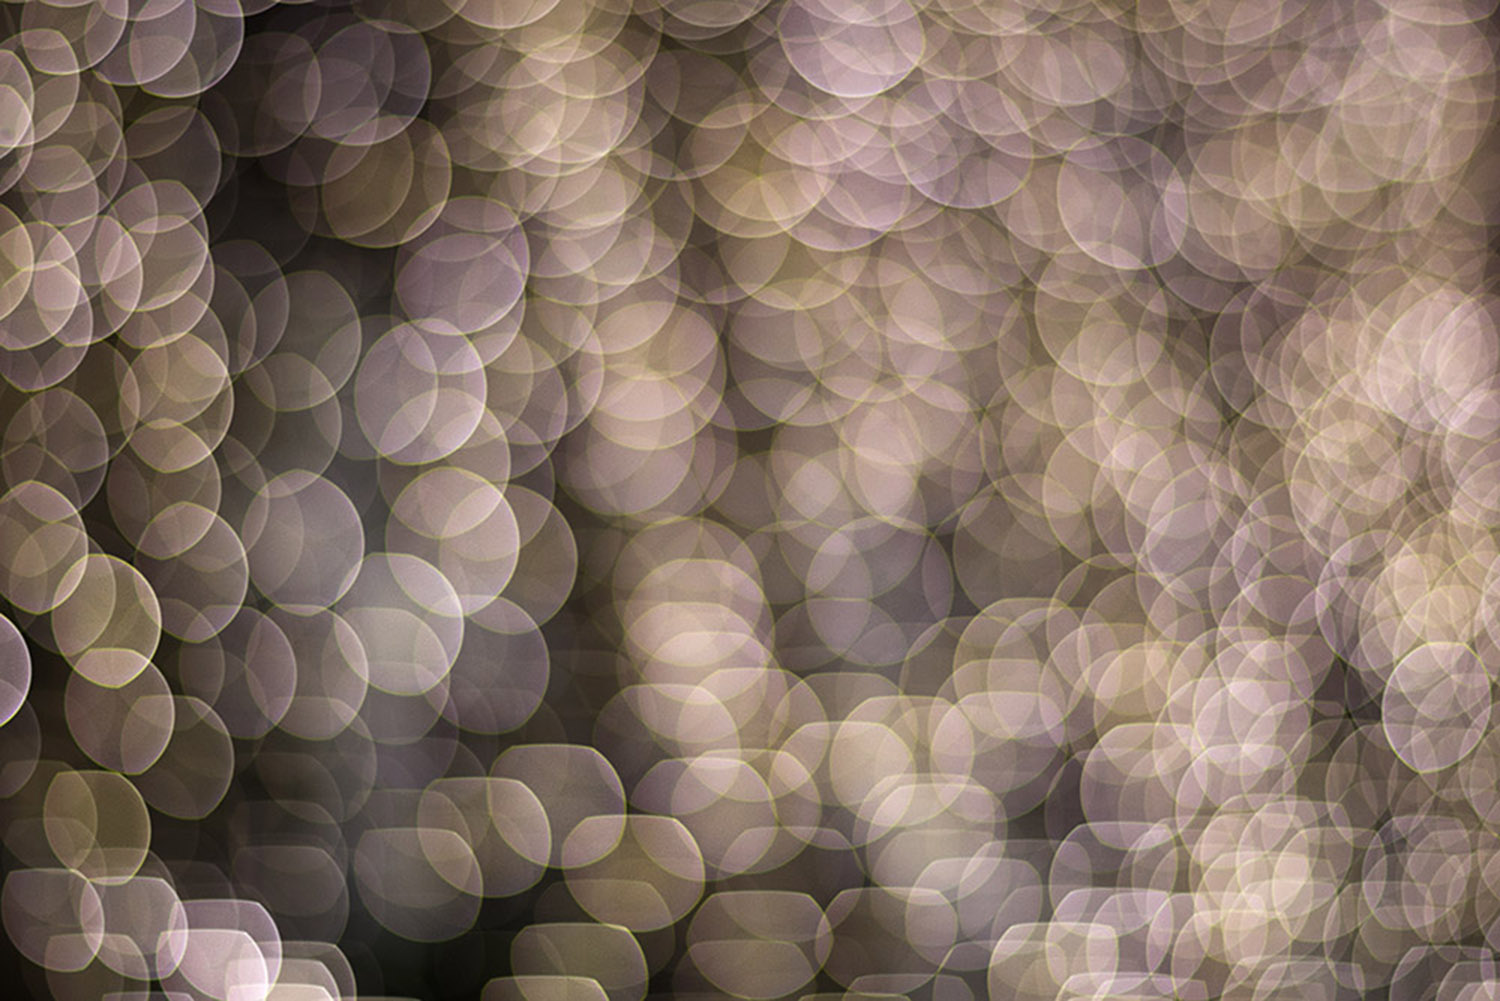
Canon EOS 60D, 50mm lens, ISO 160, 1/80 sec. at f1.4, handheld, manually focused.
Equipment
A few words about the lens that I was using: I chose it for its brightness and great bokeh properties. It was also a new purchase of mine, and I simply wanted to try it out at the time. I took into consideration that I might need to go back to the same spot another time, equipped with another lens. (I was considering the Canon 100mm f 2.8 macro then.) Instead, when I saw the bokeh the f 1.4 lens has produced, I absolutely fell in love with it. I wanted to keep it as the background of the picture.
Shooting the Subject
Now that I had the shot of my perfect background, I needed to shoot the rest separately. This time I chose to model myself. I waited for the early dusk, prepared the same lens, and then set the camera on a tripod. I was standing outdoors, but I purposefully positioned myself in such a way that the light from the room was entering through an open window and throwing a bit of a warm glow on the gloves. I didn’t want the hands to remain just a silhouette, because I loved the knitted pattern of the gloves with its golden thread elements. I wanted it to be well-discernible.
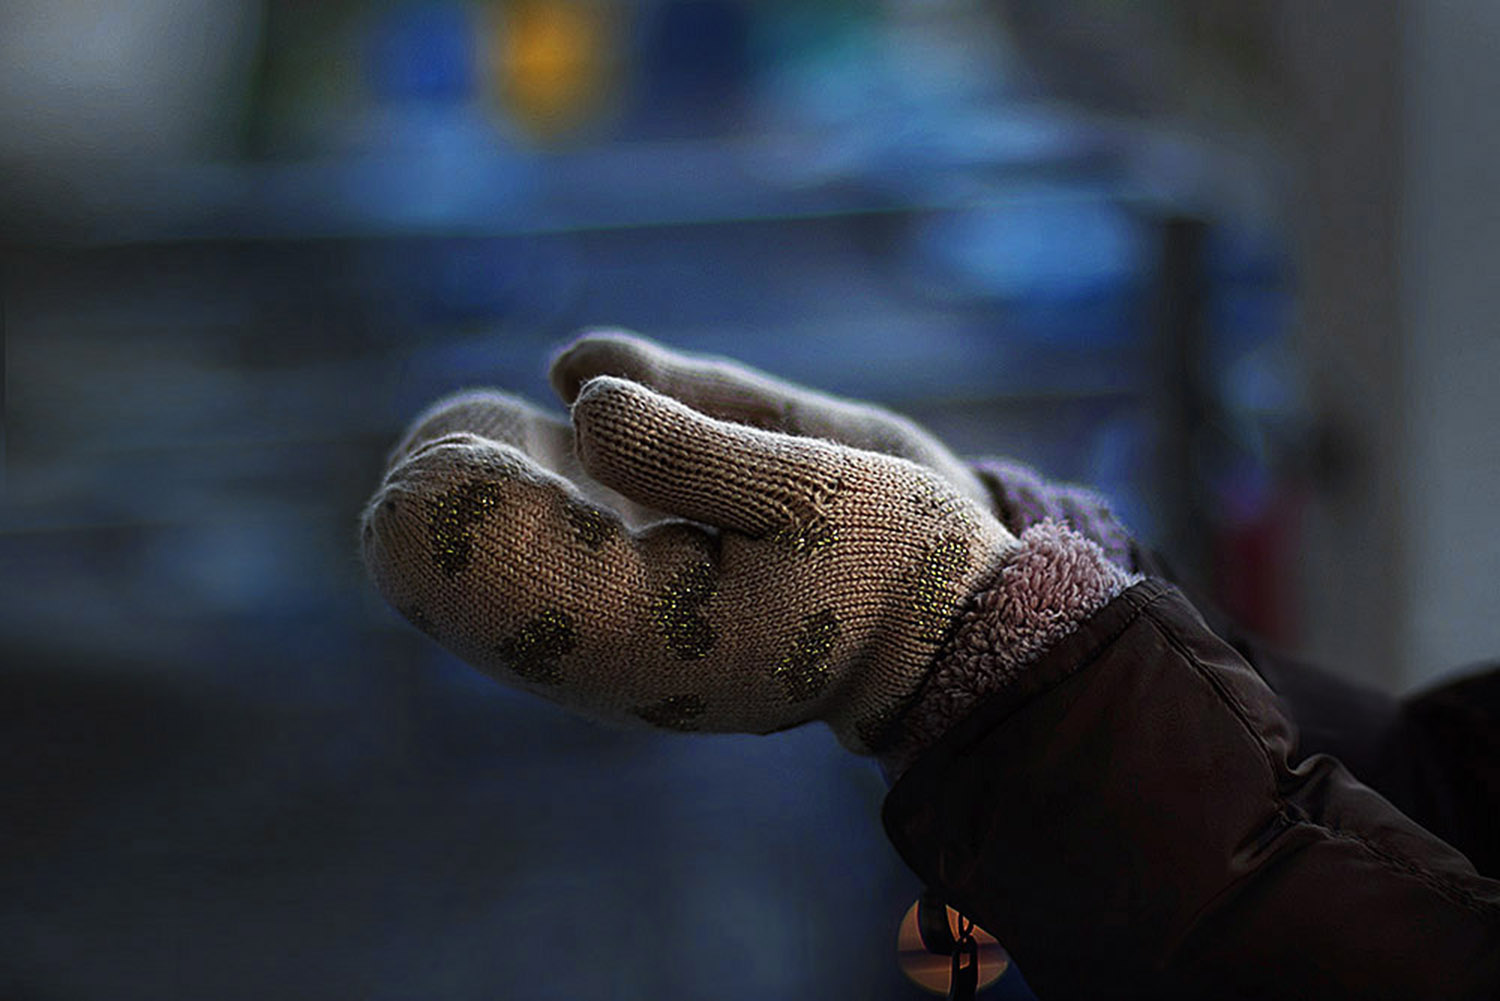
Canon EOS 60D, 50mm lens, ISO 100, 1/250 sec. at f1.4
With a little bit of daylight still available, plus the light from the room and the aperture fully-opened, there was enough light to ensure a stable, sharp picture. That’s why I decided not to use a remote control or the self-timer. But I asked my husband for help. With him pressing the shutter, I had more time and flexibility to place my hands in the right pose. But of course, if there’s no one around, this can be done by yourself. Just pre-set the focus manually, and using a remote control, set to a few seconds’ delay or a self-timer, as I have done with some other projects for which I was modeling myself.
Props: Shooting the Star…or Snowflake
You may be asking now, “And what about the star?” As you know, to have a pair of hands holding up a star was the crucial detail in this photo. At first, it was originally supposed to be a star-shaped little light prop. If the picture had been taken inside, I was supposed to use a star from my Christmas illuminations set as a prop. However, moving the shoot outdoors complicated the thing a bit—no electricity plugs. So I decided to look for a battery-operated star, but believe it or not, I couldn’t find one! I bought a snowflake instead, even though it wasn’t quite my original idea. And only then did I have another “Eureka!” moment. I figured it would look quite unique if the star was all made entirely out of bokeh. I also liked the fact that it would add the surreal element of “impossible” and “unbelievable” to the picture. That revelation put a huge smile on my face because I didn’t have to compromise on my original “wishing upon a star” idea. I also recalled that the previous year, I took a shot of a big Bethlehem star illumination, which would work great here, so I decided to use that shot to complete my work:
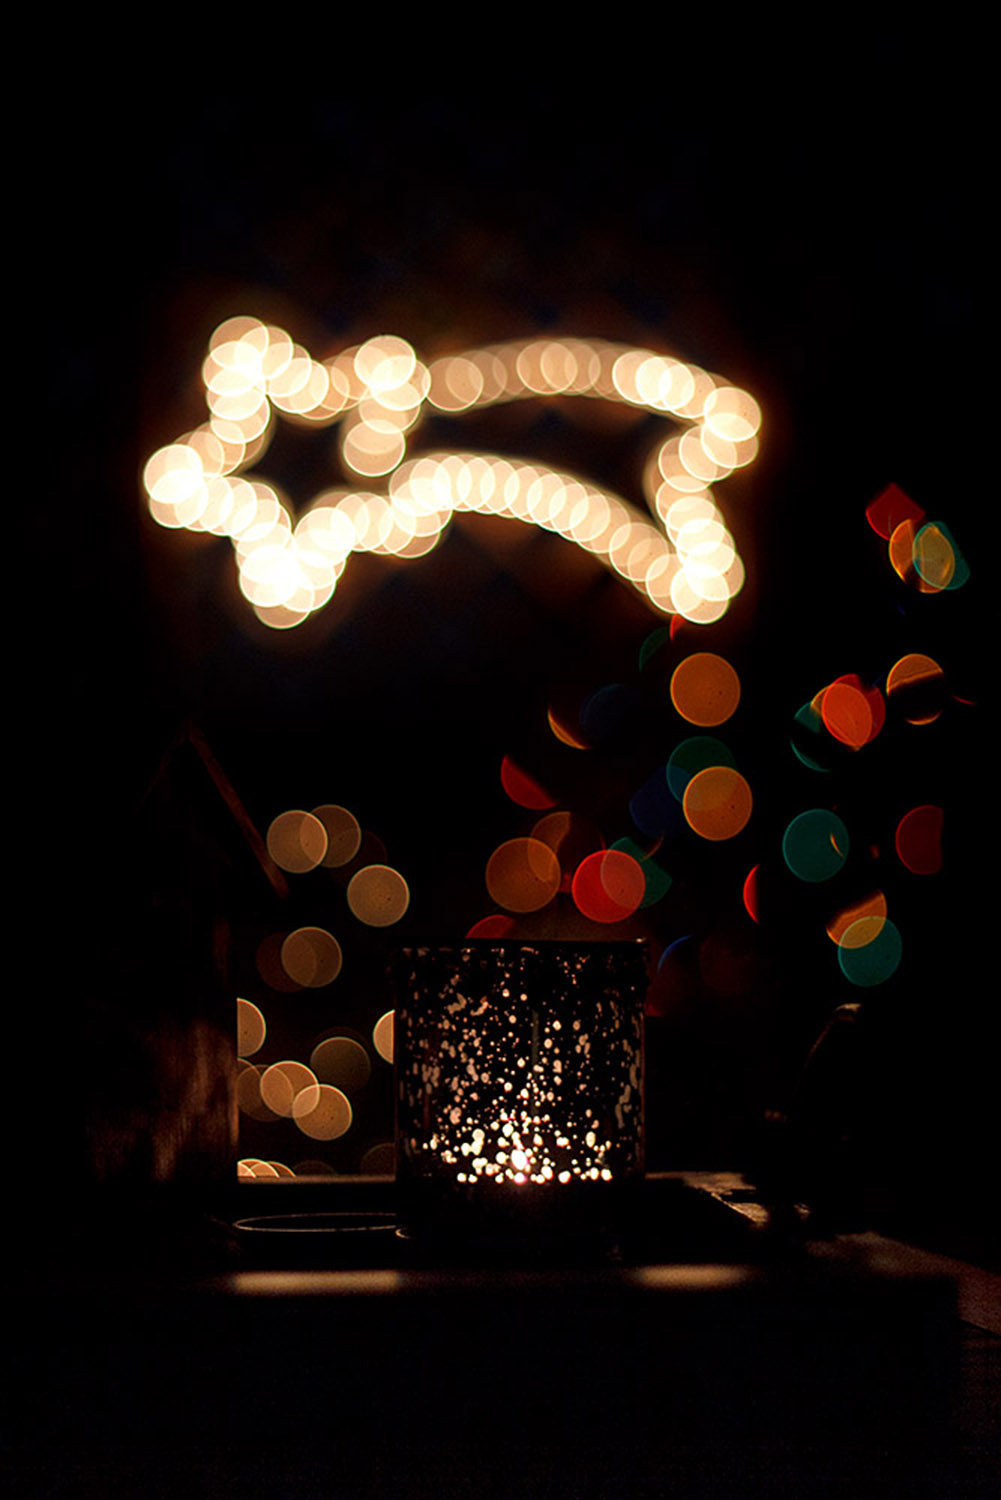
Canon EOS 60D, 50mm lens, ISO 500, 1/50 sec. at f1.8, handheld
Post-Processing Workflow
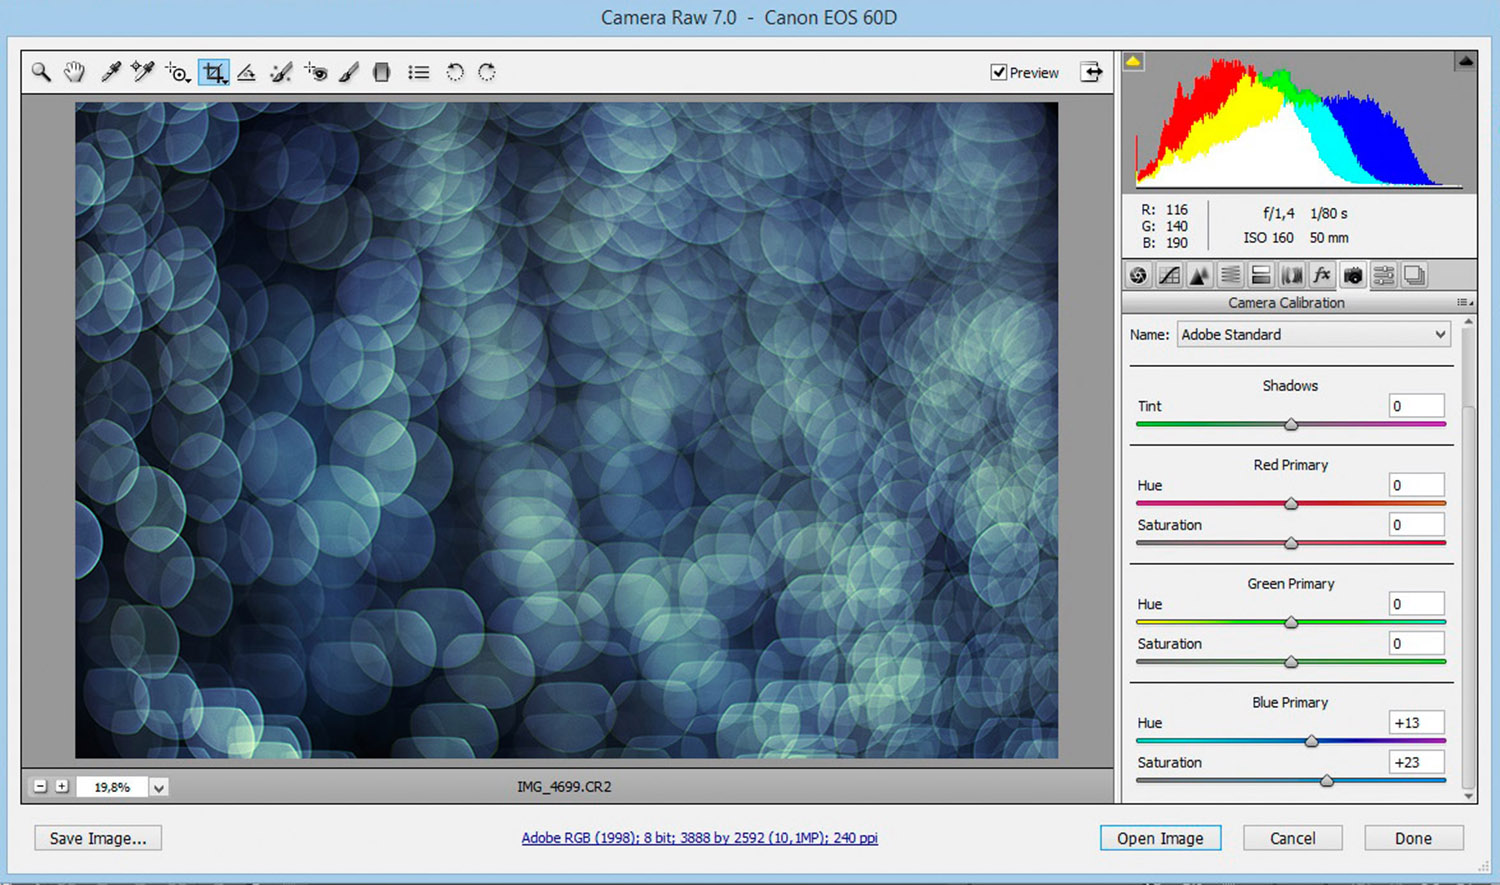
All the component pictures were shot in RAW. I post-processed them in Camera Raw and made some standard adjustments like contrast, brightness, sharpness, etc.
I also decided to turn the background into blue. I thought it would create a nicer contrast to the brightly-illuminated star. I did this by simply changing the picture’s temperature from warmer to cooler, using the temperature slider in Camera Raw.
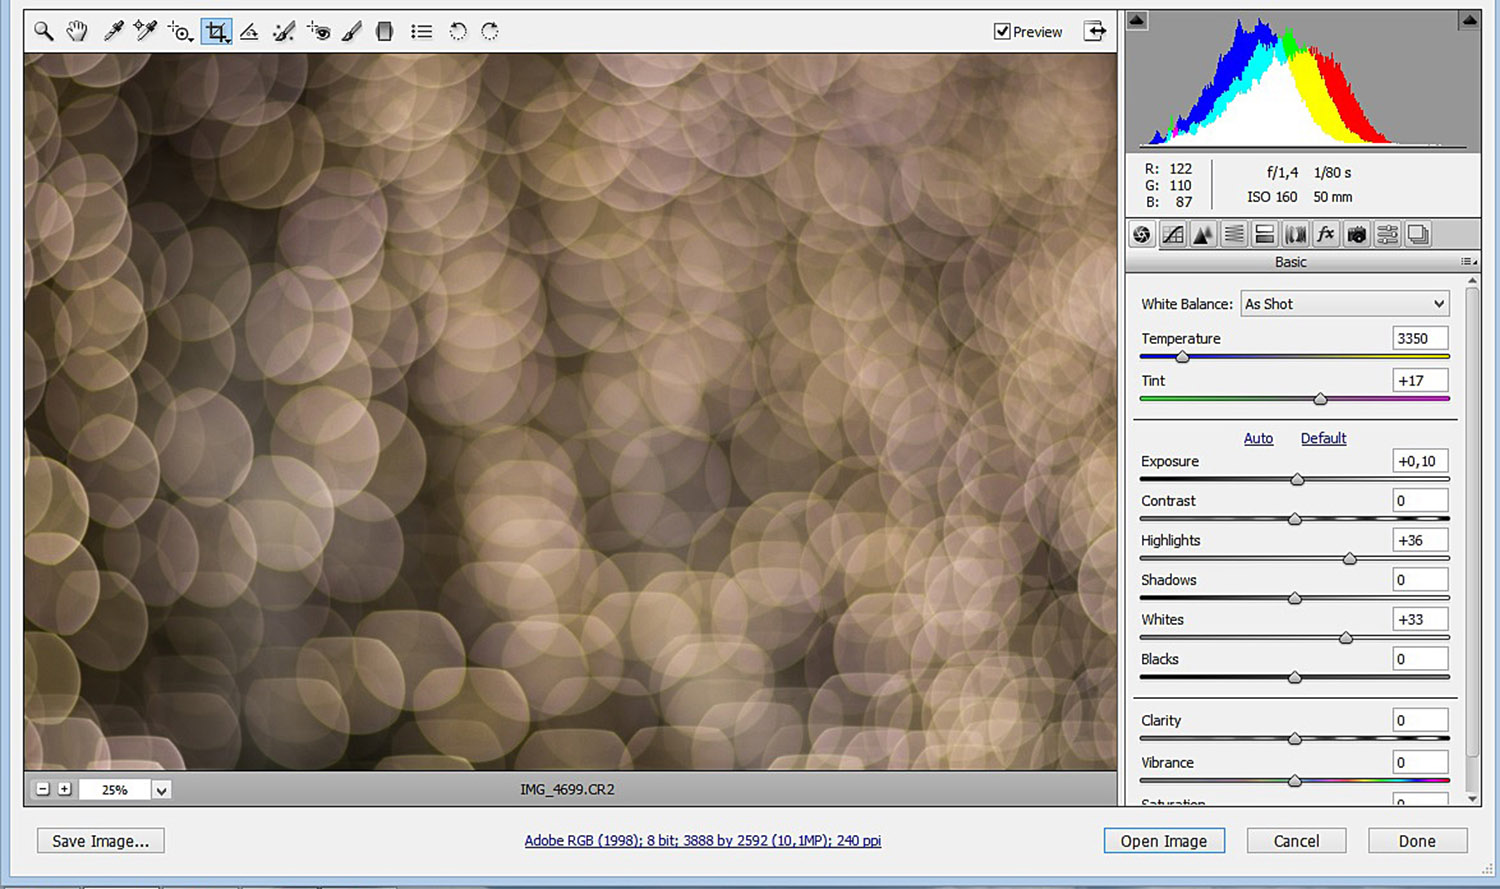
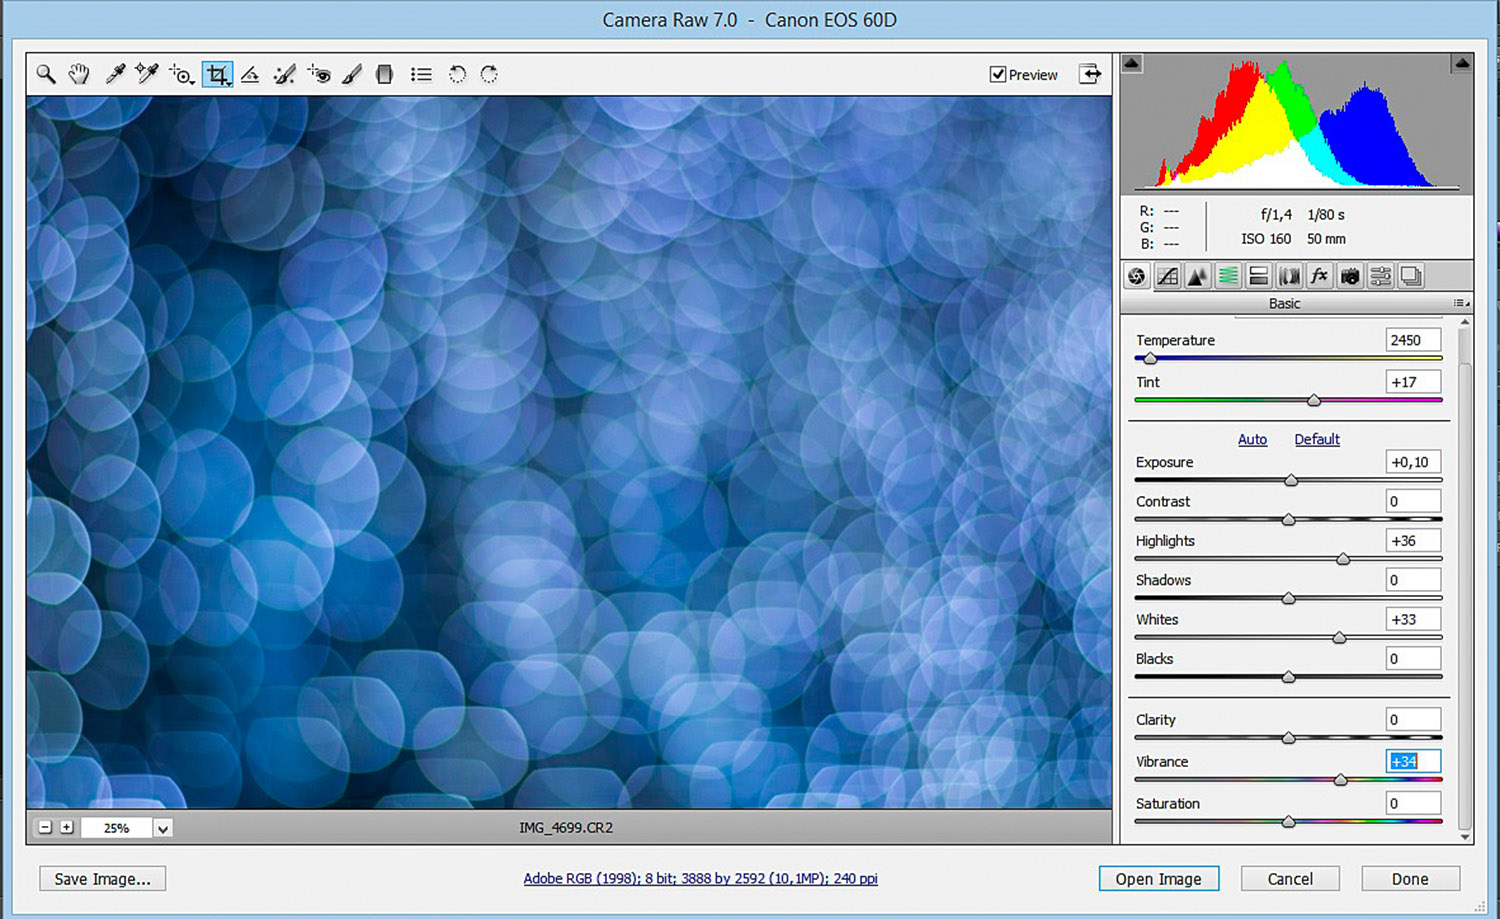
Then, I played a bit with the hues, vibrance, and blue primary tones until I obtained my desired tone of blue:
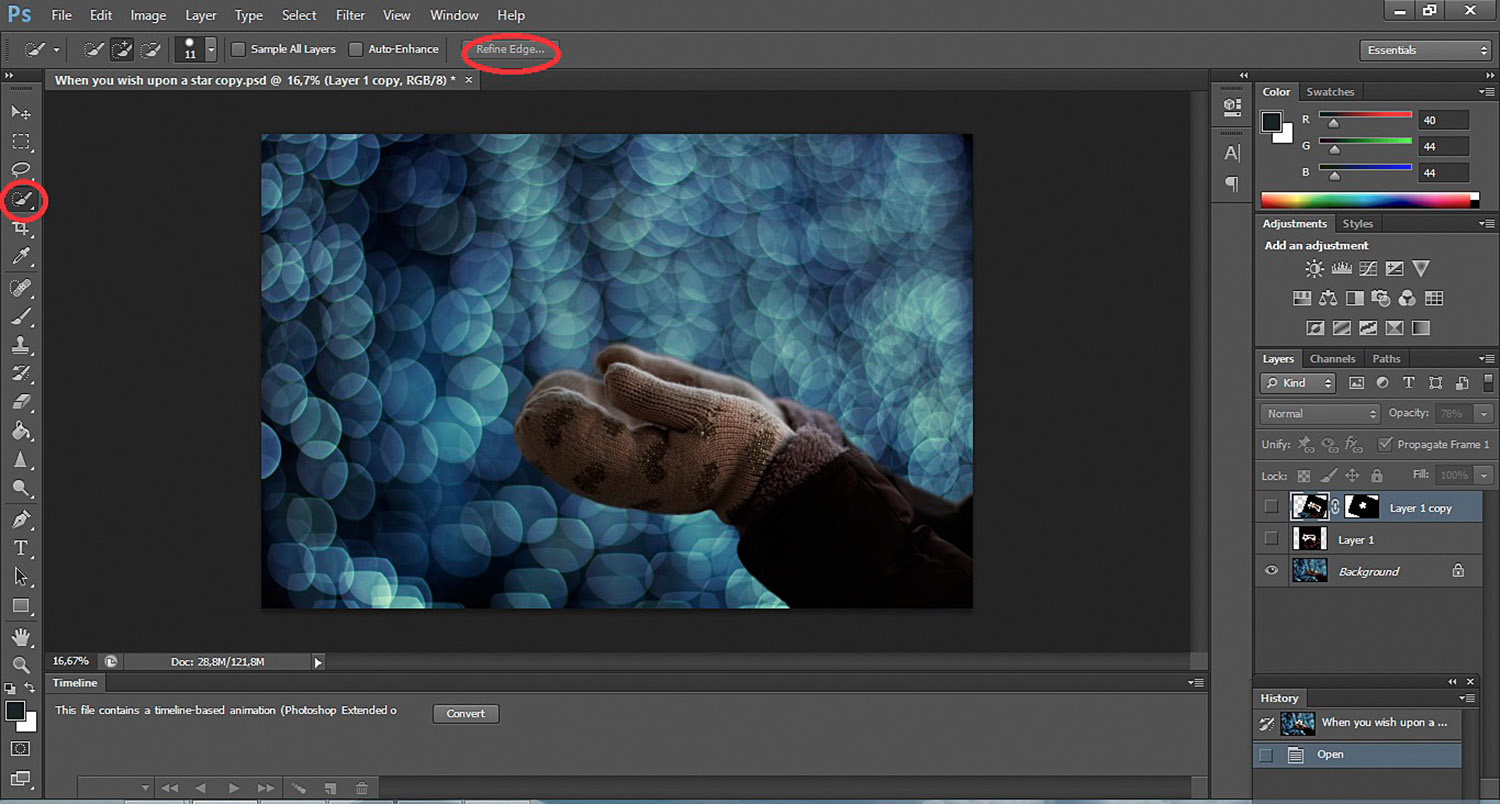
Now that all the necessary components were ready, I needed to put them all together. I moved to Photoshop to do the cutting and merging. I used the quick selection tool and refine edge to cut out the hands and the star. Then, I repositioned all the elements and merged the layers:
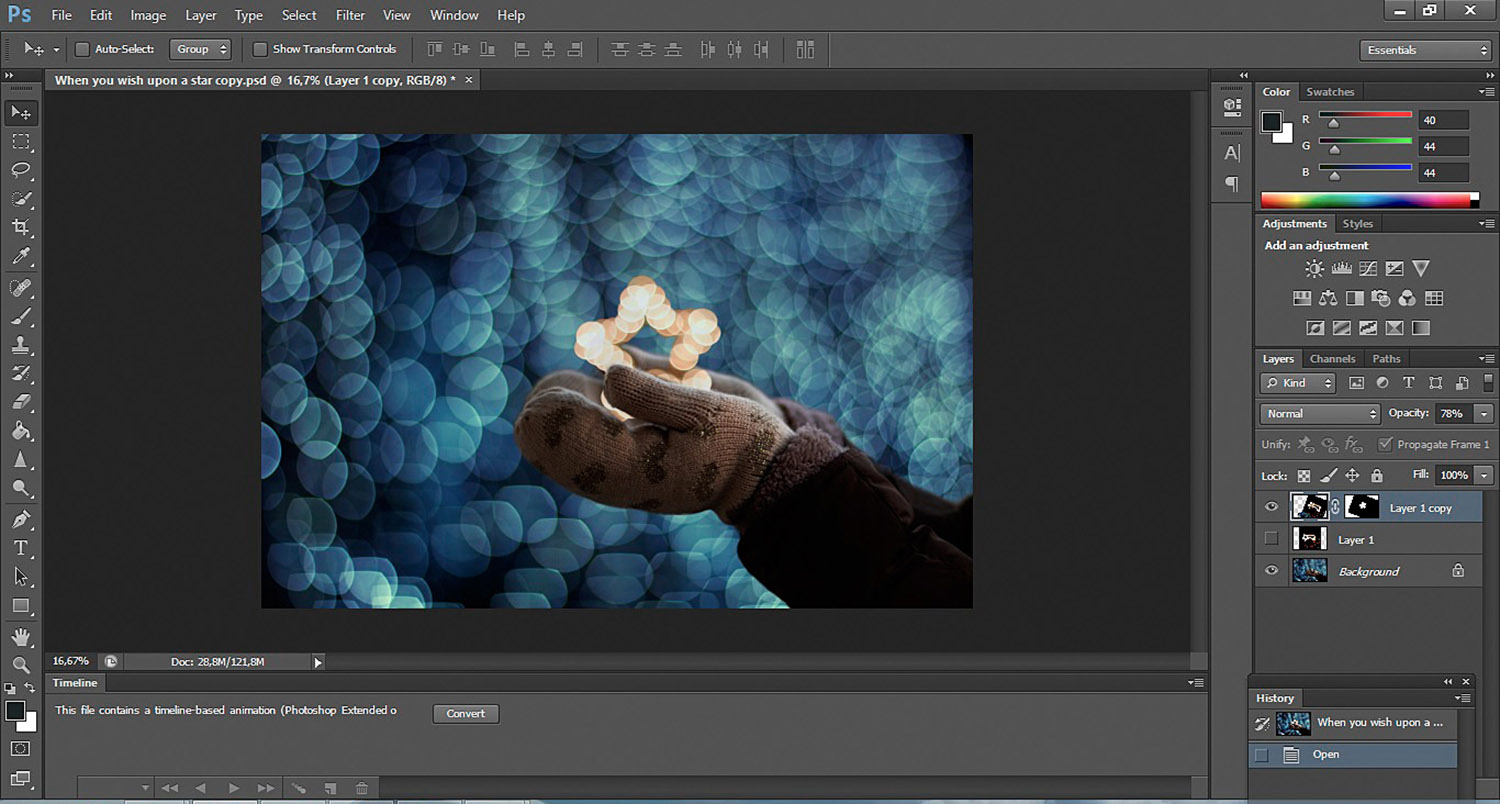
The very last step was to use the dodge and burn tool. I wanted to highlight and/or darken the given spots to get this final image:
And that’s it for this bokeh tutorial. I’d like to wish everybody an inspirational and creative Christmas! Don’t be afraid to unleash your imagination, and have fun with your shoot.
To see more of my work, please follow me on 500px. If you have any questions for me about my tutorial and photos, leave a comment for me below!


Leave a reply