Summer has landed, and we want nothing more than to hit the shores and capture cool seaside shots! One subject that can instantly add drama to your seascapes are waves. To help you nail incredible wave images, we asked 12 seascape photographers to share their tried-and-tested tips—from setup to gear to workflow. (Bonus: There are even a few tips here on shooting waves in cold-weather conditions.) To inspire you, we also added these photographers’ best wave photos, and the story behind these shots. Scroll down and dive in!
This roundup features the work and tips of the following 500px photographers:
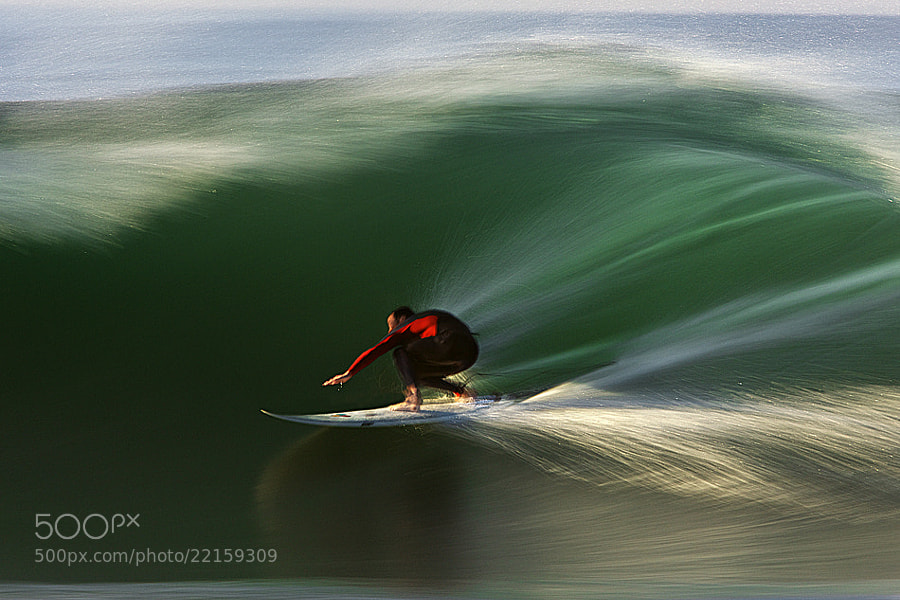
ARILD HEITMANN
BOBBY BONG
DAVID ORIAS
GIOVANNI ALLIEVI
JEFF DOTSON
JEFF HOBSON
KELLY HEADRICK
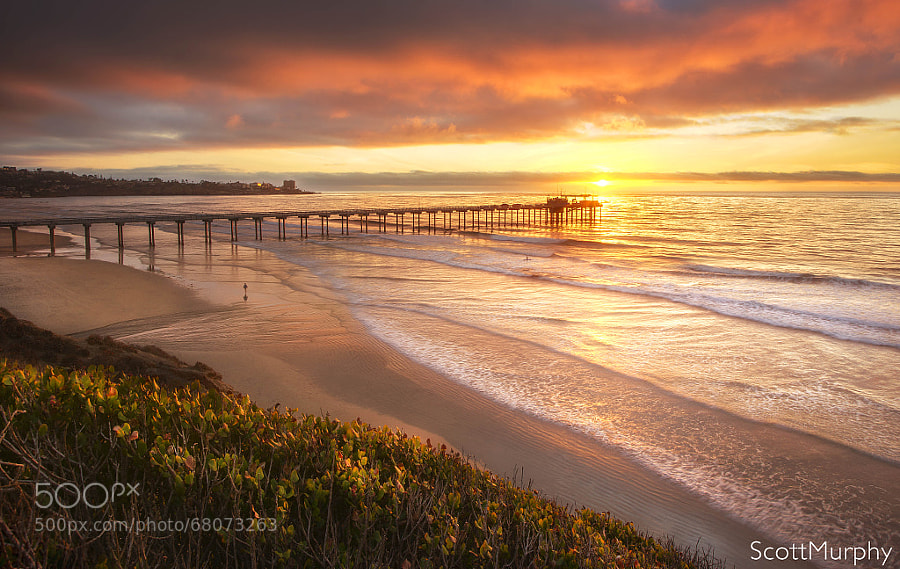
SCOTT MURPHY
STEPHEN SCULLION
VESELIN MALINOV
ARILD HEITMANN
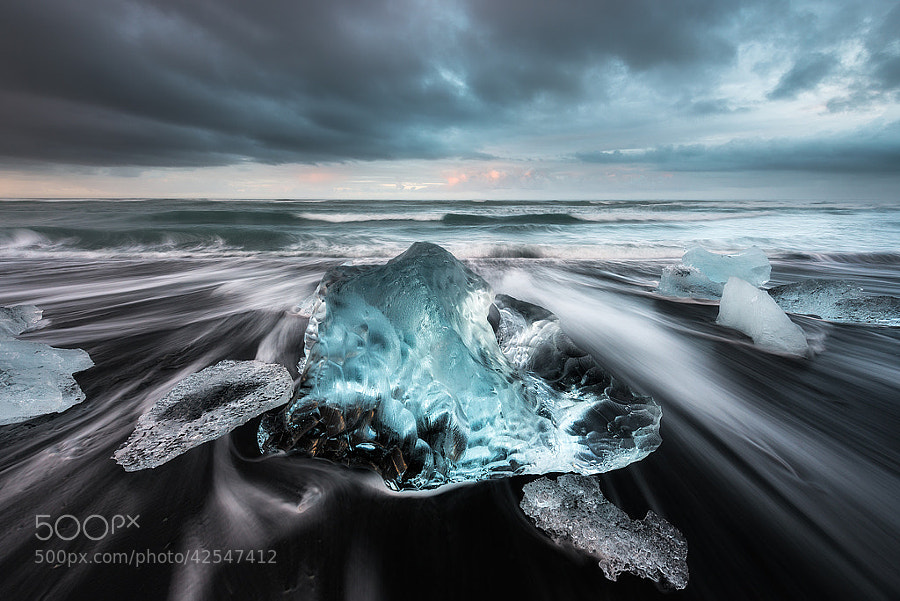
“This photo was taken on the iconic Breidamerkursandur Beach near the Jokulsarlon lagoon on Iceland. It is one of the most unique and amazing beaches in the world. The shoreline is constantly fed with chunks of ice flowing down from the lagoon before being washed ashore by the mighty waves. This beach looks different every time you visit. Me and my travel partner were asleep in the car, exhausted after a really long drive going non-stop from Reykjavik to Jokulsarlon. The weather was really awful—heavy clouds, rain, and strong winds. At 3 a.m., I barely opened my eyes to check out any chances for a sunrise break in the clouds. I could see a small opening towards the east, so I jumped in my waders and walked down to the beach. At 3 a.m., I had the beach all for myself.
“I shot this with a Nikon D800 and 14-24mm f2.8 lens, Wonderpana 145mm circular polarizer, and Benro C1570T Tripod. It’s processed in Lightroom 5 and Photoshop CC. The dynamic range of the D800 is a dream to work with, so no need for graduated filters under these conditions. The post-processing involves standard adjustments in the RAW converter—setting the white balance and balancing the exposure. In Photoshop, it’s basically a lot of dodging and burning to enhance the striking elements in the picture. If I ever have twins, I will name them Dodge and Burn.”

ARILD’S TIPS
1. When shooting waves in cold and icy conditions, it is highly recommended to wear neoprene waders. I like to get as close to the action as possible, and that means standing in the waves. Wearing neoprene waders means you can stand in the water for hours without getting cold.
2. Do many exposures! Each wave is different, and each wave will look different in a picture. Try different shutter speeds. A slight change in shutter speed can have a huge impact on the result.
3. Bring a cloth. You don’t want to return home and find your images ruined by water drops. I use a 145mm polarizer, which works like a magnet for drops and spray.
4. Use a polarizer when shooting ice. It brings out details and removes reflections from the ice. There are so many magnificent details even in the smallest chunks of ice.
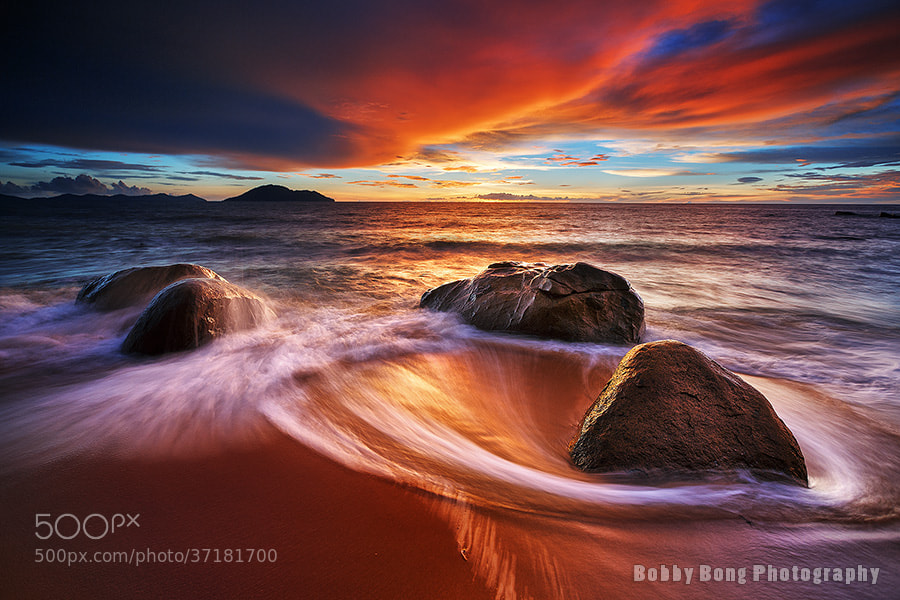
BOBBY BONG
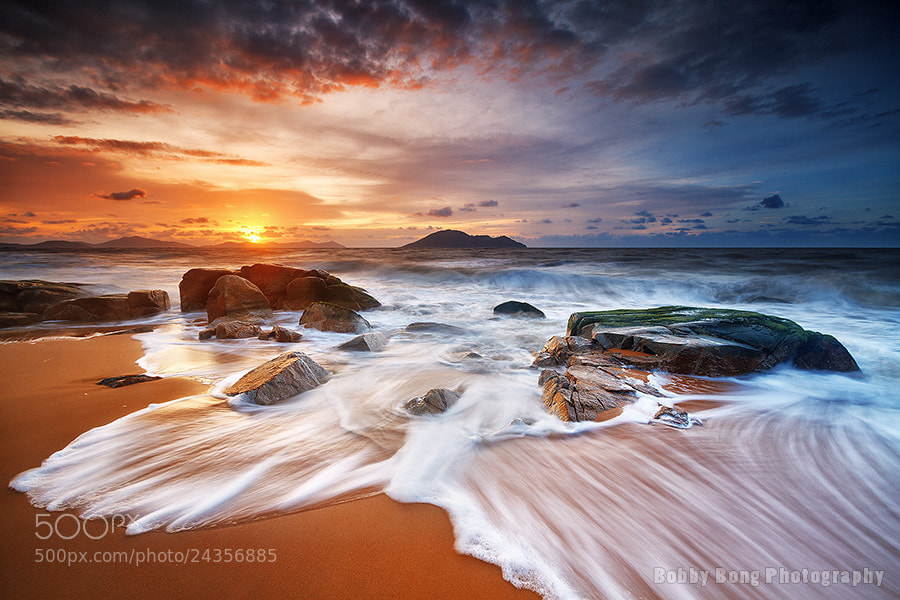
“This photo was taken at Kura-Kura Beach in West Kalimantan, Indonesia around 5:54 p.m. I used a Canon EOS 7D, Canon EF-S 10-22mm, CPL, GND 0,6 hard-edge. I did some post-processing on Photoshop.”
BOBBY’S TIPS
1. Invest in a good and sturdy tripod.
2. Use Graduated ND filter to balance the exposure between sky and foreground.
3. Put safety first. Waves are unpredictable.
4. Experiment and try different shutter speeds to find which works the best.
5. Always bring a cleaning cloth to clean sea spray off your lens and filter.
DAVID ORIAS
“The photo was taken around 8 a.m. at a surf break called Rincon which is on the Santa Barbara/Ventura county line in California. I used a Canon 5D Mark II and Canon EF 600mm F4L with a 1.4X teleconverter. I used Lightroom for processing as well as Photoshop CS5.”
DAVID’S TIPS
1. Slow shutter speed panning will give your waves a look that is not commonly seen in other wave photos.
2. Shoot when the light is most interesting. Depending on your location, that could be in the morning or the evening.
3. To bring out the curl in the waves, use a long lens and try to shoot somewhat parallel to the shore, rather than shooting it face on.
GIOVANNI ALLIEVI

GIOVANNI’S TIPS
1. Perseverance is the key to success. Nothing is going to happen magically by itself.
2. Take your time and carefully watch what’s going on around you before tripping the shutter.
3. When photographing waves from a short distance one has to pay attention to the motion of the waves and predict where the spray is going.
4. Protect yourself and your gear from the waves. Often times, to protect myself and my gear, I might decide not to use my tripod to be able to run fast if needed. When the wind is rough, I usually wrap the lens and the camera in a Ziploc bag in which I’ve previously cut a hole into to make the front element of the lens peek through it. Use a rubber band to make it stay in place. Another great and simple tip is to have a microfiber cloth at hand to wipe away sea spray from the glass of the lens.

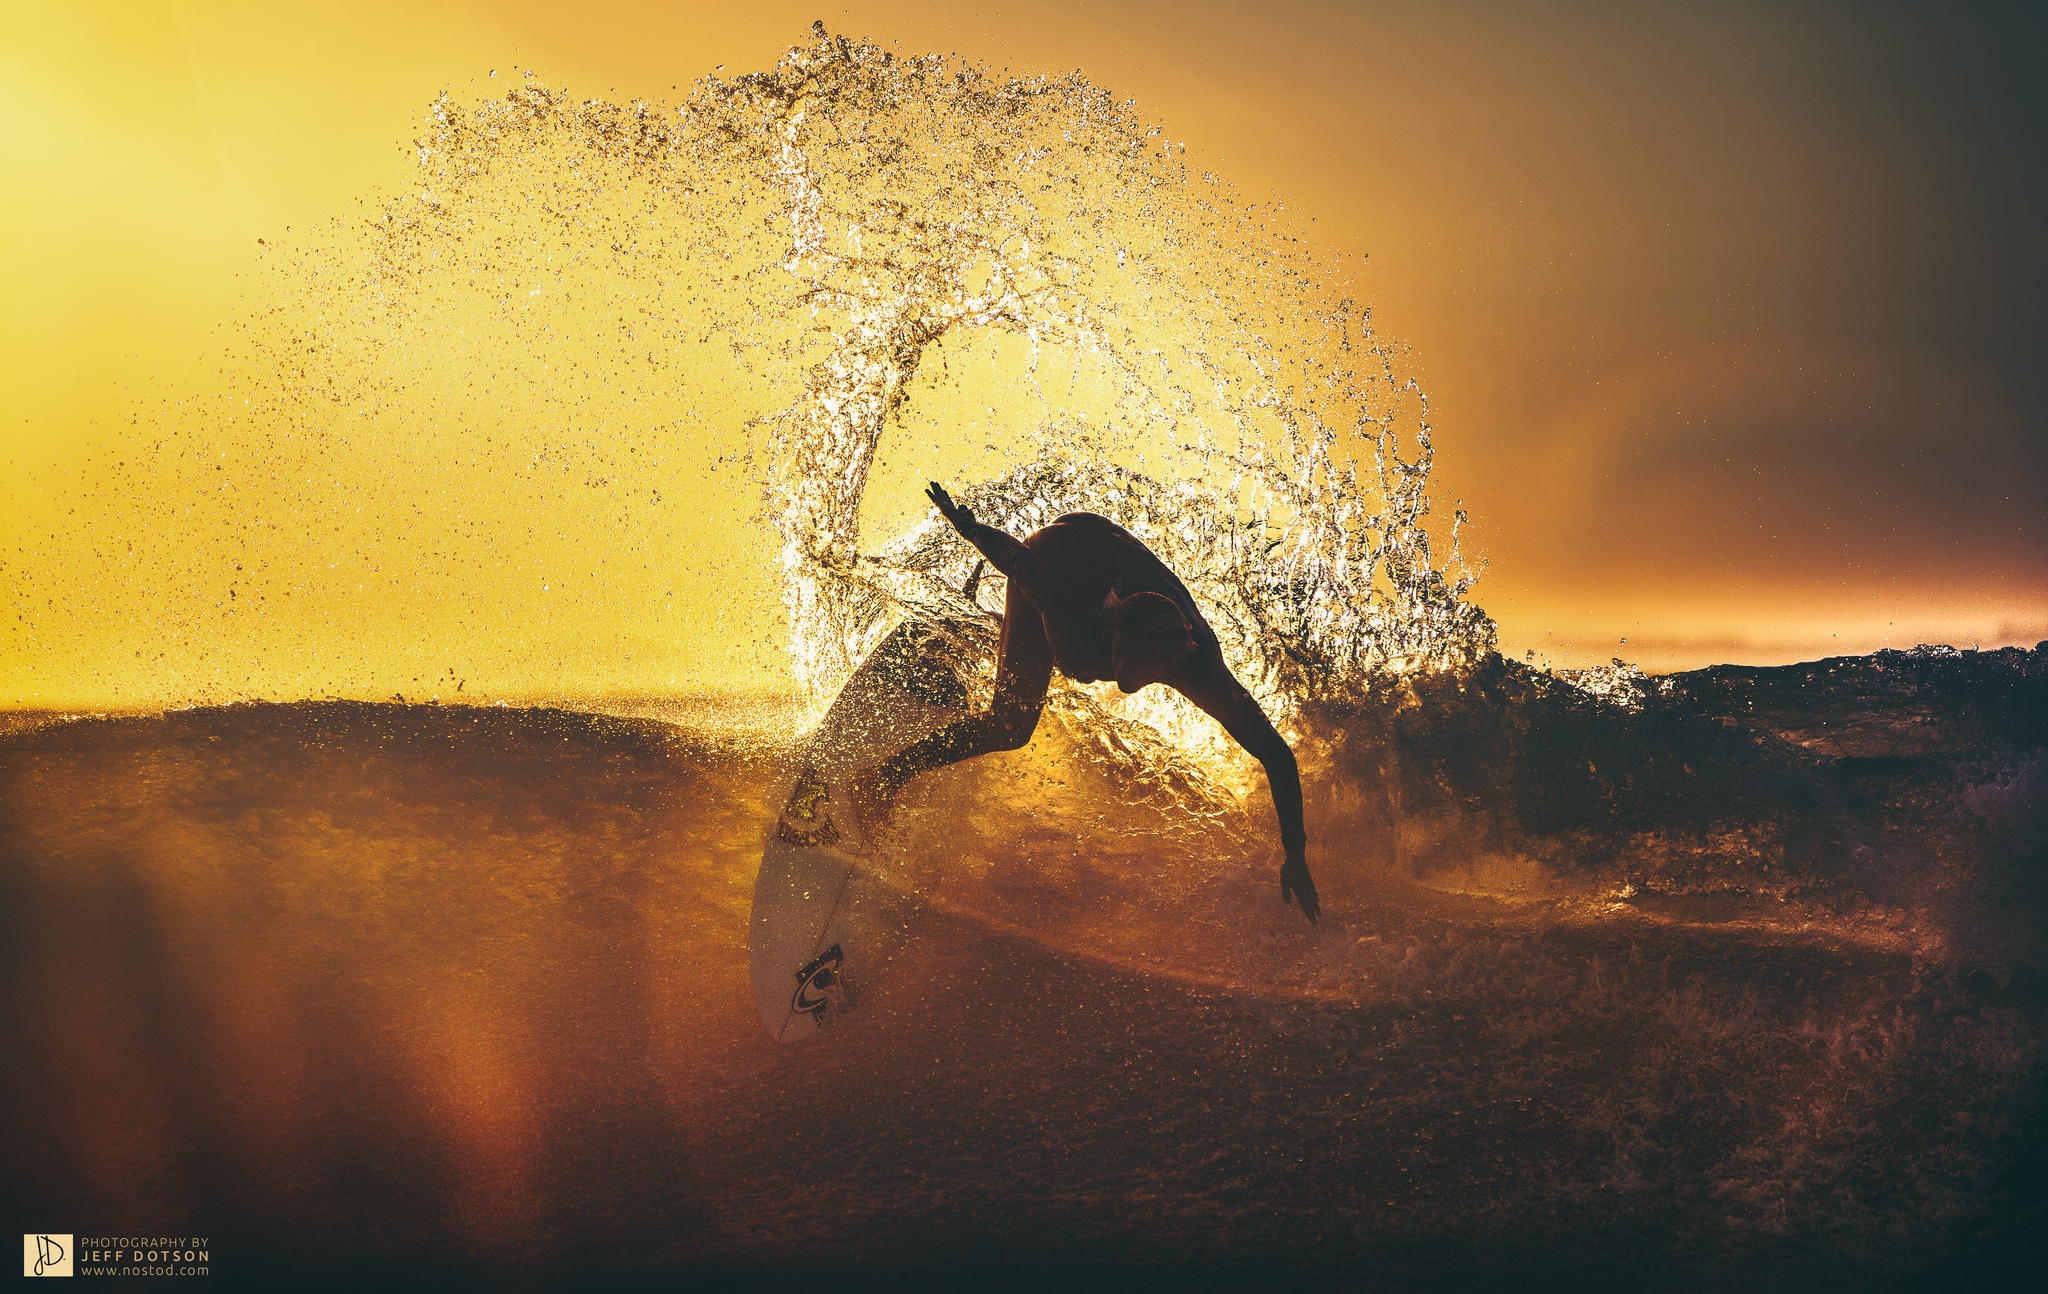
JEFF DOTSON
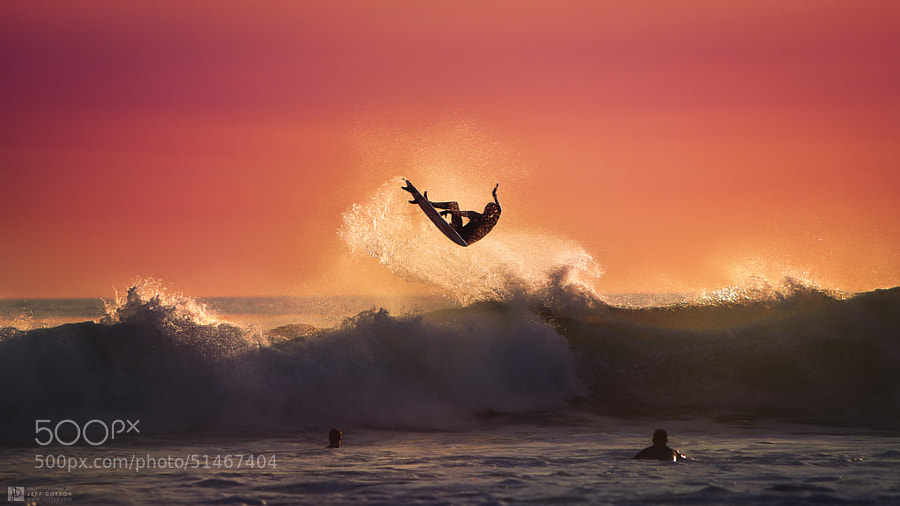
“The photo was captured at Salt Creek in Dana Point, California last summer. I always shoot between 5 p.m. to sunset, so it’s somewhere between. For my surf photography, I shoot with a Canon 5D mk3 using a EF 70-200mm F/2.8L USM lens. I tend to edit most of my photography in Adobe Lightroom, which allows me to stay more organized and avoid photo manipulation. I am very selective with colors, so I created a series of custom Lightroom presets that I use.”
JEFF’S TIPS
1. With surf photography, there’s not much in your control. It’s nature, and the only thing you can do is keep your eye out. I can’t tell you how many times I’ve missed a shot, but that is the thrill of shooting—you never what is going to happen so always be ready.
2. Protect your gear. When it comes to the water and sand, nothing is worse then ruining your gear. I use a protective water cover even when I shoot in the sand. It allows me focus on my photography without worrying about the gear.
3. Do some networking. I always make it my priority to network with local surfers, sometimes I even meet pro athletes and these are the best days to shoot! It’s all about the action, and these guys love it when they know there is a photographer around.
4. Get in the water. That’s right, get in the water. Get a protective housing or cover that allows you to bring the camera anywhere. You can capture some amazing photos when you get up close to the action.
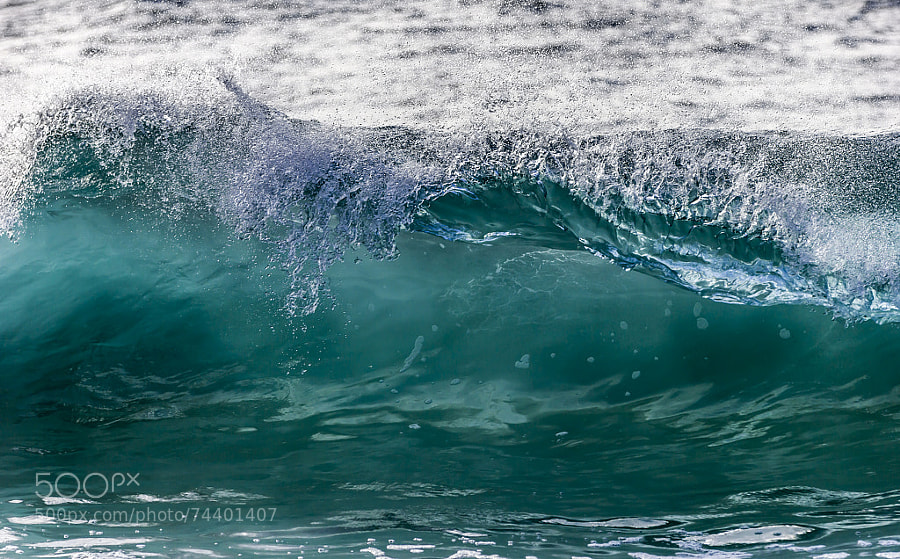
JEFF HOBSON
“This photo was taken in Coos Bay, Oregon. I was there at sunrise and shot until about 11:00 A.M. capturing these waves. I used a Nikon D800e, and a Nikon 55mm Macro lens supported on Really Right Stuff TVC-34L and BH55. I used Adobe Photoshop 6 and Nik Silver Efex for processing.”
JEFF’S TIPS
1. Find a place that receives large waves. Search the Internet for images of large waves around your area or place of travel. Find out what’s causing these waves, winds, tides, something they break against, signs of an incoming storm. Travel there often to catch them at their prime.
2. Get the right gear for the job. Sometimes, you can’t get close to these large waves. 200-500mm is considered normal for many wave photographers. I do use 16-200 range quite often, but the extra reach will allow you to get incoming waves breaking at a distances and unusual compositions.
3. Get the shutter speed right! Whatever motion you’re going for on your waves, make sure you experiment with different shutter speeds to determine the best look. I usually prefer my waves frozen, so it’s not uncommon for me to crank up my ISO if needed. This is to make sure I am freezing that wave. I use a remote control shutter release on multiple exposure mode, then I fire away!
KELLY HEADRICK
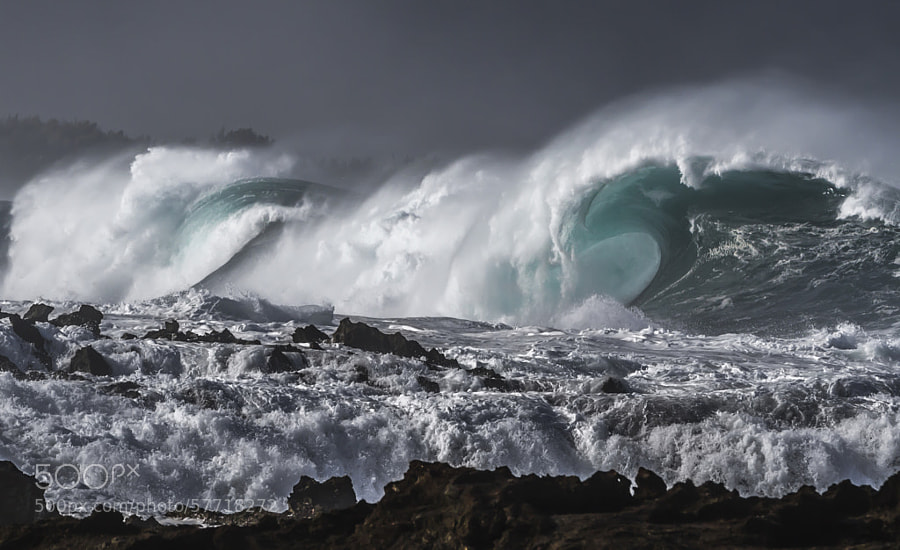
“This photo was taken at Sharks Cove here on the North shore of Oahu in Haleiwa. It was taken in the morning around 10 a.m. I used a Canon 7D with a 70-200mm f/2.8L IS II USM Telephoto Zoom, B+W circular Polarizer filter, Manfrotto tripod, and RRS ball head.”
KELLY’S TIPS
1. Be safe. That’s the first and most important thing when photographing waves.
2. The waves here on the north shore get up to 50 feet high, so it’s a good idea to check what the tide and surf forecast is before heading out.
3. When you find a good spot to get a good angle, watch it for at least 20 minutes before setting up. That will give you time to see what the ocean does when a set comes in.
4. Check the high water mark of these waves, then set up behind that line.
5. While shooting, keep one eye on the water at all times. I have learned the hard way to do this, having been completely drenched before.
6. Shoot in the morning and evening when there is sun. Cloudy days don’t bring out the color of the water and everything looks grey.
7. A fast shutter speed and smaller aperture are usually the best settings, so the highlights don’t get blown out.
8. Shoot in manual and adjust according to the light.
9. I use Lightroom when editing. I always shoot in RAW format. I adjust the highlights and darks, remove any chromatic aberration and noise, and up the clarity a little. I rarely use any color saturation or sharpening.
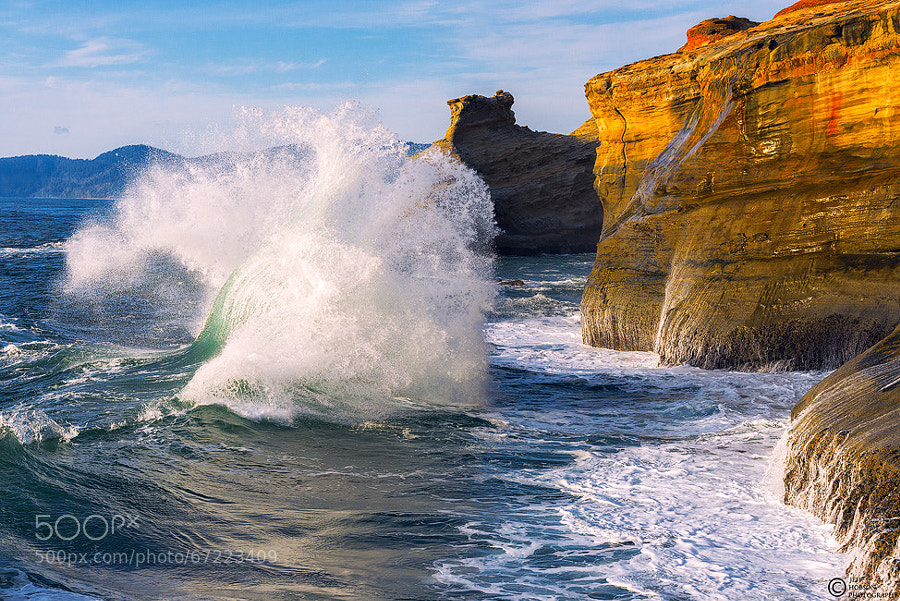
SCOTT MURPHY
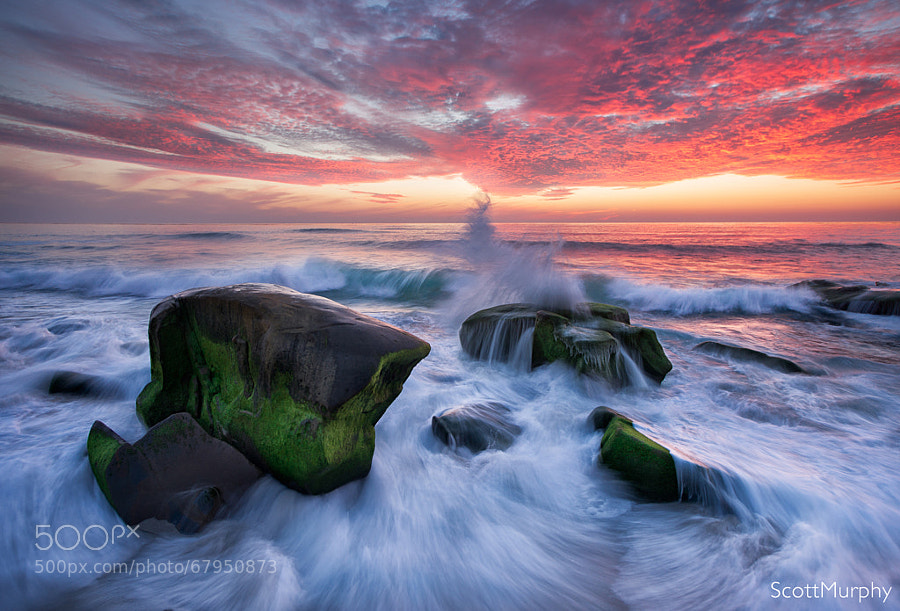
“This photo was taken in La Jolla, California, a neighborhood in San Diego last February. It was taken at 5:51 p.m., about 10 minutes after the sun went down—magic hour time. I used a Sony Alpha 850 with Carl Zeiss (16-35mm/ f2.8) wide angle lens and shutter release cable. For filters, I used Lee 0.9, 0.6 Neutral Density Filter and Lee Graduated Neutral Density 0.9 Filter. I shot in RAW, and imported the image to Lightroom, then to Photoshop CS5 combined with Nik and Topaz filters.
SCOTT’S TIPS
1. Use apps to check the local weather and cloud coverage for tide and surf reports before photographing. The best photo conditions are high tide and partly cloudy skies.
2. Arrive early. I usally arrive 2 hours before sunset to scout the beach for the best location and composition to reserve a spot. A popular beach will quickly fill up as sunset approaches.
3. Drop the HDR technique. For beachscape and wave shoots, you’ll need quality neutral density filters to slow the water. To balance the bright sky with the foreground, used graduated ND filters.
4. Don’t go cheap on the filters. There’s no point in spending big bucks for a good lens, only to put a low-quality filter on it. I recommend Lee Filters.
5. Once you have the perfect composition, lock your focal length and tripod. You want every shot to have the same focal length, so you can blend the different exposures later in Photoshop. Use layer masks in Photoshop to add the parts you want.
6. Start at 1/4 shutter speed. Depending on the wave movement, experiment with 1/5 or 1.3s till you get the wave movement you want.
7. Overshoot. The light and waves are constantly changing, so you have to quickly adjust your f-stop and shutter speed. I shot around 600 images in two hours to get mine.
8. Sometimes the best colors come after the sun goes down so don’t pack up right away.
9. Keep a lens cloth on you. The closer you are to the waves the greater the sea mist will cover your lens and filter. You will need to wipe it off in between shots to maintain sharpness.
10. Always shoot RAW—no exceptions!
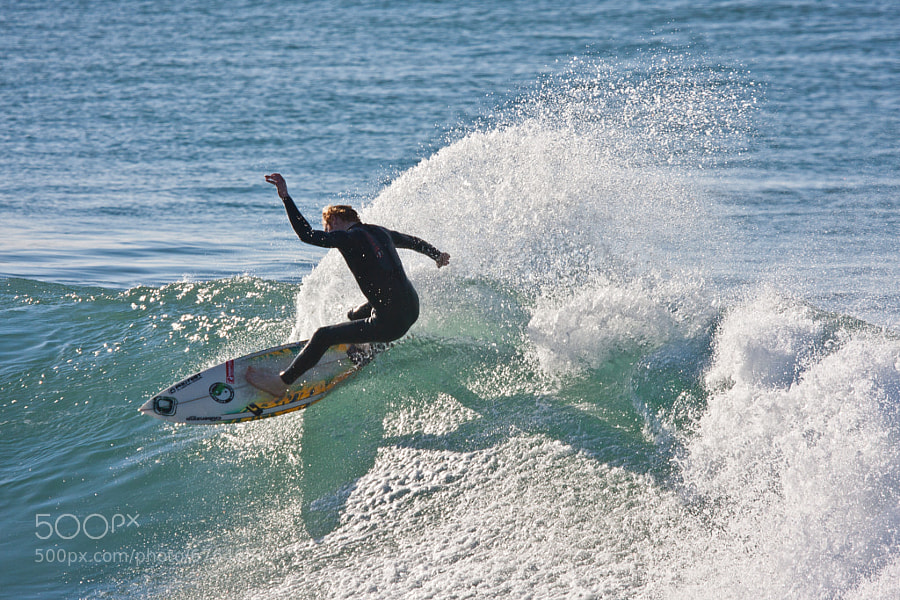
STEPHEN SCULLION

“The photo was taken in Castlerock, County Derry, a village on the North Coast of Northern Ireland. I took the shot just after 5 p.m. on February 20th back in 2009. It was quite cold. I used a Canon EOS 40D with a Canon EF 100-400mm L lens, shot at 260mm, 1/800, F5.6, shot in RAW. The only post-processing I did was to increase the contrast, and sharpen and convert to black and white—all of this was done in Adobe Lightroom.”
STEPHEN’S TIPS
1. Get to know your subject, especially when it comes to sports and action photography. I’ve surfed for 15 years, so I feel that has really helped me achieve the surf photos that I’m happy with.
2. Shoot when the wind is blowing offshore, as this creates a nice fan of spray off the back of the wave.
3. Shoot close to sunset time, as this creates a backlighting effect on the wave.
4. If shooting in the water with your camera in a waterhousing, use a fisheye or super wide angle lens.
5. Prefocus the lens on land, then switch it to manual before you swim out into the water. This means you don’t have to worry about the cameras autofocus hunting for a focal point.
VESELIN MALINOV
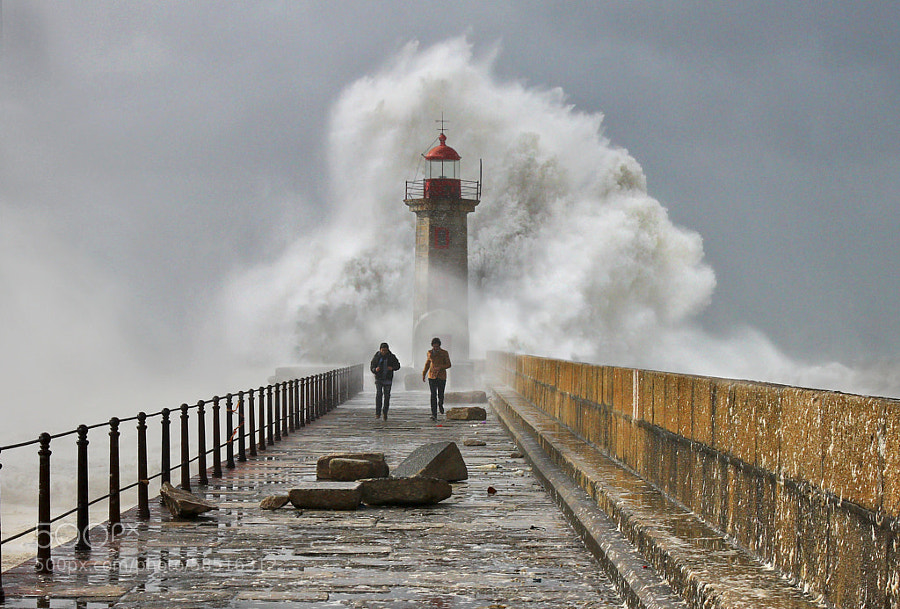
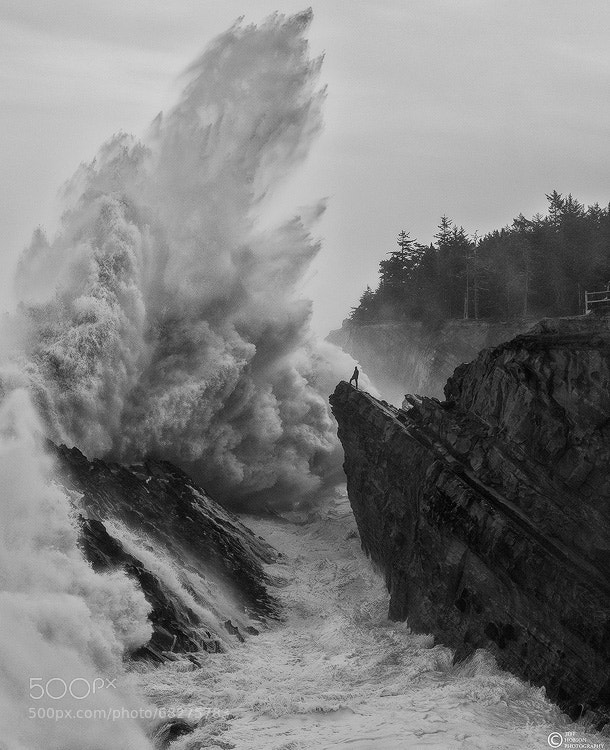
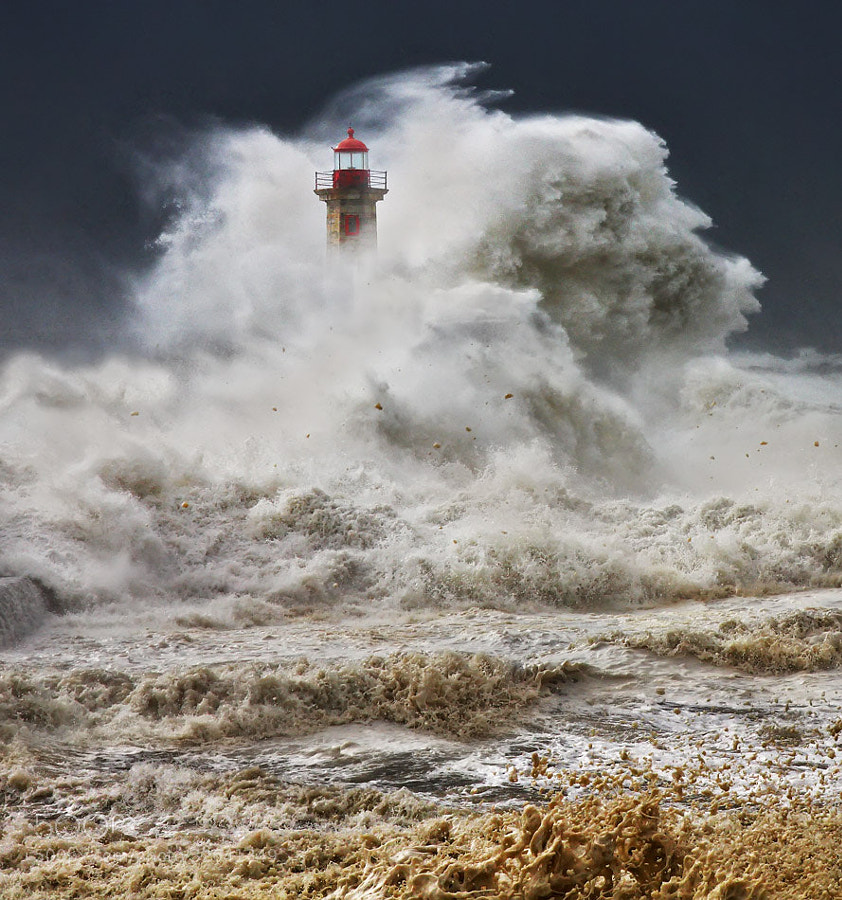
“I took this photograph during an amazing storm that hit Porto, Portugal in January 2013. The storm started at night, and the windows of my room were barely holding on. I went to sleep with the notion of going to the ocean first thing in the morning. The streets around the ocean were closed. There were fallen trees everywhere. I couldn’t believe my eyes when I headed to the ocean—the waves were going over the whole pier maybe two or three times more. It was scary. I filmed this video footage because I knew there would be a lot people that wouldn’t believe my photograph.
“Don’t get me wrong; I was scared, but the passion for taking pictures is stronger! So I went straight for the pier, and I saw these brave two guys just beneath the lighthouse taking pictures. They were just too close! Immediately, I saw the frame in my head and I knew that I just had to wait for “the wave”. I saw it coming long before it hit the pier. It was easy to see it! So, the wave hit the pier, the guys went running, and I started to shoot.
“I used my 550D camera with 24-105 F4 L lens. The camera settings were f9, ISO 200, and shutter speed 1/1000 sec. The clouds were changing the light conditions all the time so I had to watch out for overexposed and underexposed pictures. Because I always shoot in manual mode, it gives me freedom.”
VESELIN’S TIPS
1. Shoot in manual mode. It’s the first and most important rule for me. But it takes a lot of practice and lots of ruined pictures.
2. Control the camera by getting to know your camera’s abilities.
3. If you know your camera, it doesn’t matter if you are shooting by the ocean, at home, or on the moon.
We hope you found these tips helpful, and will inspire you to shoot some stunning seascapes this season.
Share some of your own tips or wave photos with us in the comments below!


Leave a reply