Tomer Razabi is a passionate freelance landscape photographer and owner of an adventure and nature expeditions company. Tomer guides photography expeditions in Israel and around the world.
500px: Tomer Razabi
Facebook page: Tomer Razabi Photography
Website: www.TomeRazabi.com
Shooting long exposure photos creates unique, eye catching and irresistible landscape images. If you haven’t experienced shooting long exposure, choosing the right shutter speed to complement the scene can be very confusing. So what makes long exposures so special? And how to choose the right shutter speed for your scene?
Long exposure is a well known technique that has been used since the early days of photography. Its main purpose is to increase the amount of light going inside the camera other than parameters like the aperture or ISO. In Addition to adding more light, long exposure also creates special effects by changing the way we normally see things that move.
I divide it into two main effects: Movement Emphasis and Movement Smoothing.
Movement Emphasis
Shooting long exposure when there is something that moves in a specific direction in the frame like a waterfall, clouds or waves makes it smear uniformly in that specific direction. The result we get is a sense of movement and it makes the photo much more dynamic and interesting.
How do you choose the right shutter speed for the effect?
If the element is constantly moving like a water fall, a river, or clouds you will get smoother and stronger emphasis of the movement the longer you expose. The shutter speed can start from about 0.5 for fast movement and longer for slower movement.

In this frame I was standing about 60cm away from this small waterfall (it is only about half a meter high). The water was constantly moving and falling over to edge of the rocks. I knew I could get a good smearing effect for the waterfall with shutter speed starting at about one second, But I also knew that if I do a longer exposure I can also get the water underneath the waterfall to become smooth and pleasant, so for this shot I chose 20 seconds exposure.
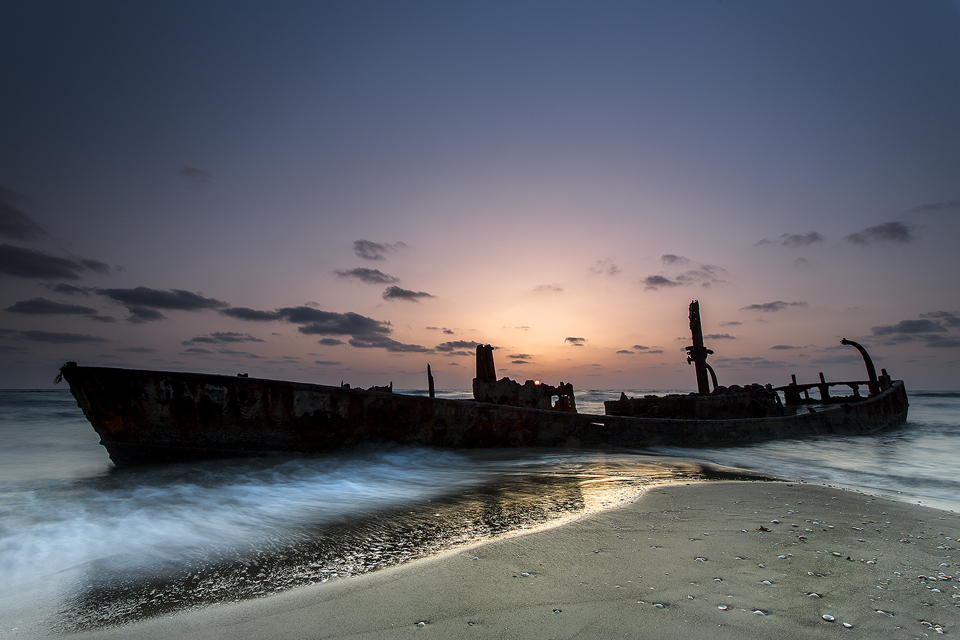
If the element is moving in intervals, like a wave with foam going up and down the beach, you have to measure the time of the motion. To emphasize the movement of a wave going back from the beach to the sea, let it get all the way in, and measure the time it moves back to the sea. The shutter speed can be from about 1/4 of a second to 2 seconds.


In the top shot, the shutter speed was 0.6 seconds; in the bottom shot, the shutter speed was 0.8 seconds. In both situations the water was moving up and down in intervals, there was no constant flow in one direction.
After initially establishing the composition, I took several opportunities to measure the time it took the water to move back into the sea and measured about a second of movement. After that I adjusted the ISO and aperture and shot the scene again and again (dodging the incoming waves from time to time). Taking multiple shots of this kind of scene is important in order to increase the chance of getting the shot with the best smear lines possible.
Movement Smoothing
Sometimes movement in the photo doesn’t add and can even disturb or distract the eye from more important things. I see it especially in bodies of water, from small ponds and lakes to large seas and oceans. Wave movement and even small ripples create texture and may attract the viewer’s eye from more important thing in the composition like the foreground or background. Furthermore, smoothing water texture can be more pleasant.
How do you choose the right shutter speed for the effect?
This is pretty simple. Gentle movement like ripples requires a shutter of about 0.5 second to 5 seconds. Aggressive movement like ocean waves may require 10 seconds and longer.

In this shot I (Taken and the Dead Sea, Israel) used a shutter of 1/30 second. It was a rare case in which very gentle movement of the water caused by light wind can be smoothed even with a pretty “fast” shutter.

In this shot of the Dead Sea I had to use a shutter of 30 Seconds. The water that morning was very wavy and aggressive and I had to use a 5 stop ND filter in order to achieve such long exposure to smooth the water and not overexpose the photo. I decided to smooth the water because I wanted to focus the attention on the unique salt textures in the foreground. Smoothing the water leaves it almost without texture and with very soft pleasant look.
Still Confused?
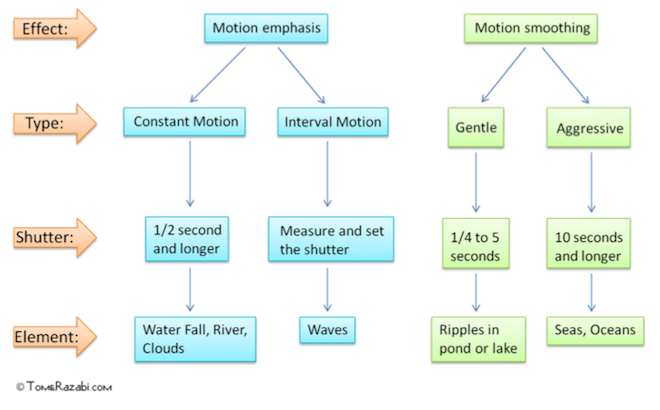
In case you’re still confused, or you want an easy way to visualize the rules laid out above, here is a flow chart that might help you choose the right shutter for the desired effect.
Shooting long exposure in day light and even in low light conditions like sunrise or sunset can be challenging because the photo can be over exposed, even in with narrow aperture and low ISO. Solving the problem can usually be done by using ND filters. The more you practice, the better and faster you’ll understand the shutter speed you need to best complement the landscape scene you shoot.
Good luck!


Leave a reply